We made baggie ice cream again for dessert tonight (it's been a warm weekend and cold ice cream tastes so good).
My new thermometer (affiliate link) arrived last week, so I thought I'd report on the temperatures of the experiment.
The rock salt and the ice mixture started out around 31.7 degrees Fahrenheit (freezing temperature of water is 32 degrees F, so the salt was already starting to work). After 10 minutes of play, the temperature of the salt/ice mixture reached 18.0 degrees F. The ice/salt mixture was so cold that it froze the condensation that was coming off of the bag! Salt does lower the temperature of ice.
I didn't measure the temperature of the ice cream mixture because I didn't want to wash the probe before (lazy, I know). I'd recommend washing your thermometer after the salt/ice mixture measurements as salt can cause damage to some materials.

Everyday science for families with young children.
Showing posts with label hot day. Show all posts
Showing posts with label hot day. Show all posts
Sunday, June 30, 2013


Wednesday, June 26, 2013
Baggie Ice Cream!
We started off the week making ice cream in a ball, but as far as Science Saturdays go, ice cream made with the ball is not very feasible on a larger scale since it takes over 20 minutes and the balls are expensive.
Instead, we took some knowledge from the recipe book of the ice cream ball (the heavier the cream, the faster it'll freeze) and combined it with this ice cream science activity from 3M. The ball recommended heavy cream for the fastest freeze time, and the 3M activity says 1 cup of milk or half and half would work. Personally, I didn't like the taste of all cream ice cream, and all cream would get expensive on the larger scale. I tried 50/50 this time, but I think I'll still like the taste better with even less cream (I'm a lighter ice cream gal) - so even more experimenting here before Science Saturday next month.
J's a little young to understand the lowering of the freezing point of water using salt. It doesn't help that we live in a place where it doesn't freeze, so we don't need to salt our sidewalks during winter time. I also wanted a 10 minute maximum for attention needed. The mixing of ingredients and change of matter is scientific enough for my four year old, and the fact that he gets ice cream at the end of it kept his attention fairly well (in fact, it made him pretty hyper).
Ice Cream Recipe (adapted from 3M activity)
1/2 cup heavy whipping cream
1/2 cup milk
1/2 tsp vanilla
2 T sugar
-Combine all ingredients into a quart sized zipped baggie. Zip the baggie, letting out all possible air.
-3M says to double bag the ice cream so we did (again with no air bubbles since air acts as insulation). I'm sure this is just so the ice doesn't accidentally puncture the ice cream mixture. I'll take extra precaution to ensure non-watery+salty ice cream.
-Place ice cream in a gallon sized zipped baggie full of 4 cups of crushed ice and 1/2 cup of rock salt. Zip the gallon baggie, and 3M says to gently shake. J got a little excited with the shaking that by no means was it gentle.
We set a timer for 10 minutes and started shaking the baggie around on squishing/mixing the ice cream with our hands. However, after a minute or two, the ice + salt got too cold for our sensitive hands. Instead of reaching for our "winter gloves" which I just thought about, John grabbed a towel and wrapped the ice cream + ice in the towel. We tossed it around that way for a few minutes. We combined it with punching/kneading the baggie through the towel.
The timer dinged after 10 minutes and the ice cream was perfect! It was enough to even split between J and me. Despite our cold hands setback, this method was actually easier and less to clean up than the ice cream ball. All we had to do was toss the bags - no dishes other than the few measuring devices and the bowls we transferred the ice cream to. You could enjoy the ice cream right out of the baggie instead of bowls.

Discussion for younger kids:
*What ingredients are you mixing together? What if you vary the ingredients (ie the ratio of milk to cream or additives like cookie pieces or chocolate chips)? Do you think it will work the same? How do you think it will taste?
*Is the ice cream mixture solid, liquid, or gas when you mix it together? What about when it becomes ice cream?
*Is ice hot or cold? When we stick something in ice does it get hotter or colder? What about the ice; does it get hotter or colder?
*What happens if we just stick the ice cream mixture in the freezer? How long will it take to freeze? Does it taste the same as the ice cream you made in your baggie?
Add on discussion points for older kids:
*What did the salt do to the ice? Why did the salt melt the ice?
*Get a thermometer and measure the temperature of the ice cream mixture, the ice before adding salt, the ice immediately after adding ice, the ice cream after it freezes, the ice + salt mixture after the experiment is over. What did you observe? What's the freezing point of water? Is the ice + salt mixture below the freezing point of water?
All in all, baggie ice cream was a success, and I do think ice cream making would be feasible for the next Science Saturday. Tentatively, we're scheduling it for Saturday, July 13th (of course we depend on weather and family wellness). Shoot me an email if you want specific details. Hope to see you then!
Related Posts:
*Baggie ice cream follow-up: temperatures of ice+salt.
*Science Saturday in the park: ingredients needed for 30 kids.
*Make ice cream in a ball
Instead, we took some knowledge from the recipe book of the ice cream ball (the heavier the cream, the faster it'll freeze) and combined it with this ice cream science activity from 3M. The ball recommended heavy cream for the fastest freeze time, and the 3M activity says 1 cup of milk or half and half would work. Personally, I didn't like the taste of all cream ice cream, and all cream would get expensive on the larger scale. I tried 50/50 this time, but I think I'll still like the taste better with even less cream (I'm a lighter ice cream gal) - so even more experimenting here before Science Saturday next month.
J's a little young to understand the lowering of the freezing point of water using salt. It doesn't help that we live in a place where it doesn't freeze, so we don't need to salt our sidewalks during winter time. I also wanted a 10 minute maximum for attention needed. The mixing of ingredients and change of matter is scientific enough for my four year old, and the fact that he gets ice cream at the end of it kept his attention fairly well (in fact, it made him pretty hyper).
Ice Cream Recipe (adapted from 3M activity)
1/2 cup heavy whipping cream
1/2 cup milk
1/2 tsp vanilla
2 T sugar
-Combine all ingredients into a quart sized zipped baggie. Zip the baggie, letting out all possible air.
-3M says to double bag the ice cream so we did (again with no air bubbles since air acts as insulation). I'm sure this is just so the ice doesn't accidentally puncture the ice cream mixture. I'll take extra precaution to ensure non-watery+salty ice cream.
-Place ice cream in a gallon sized zipped baggie full of 4 cups of crushed ice and 1/2 cup of rock salt. Zip the gallon baggie, and 3M says to gently shake. J got a little excited with the shaking that by no means was it gentle.
We set a timer for 10 minutes and started shaking the baggie around on squishing/mixing the ice cream with our hands. However, after a minute or two, the ice + salt got too cold for our sensitive hands. Instead of reaching for our "winter gloves" which I just thought about, John grabbed a towel and wrapped the ice cream + ice in the towel. We tossed it around that way for a few minutes. We combined it with punching/kneading the baggie through the towel.
The timer dinged after 10 minutes and the ice cream was perfect! It was enough to even split between J and me. Despite our cold hands setback, this method was actually easier and less to clean up than the ice cream ball. All we had to do was toss the bags - no dishes other than the few measuring devices and the bowls we transferred the ice cream to. You could enjoy the ice cream right out of the baggie instead of bowls.

 |
| The seal of approval |
 |
| One satisfied scientist |
Discussion for younger kids:
*What ingredients are you mixing together? What if you vary the ingredients (ie the ratio of milk to cream or additives like cookie pieces or chocolate chips)? Do you think it will work the same? How do you think it will taste?
*Is the ice cream mixture solid, liquid, or gas when you mix it together? What about when it becomes ice cream?
*Is ice hot or cold? When we stick something in ice does it get hotter or colder? What about the ice; does it get hotter or colder?
*What happens if we just stick the ice cream mixture in the freezer? How long will it take to freeze? Does it taste the same as the ice cream you made in your baggie?
Add on discussion points for older kids:
*What did the salt do to the ice? Why did the salt melt the ice?
*Get a thermometer and measure the temperature of the ice cream mixture, the ice before adding salt, the ice immediately after adding ice, the ice cream after it freezes, the ice + salt mixture after the experiment is over. What did you observe? What's the freezing point of water? Is the ice + salt mixture below the freezing point of water?
All in all, baggie ice cream was a success, and I do think ice cream making would be feasible for the next Science Saturday. Tentatively, we're scheduling it for Saturday, July 13th (of course we depend on weather and family wellness). Shoot me an email if you want specific details. Hope to see you then!
Related Posts:
*Baggie ice cream follow-up: temperatures of ice+salt.
*Science Saturday in the park: ingredients needed for 30 kids.
*Make ice cream in a ball
Sunday, June 23, 2013
Ice Cream Making - It's Science!
This was my second year with BioX Kids' Day, and both years, I saw many kids having fun with the YayLabs! ice cream ball in the chemistry booth nearby. I wanted to try, but the day is so jam packed that there is no breaks for helpers (at least from my experience).
How does ice cream making work? The key is getting the mixture to mix around while surrounded by salt and ice. Salt is a special ingredient that lowers the freezing point of water (ie. it melts the ice to make colder than ice water!!).
I think J's school has made ice cream with the kids, but I wanted to do it on my own with him. I decided to purchase the ice cream ball from Amazon (affiliate link) (as a bday gift to myself - thanks to my bro and sis-in-law).
The ball came with a simple recipe: 1 pint of cream (we used heavy whipping cream), 1/3 cup + 2T of sugar, and 1.5 tsp of vanilla.
After filling the ball portion with crushed ice and rock salt (Safeway had a box of special ice cream making salt for $0.99 - it's not food grade, but it's great to use in experiments like this since it won't be directly touching what we'll eat):

we mixed the ingredients in a separate bowl:


and poured into the ice cream compartment:

Don't forget to seal both compartments!
Then we got to tossing/rolling.


The book that came with the ice cream ball had approximate freeze times for ice cream. The heavier the cream, the faster the freezing time. Since we used the 2nd heaviest cream (heavy whipping cream), we decided 20 minutes would be a good time based on their recommendation.
And this is what we got after 20 minutes of "play":
I was warned by a few parents at the last Science Saturday when brainstorming ideas for the next Science Saturday that ice cream making does take a long time, which is why I'm currently testing the ideas. Really, the ball took 20 minutes and it was soupy (but still good enough to eat as ice cream). Keeping J's attention that long was tough. Plus, it's too expensive to get enough ice cream balls to make it worth while for a Science Saturday event.
However, I'm still determined to make ice cream making work on a larger scale for a Science Saturday event. Tonight, we had much more success just making ice cream in a baggie. I have pictures, video, directions, and activities surrounding baggie ice cream that I'll post later in the week. Stay tuned.
Until then, I hope you are enjoying your summers thus far!
Related Posts:
*Make ice cream in a baggie
How does ice cream making work? The key is getting the mixture to mix around while surrounded by salt and ice. Salt is a special ingredient that lowers the freezing point of water (ie. it melts the ice to make colder than ice water!!).
I think J's school has made ice cream with the kids, but I wanted to do it on my own with him. I decided to purchase the ice cream ball from Amazon (affiliate link) (as a bday gift to myself - thanks to my bro and sis-in-law).
The ball came with a simple recipe: 1 pint of cream (we used heavy whipping cream), 1/3 cup + 2T of sugar, and 1.5 tsp of vanilla.
After filling the ball portion with crushed ice and rock salt (Safeway had a box of special ice cream making salt for $0.99 - it's not food grade, but it's great to use in experiments like this since it won't be directly touching what we'll eat):

we mixed the ingredients in a separate bowl:


and poured into the ice cream compartment:
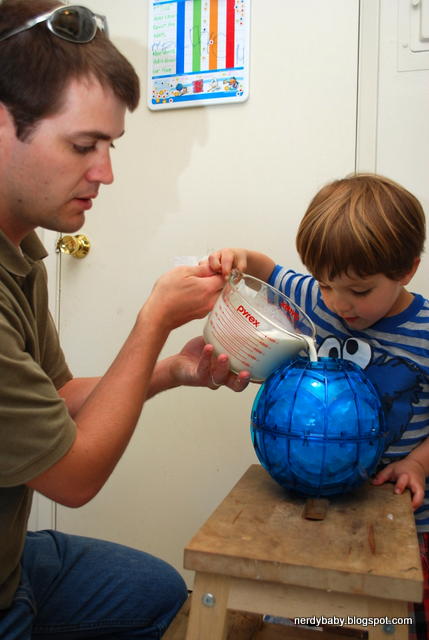
Don't forget to seal both compartments!
Then we got to tossing/rolling.


The book that came with the ice cream ball had approximate freeze times for ice cream. The heavier the cream, the faster the freezing time. Since we used the 2nd heaviest cream (heavy whipping cream), we decided 20 minutes would be a good time based on their recommendation.
And this is what we got after 20 minutes of "play":
 |
| A little soupy |
I was warned by a few parents at the last Science Saturday when brainstorming ideas for the next Science Saturday that ice cream making does take a long time, which is why I'm currently testing the ideas. Really, the ball took 20 minutes and it was soupy (but still good enough to eat as ice cream). Keeping J's attention that long was tough. Plus, it's too expensive to get enough ice cream balls to make it worth while for a Science Saturday event.
However, I'm still determined to make ice cream making work on a larger scale for a Science Saturday event. Tonight, we had much more success just making ice cream in a baggie. I have pictures, video, directions, and activities surrounding baggie ice cream that I'll post later in the week. Stay tuned.
Until then, I hope you are enjoying your summers thus far!
Related Posts:
*Make ice cream in a baggie
Wednesday, December 7, 2011
Bicycles
I may have stretched the science limits on boxes just a little, but I still think they are an awesome learning tool for babies and young children. Now, I'll convince you that the bike that comes in the box is also science!
*Transfer of energy (metabolic to kinetic)
*Kinetics and kinematics (fancy terms for motion)
*Newton's first law (an object in motion stays in motion - until an outside force, ie. brakes, parked cars, bushes, etc., acts upon it)
*Balance and coordination
*Anatomy - we ALWAYS need to wear helmets to protect our brains. We might want to use padding on other non-cushioned areas of the body, like the elbows, knees, or shins.
Major engineering points:
*Bike design - point out the parts of the bikes and what each part does
*Bike maintenance - how to take care of your bike so you can ride it for a long time
*How many wheels does your bike have? Does it act differently if you have a different number of wheels (for example, training wheels vs. no training wheels)
Other important things to discuss (not really science):
*We always wear our helmets, or we don't ride bikes.
*We do not bike without Mommy or Daddy/responsible adult around.
*We always stop and pull to the side if there's a car in motion until the responsible adult says it's ok to go back riding.
Mainly, I wanted to show you that a two year old can ride a two-wheeler (queue proud Mommy moment):
Monday, October 24, 2011
Baking Soda + Vinegar Power Boats
Go boat, go!
For every action, there's an equal and opposite reaction. The action is the chemical reaction between the vinegar and baking soda, which yields water and carbon dioxide (CO2) gas. The gas wants to escape, and giving it a little hole to escape, powers the bottle across the water (the reaction).
I did this experiment with the 3rd-5th graders in summer camp many moons ago. It wasn't exactly like this, as I don't remember the details. Luckily, there are plenty of sites out there to refresh my memory. I decided to approach it like I do cooking and looking up recipes online: a little from this recipe and a little from that recipe and add a few ingredients of my own.
Directions
Experiment
**We've also used old baking soda down the drain and added vinegar. It magically unclogged our drain. Not as exciting to a little kid, but it saved us a trip to the store. Woohoo! Science!
For every action, there's an equal and opposite reaction. The action is the chemical reaction between the vinegar and baking soda, which yields water and carbon dioxide (CO2) gas. The gas wants to escape, and giving it a little hole to escape, powers the bottle across the water (the reaction).
I did this experiment with the 3rd-5th graders in summer camp many moons ago. It wasn't exactly like this, as I don't remember the details. Luckily, there are plenty of sites out there to refresh my memory. I decided to approach it like I do cooking and looking up recipes online: a little from this recipe and a little from that recipe and add a few ingredients of my own.
Directions
- Take an old 20oz soda bottle (I used a Diet Pepsi bottle from the power vote days) - the type of drink doesn't matter, though I don't recommend water bottles now that they are more eco-friendly and very squishable (yes, that's an official scientific term).
- Dril a hole through the cap (about the size of a straw diameter).
- Place about 10 marbles in the bottle to give it weight (since the bottle is buoyant when placed in the water).
- Fill up the bottle ~1/4 with vinegar (just plain, cheap, generic name vinegar).
- Add ~1T of baking soda to the bottle (other people suggest rolling the baking soda in toilet paper. This was VERY messy and frustrating though just dumping 1T of baking soda in the bottle was relatively painless). -This is a great use for your old baking soda that A&H recommends switching out soon with the time switch. **
- Screw on the lid.
- Cover the hole in the lid and shake the bottle.
- Place the bottle in the water and watch it go!
Experiment
- See if the shape of plastic bottle affects the motion (Mt Dew has a different shape than Diet Coke which has a different shape than Diet Pepsi).
- Alter the ratio of baking soda-to-vinegar and see what happens (more/less vinegar and/or baking soda).
- Race - you'd probably need a bigger tub than our small cooler.
Questions
- What made the boat move?
- What happened when I put this white powder (baking soda) into this bottle of vinegar (it's also good to ask beforehand too for a hypothesis)?
- What would happen if I try this again but differently (your choice on different, or let your child experiment)?
- What happens if we remove the marbles from the bottle?
- What did the vinegar turn into after the addition of baking soda? (water + CO2 - but the CO2 is what powered your boat)
- What else can make your boat move? (J liked using his hands)
**We've also used old baking soda down the drain and added vinegar. It magically unclogged our drain. Not as exciting to a little kid, but it saved us a trip to the store. Woohoo! Science!
Sunday, September 25, 2011
Fan 2011
Good to know that the fan can still keep J's interest over a year later.
He's into kicking the floating ball nowadays, but he likes to keep it floating.
Yes, we did get a new, more powerful fan and the floating ball works so much better (and our house is MUCH cooler - double win!). The original fan is still in commission on the other side of the apartment hoping for any sort of cross breeze. And for safety, J knows that he is not allowed to touch the fan.
He's into kicking the floating ball nowadays, but he likes to keep it floating.
Yes, we did get a new, more powerful fan and the floating ball works so much better (and our house is MUCH cooler - double win!). The original fan is still in commission on the other side of the apartment hoping for any sort of cross breeze. And for safety, J knows that he is not allowed to touch the fan.
Tuesday, August 23, 2011
Sailboats with Toddlers
Believe it or not, I had twelve 18-27 month olds attention for 10 minutes! Science is fun!
I decided that we should just jump into hands-on science.
I had a big box full of fun, relatively non-chokeable things to throw in the water (some that they wouldn't typically get to play with in water). We had some unsharpened pencils, giant bouncy balls, some foam balls, some other random balls (balls+toddlers = win), pieces of paper, sponges, rubberband bracelets (think "Livestrong"), large rocks, cotton balls, straws, etc. Without much organization, the kids came to me one at a time for an object to test in the water. My favorite part was their eagerness to experiment.
After all of the objects had been plopped in the water, we talked briefly about things that float and thinks that sink. I had the kids fish the objects out and put them away in my cubby box that I brought. This took a few more minutes of their attention.
Then I pulled out the sailboats!! I chopped off the ends of toothpicks and taped a piece of index card onto the remaining toothpick. In order to get the flat toothpick in the sponge, I made a hole with a pointy toothpick, then inserted the dull one, with a dab of hot glue - as during my test run, the first thing J did was disassemble my prototype and try to stick the toothpick up his nose. These worked really well if you are one-on-one. Twelve two year olds + one me still passing out the boats = chaos. A few of the boats survived long enough to have some races. The toddlers liked blowing on the race boats like they blow out a candle. I think some of the teachers had more fun than the kids ;-).
Tips:
*Squeeze out excess water so the sponges float better.
*Use more waterproof tape (I used Scotch tape) when attaching the sail to the mast.
*Maybe conduct this experiment with 3 kids, not the flock of toddlers I had (though it was fun).
I don't have pics from the event since photo release forms weren't collected, except for this photo (since it's of J). 10 minutes of science lesson = 15 minutes of water play afterward. Good thing it was a hot day! **

**Hot = 80s for us...my Vegas roots are shaking their heads in shame.
Anyways, for the pre-schoolers, I created these fun Sink/Float graphics in Word. I thought I'd share.


Happy Sailing!!
---
Edited 6/30/13 to remove Pepsi Refresh Voting tag. Voting has long since ended.
I decided that we should just jump into hands-on science.
I had a big box full of fun, relatively non-chokeable things to throw in the water (some that they wouldn't typically get to play with in water). We had some unsharpened pencils, giant bouncy balls, some foam balls, some other random balls (balls+toddlers = win), pieces of paper, sponges, rubberband bracelets (think "Livestrong"), large rocks, cotton balls, straws, etc. Without much organization, the kids came to me one at a time for an object to test in the water. My favorite part was their eagerness to experiment.
After all of the objects had been plopped in the water, we talked briefly about things that float and thinks that sink. I had the kids fish the objects out and put them away in my cubby box that I brought. This took a few more minutes of their attention.
Then I pulled out the sailboats!! I chopped off the ends of toothpicks and taped a piece of index card onto the remaining toothpick. In order to get the flat toothpick in the sponge, I made a hole with a pointy toothpick, then inserted the dull one, with a dab of hot glue - as during my test run, the first thing J did was disassemble my prototype and try to stick the toothpick up his nose. These worked really well if you are one-on-one. Twelve two year olds + one me still passing out the boats = chaos. A few of the boats survived long enough to have some races. The toddlers liked blowing on the race boats like they blow out a candle. I think some of the teachers had more fun than the kids ;-).
 |
| My fleet of sailboats |
*Squeeze out excess water so the sponges float better.
*Use more waterproof tape (I used Scotch tape) when attaching the sail to the mast.
*Maybe conduct this experiment with 3 kids, not the flock of toddlers I had (though it was fun).
I don't have pics from the event since photo release forms weren't collected, except for this photo (since it's of J). 10 minutes of science lesson = 15 minutes of water play afterward. Good thing it was a hot day! **

**Hot = 80s for us...my Vegas roots are shaking their heads in shame.
Anyways, for the pre-schoolers, I created these fun Sink/Float graphics in Word. I thought I'd share.


Happy Sailing!!
---
Edited 6/30/13 to remove Pepsi Refresh Voting tag. Voting has long since ended.
Wednesday, August 17, 2011
Submarines - more things to do with your power vote bottles
I did Submarines with J and our 3 yr old neighbor friend (not pictured) shortly after I took it to J's school for the 5 year olds last month. However, because they were so young, I decided to assemble the submarines for them before we were going to play with science. I made a few modifications. I decided to use the cap with a hole drilled into it for the straw instead of clay since the clay didn't stick well for long water exposure (note cheap clay was used). I also created a valley on the aluminum foil wrapped pennies for the rubber bands. Next time, hot glue the rubber bands and penny stacks. They still kept falling off. Here's the final product:
Let the sub fun begin!
J demonstrates what the 5 year olds found out too - that these subs make good fountains, which is also ok since it's still science (pressure differences).
Science is fun, but how often do you get to do science naked?
Our version of Sink/Float:
Lessons learned: science with kids doesn't necessarily go as planned (see naked baby and fountain sub above). The idea is to go with the flow and roll with what the kids show interest in. The 5 year olds loved their sinking subs, but they also liked the fountain it created when pulled out of the water. If there's a teaching moment you think they'd understand, go for it. If not, congratulate them for experimenting as ask them if they know what's going on. Re-direct their attention if you don't like where the experiment is going.
**Now I realize, that is not a Pepsi bottle featured in this article. I apologize. We did this experiment in the middle of July. Yes, I had applied to the Refresh Grant by then, but I had no idea about the craziness of these power vote collections that is needed to win. (so pass on a power vote code or two if you don't mind).
----
Edited 6/30/13 to remove Pepsi Refresh Voting tag. Voting has long since ended.
P.S. I love you guys. Thanks for all of your support!
 |
| Note the holes in between the rubber bands (3 total) Use caution when making holes, we used an awl |
Let the sub fun begin!
 |
| J tosses the sub into the water |
 |
| Sink sub, sink |
 |
| Scientist at work |
Science is fun, but how often do you get to do science naked?
 |
| Eureka! |
Our version of Sink/Float:
 |
| Sponges float |
 |
| J sinks |
 |
| Sponge Bob shoes float |
 |
| Bouncy ball floats |
Lessons learned: science with kids doesn't necessarily go as planned (see naked baby and fountain sub above). The idea is to go with the flow and roll with what the kids show interest in. The 5 year olds loved their sinking subs, but they also liked the fountain it created when pulled out of the water. If there's a teaching moment you think they'd understand, go for it. If not, congratulate them for experimenting as ask them if they know what's going on. Re-direct their attention if you don't like where the experiment is going.
**Now I realize, that is not a Pepsi bottle featured in this article. I apologize. We did this experiment in the middle of July. Yes, I had applied to the Refresh Grant by then, but I had no idea about the craziness of these power vote collections that is needed to win. (so pass on a power vote code or two if you don't mind).
----
Edited 6/30/13 to remove Pepsi Refresh Voting tag. Voting has long since ended.
P.S. I love you guys. Thanks for all of your support!
Monday, August 15, 2011
Exploding Soda!
I've been dying to try out Mentos and Diet Coke Geysers for years. However, Diet Coke wasn't going to get me a handful of power votes (the power votes work I promise). Here's a video of how easy it is. My two-year-old, J, can do it!
Steve Spangler explains that the reaction is caused by the small pockets of air "pits" in the Mentos candy that allows a lot of bubbles from the carbonation to form, basically releasing the gas from the soda bottle, causing a fountain.
It's really fun to try.
First you take a soda bottle and place it somewhere where a giant wet mess is going to be ok (aka the grass in a local park).

Then open the soda top (which you would save for a power vote towards Nerdy Science).

Then pop some Mentos candies into the bottle (1 will work, 2 is a little better, >2 seems a little wasteful)

Run away

Watch the explosion

Repeat (over and over and over again).


Just be careful the camera person is not in the line of action:

Things to experiment with:
1. Different sodas (warning: sugar soda leaves an icky, sticky mess).
2. Different sized bottles/cans.
3. Amount of Mentos added to soda (we started with a whole roll, but it seemed to give us a good reaction with even just 1 or 2).
4. Try different kinds of Mentos (fruit/mint).
5. Taste the soda before and after the Mentos experiment:

6. Taste the diet soda flavored Mentos.
7. Compare the Mentos you threw in the soda to fresh Mentos.
8. How high can you get the soda to shoot? Set a target to aim for. Adjust the size of the nozzle (hint: smaller diameter).
----
Edited 6/30/13 to remove Pepsi Refresh Voting tag. Voting has long since ended.
P.S. I love you guys. Thanks for all of your support!
Steve Spangler explains that the reaction is caused by the small pockets of air "pits" in the Mentos candy that allows a lot of bubbles from the carbonation to form, basically releasing the gas from the soda bottle, causing a fountain.
It's really fun to try.
First you take a soda bottle and place it somewhere where a giant wet mess is going to be ok (aka the grass in a local park).

Then open the soda top (which you would save for a power vote towards Nerdy Science).

Then pop some Mentos candies into the bottle (1 will work, 2 is a little better, >2 seems a little wasteful)

Run away

Watch the explosion

Repeat (over and over and over again).


Just be careful the camera person is not in the line of action:

Things to experiment with:
1. Different sodas (warning: sugar soda leaves an icky, sticky mess).
2. Different sized bottles/cans.
3. Amount of Mentos added to soda (we started with a whole roll, but it seemed to give us a good reaction with even just 1 or 2).
4. Try different kinds of Mentos (fruit/mint).
5. Taste the soda before and after the Mentos experiment:

6. Taste the diet soda flavored Mentos.
7. Compare the Mentos you threw in the soda to fresh Mentos.
8. How high can you get the soda to shoot? Set a target to aim for. Adjust the size of the nozzle (hint: smaller diameter).
----
Edited 6/30/13 to remove Pepsi Refresh Voting tag. Voting has long since ended.
P.S. I love you guys. Thanks for all of your support!
Wednesday, July 6, 2011
Pooh Sticks
I don't know if that's what this game is called, but it's what I first called it and what J's uncles first said when they realized what we were playing. The idea for this week's science came from Winnie the Pooh (I don't remember which one - they all blend together).
Background:
We were waiting around Ashland while J's daddy, uncles, and gpa went mountain biking. After about an hour of playing in the park, J got anxious. We went on a walk where we met a very odd man who gave J a stick. We graciously accepted the stick but by the next bridge didn't want more to carry, so we showed J what happens when we throw the sticks over the bridge and into the water. We then spent the next hour gathering sticks and leaves and tossing them off of the side of the bridge.


Topics covered in "Pooh Sticks"
Fluid dynamics/mechanics - flow of water. What happens to the sticks in currents or around obstacles like rocks? How do different items (ie leaves, rocks, sticks) react differently to the water.
Transfer of energy - things falling from bridge - transfer of potential (things "potentially" fall) to kinetic energy ("kinetic" is a fancy term for motion - so once it's falling it has motion and kinetic energy).
Trajectory motion - throw things off of the bridge. Can you hit targets right off the bat?
Games
The original "Pooh Sticks": pick unique sticks per person. Have everyone drop them off the bridge at the same time (drop them so the sticks end up going down stream and under the bridge). Run to the other side of the bridge and see who stick wins the race under the bridge.
Targets: who can get their stick to hit a rock (or other target) after you throw it in the river?
Different objects: try throwing different objects into the river. Note how each react.
Find the coolest stick!: the name says it all and if your child is like mine, it will take up to 15 minutes of time.
Name colors of sticks/leaves/rocks/anything you see off the bridge: colors are a very small portion of our electromagnetic spectrum. Why not start nerdying up your child now getting him/her to memorize names and wavelengths? I'm only somewhat joking.
Background:
We were waiting around Ashland while J's daddy, uncles, and gpa went mountain biking. After about an hour of playing in the park, J got anxious. We went on a walk where we met a very odd man who gave J a stick. We graciously accepted the stick but by the next bridge didn't want more to carry, so we showed J what happens when we throw the sticks over the bridge and into the water. We then spent the next hour gathering sticks and leaves and tossing them off of the side of the bridge.


Topics covered in "Pooh Sticks"
Fluid dynamics/mechanics - flow of water. What happens to the sticks in currents or around obstacles like rocks? How do different items (ie leaves, rocks, sticks) react differently to the water.
Transfer of energy - things falling from bridge - transfer of potential (things "potentially" fall) to kinetic energy ("kinetic" is a fancy term for motion - so once it's falling it has motion and kinetic energy).
Trajectory motion - throw things off of the bridge. Can you hit targets right off the bat?
Games
The original "Pooh Sticks": pick unique sticks per person. Have everyone drop them off the bridge at the same time (drop them so the sticks end up going down stream and under the bridge). Run to the other side of the bridge and see who stick wins the race under the bridge.
Targets: who can get their stick to hit a rock (or other target) after you throw it in the river?
Different objects: try throwing different objects into the river. Note how each react.
Find the coolest stick!: the name says it all and if your child is like mine, it will take up to 15 minutes of time.
Name colors of sticks/leaves/rocks/anything you see off the bridge: colors are a very small portion of our electromagnetic spectrum. Why not start nerdying up your child now getting him/her to memorize names and wavelengths? I'm only somewhat joking.
Monday, June 20, 2011
Blue Shadows
True/False??
You can make a blue shadow.
Think about it...
Think about it some more...
Ready...
It's...
TRUE!!
I'm serious. I saw it with my own two eyes!
Experiment with opaque and translucent objects outside.
Balls
Balloons - different colors
Saran Wrap of various colors/shapes
Stuffed animals
Bottles of water - various sizes, shapes, and colors of water.
Shadows are caused by objects blocking light. However, if the object is transparent (see-through) or translucent (kind of see-through), some light is passed. We're so used to seeing shadows cast by us that we sometimes forget that shadows aren't necessarily black or just of human form. We were walking home from a dinner this weekend where J was given a blue balloon. It was so neat to see blue with our own family of shadows!
Try to make different shaped shadows or depict a story in shadows. Then trace it with some sidewalk chalk or take a picture.
You can make a blue shadow.
Think about it...
Think about it some more...
Ready...
It's...
TRUE!!
I'm serious. I saw it with my own two eyes!
Experiment with opaque and translucent objects outside.
Balls
Balloons - different colors
Saran Wrap of various colors/shapes
Stuffed animals
Bottles of water - various sizes, shapes, and colors of water.
Shadows are caused by objects blocking light. However, if the object is transparent (see-through) or translucent (kind of see-through), some light is passed. We're so used to seeing shadows cast by us that we sometimes forget that shadows aren't necessarily black or just of human form. We were walking home from a dinner this weekend where J was given a blue balloon. It was so neat to see blue with our own family of shadows!
Try to make different shaped shadows or depict a story in shadows. Then trace it with some sidewalk chalk or take a picture.
Tuesday, May 17, 2011
Sink/Float
Go on a scavenger hunt looking for different objects to test if they sink/float.
Some examples:
Rocks
Leaves
Cotton balls
Sponges
Bouncy balls
Small beach balls
Balloons (air and water)
Feathers
Paper (crumpled/not crumpled)
Styrofoam pieces
Various toys (bath or just plain play time)
Water bottles filled with various amounts of liquids
Have three bins/tubs (clear see-through storage bins work well - or clean barf buckets) filled half full of water (to keep the water from overflowing) and label the bins: Sink, Float, Tricky (Both/Depends).
Have your scientist experiment with the objects and place the objects in their respective sink/float bin.
Concepts to discuss:
Density - mass of the object per volume. More "stuff" in a certain area = dense. A rock is the best example of something that is dense. It's not fluffy, there's little/no air pockets in dense rocks. Something filled with air (like a sponge) is considered less dense. Dense isn't necessarily "heavy" an example of something that is dense but light would be a bouncy ball.
Buoyancy - when an object floats, it is called buoyant, meaning the weight of the object is being held up by the forces the water puts on the object (in other words, the water hold the object up).
Neutral Buoyancy - Submarines are neutrally buoyant. They don't sink to the bottom of the ocean, and they also don't float on the top. It floats in the middle of the water. Can you make an object neutrally buoyant? Try experimenting with water bottles filled with various amounts of liquid. Who doesn't get excited about making your own submarine?
Friday, April 29, 2011
Car ceiling reflections
Wow, two consecutive postings. This post is for all those parents stuck in rush hour traffic with the blinding sun in your faces and grumpy children in the backseat.
Today, beyond my will, I ended up spending 30 minutes driving back from the ER staring directly into the sun. My son's nursemaid's elbow was relocated, and he was picking everything out of his diaper bag with his once problematic arm. He was relatively happy throwing everything out of his diaper bag, but that pesky sun kept shining into his eyes. Needless to say with the rush hour commute, ER visit, the sun, and a squealing toddler in the back, I'm surprised I didn't go bonkers.
One of the final items left in his diaper bag was our clear plastic refillable diaper wipe case. He wanted the bag empty and the wipes out of the container. However, before the latter could happen, he got distracted by the reflection from the sun that the wipe container made on the ceiling. He pointed to it (moving his body and in turn, the case), and the reflection moved. He had fun trying to see if he could touch the reflection from his seat, but it kept moving. Then he decided to see if he could move the reflection to a different part of the car that he could touch, but alas, he sits in the middle seat and is still too short to reach the ceiling. As he was getting frustrated, I decided to distract him by playing catch the reflection (we were stopped at a light waiting for a train to pass). He kept moving the reflection, and I had to touch it. He loved being in control. And, we were doing science! (and not screaming!)
Just thought I'd share this idea as a science tool you could use on those days when all is going wrong.
**I don't encourage distracted driving, but I also think a screaming toddler is more of a distraction than lifting one arm to the ceiling when stopped at a traffic light. Please drive safely and use your best judgment.
Good luck!
Today, beyond my will, I ended up spending 30 minutes driving back from the ER staring directly into the sun. My son's nursemaid's elbow was relocated, and he was picking everything out of his diaper bag with his once problematic arm. He was relatively happy throwing everything out of his diaper bag, but that pesky sun kept shining into his eyes. Needless to say with the rush hour commute, ER visit, the sun, and a squealing toddler in the back, I'm surprised I didn't go bonkers.
One of the final items left in his diaper bag was our clear plastic refillable diaper wipe case. He wanted the bag empty and the wipes out of the container. However, before the latter could happen, he got distracted by the reflection from the sun that the wipe container made on the ceiling. He pointed to it (moving his body and in turn, the case), and the reflection moved. He had fun trying to see if he could touch the reflection from his seat, but it kept moving. Then he decided to see if he could move the reflection to a different part of the car that he could touch, but alas, he sits in the middle seat and is still too short to reach the ceiling. As he was getting frustrated, I decided to distract him by playing catch the reflection (we were stopped at a light waiting for a train to pass). He kept moving the reflection, and I had to touch it. He loved being in control. And, we were doing science! (and not screaming!)
Just thought I'd share this idea as a science tool you could use on those days when all is going wrong.
**I don't encourage distracted driving, but I also think a screaming toddler is more of a distraction than lifting one arm to the ceiling when stopped at a traffic light. Please drive safely and use your best judgment.
Good luck!
Sunday, April 10, 2011
Balloons + Fan = Fun!
J decided to experiment with our downed helium balloons. It was quite entertaining for the both of us.
Thursday, March 31, 2011
Shadows!
**Edited 4-10-11 to add shadow jumping video**
Not too long ago, we were complaining of 2 months of continuous rain. We never saw the sun. This week we jumped from low 60s and rain to almost 80 and SUNSHINE!! (Being a Vegas kid, I really, really missed the sun).
I've been letting J play outside during what I call the "witching hours" - where if we are inside, he'd have a meltdown and I would say things that make me feel like the worst parent ever. Usually, we're on a bike or playing with a ball. Well, today, J took a break from his play to say "Hi!" to his shadow. It's so fun to see how novel everything is to a little kid.
Things to try with your shadow:
*Run towards your shadow. Then run away.
*Shadow puppets.
*Note the different lengths of the shadow during different times of the day. Which time of the day casts the longest shadows?
*Jump/stomp on your shadow (J's favorite). This is really fun to watch and can actually keep a kid occupied for quite some time.
*Jump/stomp on Mama's shadow.
*Stand in one spot and face north (your shadow should face north at noon if you are in the Northern Hemisphere) or in the same orientation (facing a particular tree). Mark with sidewalk chalk where the top of your head is each hour. Can you tell time with your shadow? Possibly draw a sidewalk chalk clock.
Enjoy the sun!! And, wear your sunscreen!! Wow, now I sound like a real mom.
Not too long ago, we were complaining of 2 months of continuous rain. We never saw the sun. This week we jumped from low 60s and rain to almost 80 and SUNSHINE!! (Being a Vegas kid, I really, really missed the sun).
I've been letting J play outside during what I call the "witching hours" - where if we are inside, he'd have a meltdown and I would say things that make me feel like the worst parent ever. Usually, we're on a bike or playing with a ball. Well, today, J took a break from his play to say "Hi!" to his shadow. It's so fun to see how novel everything is to a little kid.
Things to try with your shadow:
*Run towards your shadow. Then run away.
*Shadow puppets.
*Note the different lengths of the shadow during different times of the day. Which time of the day casts the longest shadows?
*Jump/stomp on your shadow (J's favorite). This is really fun to watch and can actually keep a kid occupied for quite some time.
*Jump/stomp on Mama's shadow.
*Stand in one spot and face north (your shadow should face north at noon if you are in the Northern Hemisphere) or in the same orientation (facing a particular tree). Mark with sidewalk chalk where the top of your head is each hour. Can you tell time with your shadow? Possibly draw a sidewalk chalk clock.
Enjoy the sun!! And, wear your sunscreen!! Wow, now I sound like a real mom.
Sunday, February 6, 2011
Homemade Bubbles
 |
| What kid doesn't like bubbles? |

It's not really bubble season, but we had a beautiful 70 degree February Saturday and J wanted to play with his bubble blowing Octopus. We unfortunately didn't have enough bubbles left to make the toy blow bubbles, and we were temporarily car/bikeless, so trying to see if stores had bubbles wasn't going to be easy. We did a quick Google search on homemade bubbles and found this recipe: homemade bubbles which seems to agree with a lot of other bubble recipes out there.
To fill the empty bubble container, we did the math and used:
2 tsp Ultra Concentrated Dawn
1/2 Cup + 2 Tbsp filtered water (we don't have distilled water on hand)
1/2 tsp of light corn syrup
Right away: The bubbles were great in the sense that they were heavy duty and remained a bubble shape on the floor without popping. However, they didn't float very well compared to store bought bubbles (which in all actuality don't cost to much, so I still highly recommend them for quick and easy sciency fun). These bubbles seemed heavy and came out one at a time. Too much corn syrup, maybe?
Some tips on the Google search said to let the bubbles rest over night in a sealed container. Some other sites say corn syrup is optional. I experimented.
Results of corn syrup recipe resting:
*More bubbles per blow than previous day (pictures below).
*Still heavy compared to store bubbles, but didn't seem to sink as quickly as previous day.


Results of no corn syrup (also resting over night):
*Not recommended. Bubbles barely formed. No pictures since it wasn't very exciting.
Overall evaluation: Use corn syrup if making homemade bubbles.
 |
| Stomping on the bubbles |
What shape is a bubble?
What do you need to create a bubble?
What different objects can you use to blow bubbles?
What happens when you blow into the bubble wand fast/slow?
What happens when you blow bubbles into a fan?
What happens when two bubbles touch?
Can you catch a bubble on the wand and blow a bubble again? How many times can you do this?
Can you blow a bubble within a bubble?
Why do bubbles float?
What colors do you see in the bubbles?
What happens to the bubbles if you touch/stomp on them?
Can you catch a bubble on your hand?
Can you touch a bubble with your ___ (name favorite body part)?
 |
| Catching bubbles on nose! |
Update 2/14/11 - Bubbles work even better when rested a week! The week old bubbles floated a lot better than last week. The only problem with this is planning ahead! Good luck :-)
Tuesday, February 1, 2011
Free/Low Cost Science Museum Days
Last updated: February 5, 2011 (added Bank of America info).

Hands-on science is fun! Museums are exciting ways to see kids' light bulb moments. However, they can be spendy. Many museums offer free days. Check your museum's website or call their offices for more information about reduced pricing, free days, and/or special admission days.
If you find information about your area, please send it to me and I can add it to this page for other families to enjoy. I'll start with information about museums close to friends and family and expand as I learn about more opportunities.
Austin, TX:
Texas Natural Science Center-free admission.
Austin Children's Museum -Wednesday community nights 5-8p, suggested donation of $1.
Bay Area:
Exploratorium - free admission, first Wednesday of the month.
Bay Area Discovery Museum - free admission, first Wednesday of the month.
The Tech - free admission, select Sundays of 2011, listed on their website.
CA Academy of Sciences - free admission, every 3rd Wednesday of the month.
Boston:
Boston Children's Museum - every Friday night 5-9p, $1 admission.
Cleveland:
Cleveland Museum of Natural History - free admission, first Thursday of the month.
Las Vegas, NV:
Lied Discovery Children's Museum - per phone call on 2/1/11 - 1st full weekend of the month (both Saturday and Sunday), Bank of America card holders (debit and/or Visa/MC) get free admission (card holder only). For info call: 702-382-5437.
Las Vegas Natural History Museum - free admission to Bank of America card holders on the first full weekend of the month.
Portland, OR:
OMSI - $2 admission first Sunday of the month.
Sponsoring Companies
Bank of America offers admissions to over 150 museums nationwide (http://museums.bankofamerica.com/) to card holders for the first full weekend of every month. Check it out to see if there's a museum by you.
Target also sponsors a lot of events. Check here for information about what they sponsor in your area.
Please let me know if you know of other science themed museums offering free/reduced price days!
Most of all, enjoy science! Maybe, take in what kind of activities/exhibits catches your child's interest and see if you can create something similar at home (see fan experiment).

Hands-on science is fun! Museums are exciting ways to see kids' light bulb moments. However, they can be spendy. Many museums offer free days. Check your museum's website or call their offices for more information about reduced pricing, free days, and/or special admission days.
If you find information about your area, please send it to me and I can add it to this page for other families to enjoy. I'll start with information about museums close to friends and family and expand as I learn about more opportunities.
Austin, TX:
Texas Natural Science Center-free admission.
Austin Children's Museum -Wednesday community nights 5-8p, suggested donation of $1.
Bay Area:
Exploratorium - free admission, first Wednesday of the month.
Bay Area Discovery Museum - free admission, first Wednesday of the month.
The Tech - free admission, select Sundays of 2011, listed on their website.
CA Academy of Sciences - free admission, every 3rd Wednesday of the month.
Boston:
Boston Children's Museum - every Friday night 5-9p, $1 admission.
Cleveland:
Cleveland Museum of Natural History - free admission, first Thursday of the month.
Las Vegas, NV:
Lied Discovery Children's Museum - per phone call on 2/1/11 - 1st full weekend of the month (both Saturday and Sunday), Bank of America card holders (debit and/or Visa/MC) get free admission (card holder only). For info call: 702-382-5437.
Las Vegas Natural History Museum - free admission to Bank of America card holders on the first full weekend of the month.
Portland, OR:
OMSI - $2 admission first Sunday of the month.
Sponsoring Companies
Bank of America offers admissions to over 150 museums nationwide (http://museums.bankofamerica.com/) to card holders for the first full weekend of every month. Check it out to see if there's a museum by you.
Target also sponsors a lot of events. Check here for information about what they sponsor in your area.
Please let me know if you know of other science themed museums offering free/reduced price days!
Most of all, enjoy science! Maybe, take in what kind of activities/exhibits catches your child's interest and see if you can create something similar at home (see fan experiment).
Wednesday, January 19, 2011
Fan Experiments

This floating ball experiment inspired me to start this blog.
It was a hot summer day - note diaper only baby, so we had the fan turned on full blast. J's favorite toy at the time was a beach ball. I remembered seeing floating balls at the science museums, so I thought I'd give it a try at home. J's light went on. Each of the following days, he asked us to turn on the fan so he can make the ball float. He also tried to unsuccessfully float other balls, but figuring it out experimentally is really fun! All you need is a beach ball and a fan!
But wait, there's more fan fun!
Spray your kid with water and point the fan at him.
 |
| J learning about convection |
Scream as loud as you can into the fan. Closer to the fan = better results!
 |
| J learning about voice inflection due to air flow |
**edited 3/29/12 - you may not be able to tell from the picture, but the fan is seated far enough away from the cage + J has fat fingers that they wouldn't fit through the cage. Also, it's very important to make sure your child knows limits. J is not allowed to touch the fan no matter what. Make sure parents/adults follow the no touching rule too! (we need a fan since we don't have A/C and it gets over 100+ degrees in our apartment)
Subscribe to:
Posts (Atom)