It didn't seem all too long ago we were blogging about the last solar eclipse that was visible in our area. Five years flies by!! My then 3-year-old is now 8, and the newbie is now 3!
A solar eclipse is where the sun is blocked by the moon. A total solar eclipse is where the sun is completely blocked by the moon. A total solar eclipse in a particular area is fairly rare. The last one in the US was 1979. There's another one in 2024 crossing over Texas. Always take proper precaution when viewing eclipses, especially when viewing them with children.
We knew the eclipse was coming. We even have family in the Salem, Oregon area. We also knew that 1. Oregon isn't 100% predictable for August weather (I moved into college in Portland on a super rainy day somewhere around the 20th of August many moons ago). 2. School would already be in session for J (and missing a few days during the second week of school for something that didn't seem to be a guarantee of a good view seemed a little irresponsible). 3. We hate crowds and traffic.
Anyways, ~75% seemed good enough for me. The elementary school bought each student a pair of eclipse glasses and took the kids out during extremely well supervised (by parents/adults) increments to view the different stages, and they had a fun coloring/maker-type activity displaying the different phases of the total solar eclipse. At my daughter's preschool, the younger classes (of which my daughter is in) did not participate in the special event though they did talk about it.
There was an impromptu viewing party at my work. I even made my company's social media page while viewing the eclipse. That's pretty fun. Here are my personal pictures from the event.
The glasses were on, but the sun was hiding behind the clouds over my left shoulder (As it started, the sky was foggy in our area and super clear in Oregon, go figure).
Finally a part in the clouds as the eclipse just started (cell phone picture taken through the solar eclipse glasses):
Our maximum coverage from the Bay Area, CA. Since it was cloudy/foggy to begin with and only ~75% coverage, we didn't see too much noticeable change in light.
Yes, I work at a pretty nerdy place. Someone grabbed a colander (lazy or not, this is a great substitute for a pinhole projector), and I suggested propping up the glasses in the picture.
Explore more:
NASA has a great rundown of the Total Solar Eclipse and what you can do the next time one is in your area.
Showing posts with label older kids. Show all posts
Sunday, August 27, 2017
Sunday, March 22, 2015
Ultimate Pi Day Party! 3-14-15 9:26:53
Last week, we celebrated the Ultimate Pi Day (3.141592653...) with a Pi Party in the park. We had 20-30 people attend and had so much fun! Here's our Pi(e) spread complete with many homemade and store bought pies.
One of our nerdy attendees made this sign by the pie. Do you get it? Also, our local grocery store got in on the Pi Day fun...notice the price of the mini pie?
We lined the other tables with butcher paper and traced circles for Pi Day Posters and Investigating Pi. One of the attendees decided to reverse my investigating pi lesson to measuring the circumference with a string and seeing how many times she could measure the diameter from the circumference string (a little more than 3). The kids were more excited about the Pi-rate Treasure Hunt! Who can blame them?
| Pi-rate booty! |
Pi-rate Treasure Hunt:
I printed out an aerial Google Map of the park with clue #1 marked. The park where we had the event had a walking path, so I stuck the clues in obvious places along the path for the problems. Hints were more hidden, so the participants had to actively look for those if they needed the help. The kids had to answer 5 questions (preferably from the same set of questions) to get a prize from the treasure chest.
I had three levels of math problems for the kids to find and solve. I cut and pasted the problems onto colorful 3x5 cards:
Easy (green): Preschool
Medium (orange): k-2 grade
Hard (pink) = 3 grade+
Then I had some problems for adults (yellow) who might have accompanied their kids around. Those were more high school math, up to pre-algebra.
Here are the problems I came up with (note, my goal was to not make anyone cry).
Easy Pi-rate treasure hunt problems
Medium Pi-rate treasure hunt problems
Hard Pi-rate treasure hunt problems
Pi-rate treasure hunt problems for the adults
How did you fare on the Pi-rate Treasure Hunt questions?
How did you celebrate the Ultimate Pi Day??
Just for fun, here's our annual Pi Day Family Photo:
And one of the kids and me:
Previous years' Pi Day Photos.
Labels:
holidays,
math,
older kids,
pi,
pi day photo,
preschool
Thursday, March 12, 2015
Pi-rate Treasure Hunt
Guess what?? Pi Day is my favorite nerdy holiday! My favorite activity so far has been celebrating with a Pi Party in the park. We made Pi Day Posters and Investigated Pi (and ate pie, but that's a normal Pi Day activity). Along with that fun, I created a treasure map and some fun math questions and sent the kids on a Pi-rate Treasure Hunt!
I used a screenshot of the park on Google Maps using the satellite feature and marked a path for the treasure hunt. I had five stops along the treasure hunt, each stop had four different levels of math questions. Clues to solving the problems if they needed help were hidden nearby, so they had to look for them if they really wanted the help. The fifth problem was at a treasure chest. After solving that problem, the kids received a small prize (leftover party goodies, like mardi gras beads and silly glasses from years of storage). (Note: edited 2/27/17 to past tense and linked to the math problems).
Easy - 3-5 year olds (preschool)
Medium - 5-7 year olds (k-2nd)
Hard - 7-9 year olds (3-4th)
And just for the adults to play alongside their kiddos:
Adult - Trig and pre-calculus level - brush up on your equations :-)
Happy Almost Pi Day to you!!
Related Post:
Ultimate Pi Party - pictures of our treasure hunt included!
I used a screenshot of the park on Google Maps using the satellite feature and marked a path for the treasure hunt. I had five stops along the treasure hunt, each stop had four different levels of math questions. Clues to solving the problems if they needed help were hidden nearby, so they had to look for them if they really wanted the help. The fifth problem was at a treasure chest. After solving that problem, the kids received a small prize (leftover party goodies, like mardi gras beads and silly glasses from years of storage). (Note: edited 2/27/17 to past tense and linked to the math problems).
Easy - 3-5 year olds (preschool)
Medium - 5-7 year olds (k-2nd)
Hard - 7-9 year olds (3-4th)
And just for the adults to play alongside their kiddos:
Adult - Trig and pre-calculus level - brush up on your equations :-)
Happy Almost Pi Day to you!!
Related Post:
Ultimate Pi Party - pictures of our treasure hunt included!
Thursday, July 3, 2014
Doing science with your kids blog
Christopher Danielson has been a reader of this blog since the beginning. He started the Talking Math with Your Kids blog where he discusses how he and his young children talk about math. We follow each other on Twitter where he virtually introduced me to Casey Rutherford. Inspired by Talking Math with Your Kids, Casey started the hashtag "#dswyk" which stands for "doing science with your kid(s)," and I promptly joined the #dswyk party. A few days/weeks (I'm oblivious to time at this point in my life, thanks to Miss Baby J) later, he created a blog: Doing Science with Your Kids, and now I'm a contributor.
My first entry is a lesson on sink or float led by my 5-year old boy, J. Does a Duplo sink or float? The answer might surprise you. Click on over to check it out!
I'll still be using this as my main blog and contributing as I can to Doing Science with Your Kids.
My first entry is a lesson on sink or float led by my 5-year old boy, J. Does a Duplo sink or float? The answer might surprise you. Click on over to check it out!
I'll still be using this as my main blog and contributing as I can to Doing Science with Your Kids.
Labels:
J lessons,
older kids,
preschool,
products we like,
toddler
Sunday, March 2, 2014
Bones!
We've had a rough week. Last Thursday, J decided to grab the inside of a restroom door as it was being shut, breaking the tip of his finger and turning his finger nail completely black almost immediately. The doctors say it should be back to normal in the next four weeks. Though it's sad to see my child in pain, this incidence got me thinking about how much I love learning about the body and how it continues to motivate me in my current research.
The human body amazes me! And, guess what? We're still learning about us! Research is awesome.
Do you know how many bones are in our body? 206, at least for adults. Babies are born with more, but they end up getting fused/grow together as they age. One of the reasons babies have more bones is to make them more squishable to help with the birthing process.
Did you know that astronauts lose bone when they are in space? The same goes for people who are bed-ridden for lengthy amounts of time. Bone is this amazing material that responds to load/weight/forces that you apply to it. If you don't use it, you lose it! Fun studies have shown that the opposite is also true. Tennis players tend to have thicker forearm bones in their dominant arm when compared to the other arm.
More research: One of my favorite grad school classes, Orthopaedic Bioengineering, was taught by Dr. Dennis Carter. He co-authored Skeletal Function and Form: Mechanobiology of Skeletal Development, Aging, and Regeneration (affiliate link) with Dr. Gary Beaupre. Both gentlemen have spent their research careers studying the formation and redevelopment of bones and other structural materials in our bodies and have shared the information they've learned with us through this book.
Since we've been preoccupied with J's finger and getting ready for Baby Sister (who will be here in six short weeks), I thought it would be a good time to do the Magic School Bus kit on the Body and Bones, but we've already done the age appropriate experiments in some form or another. Here's a flashback to some of the fun with the human body we've had:
Sunday, February 16, 2014
Mathematical Dice Games
J spent a day sick at home last week. It was a minor illness, so he was very antsy about being inside all day. He pulled out his dice to pass the time. J's great aunt had given him the Tenzi Game
We started out with each person having their own color of dice, so we can easily distinguish who rolled what.
The Bigger Number Wins!
J actually came up with this game on his own. We started out with one dice (aka. die) each. We rolled the dice, and J first counted the dots on each die and told me which die had the most dots. As we played more, I encouraged J to make his decisions quicker, without counting.
This game is great for older toddlers (who won't shove dice in orifices that they shouldn't be in) and preschoolers to understand the concept of greater than/less than.
Addition: The Bigger Number Wins!
The next game included two dice each. Again, having different color dice is wonderful for determining what numbers belong to each person.
We rolled the dice, and J added up the dots on everyone's rolls. Whoever rolled the biggest number wins! J also ranked who came in second, third, and last. We also increased the frequency of rolls and decreased the amount of time between each roll as we progressed. This challenged our 4.5 year old to make quicker decisions and encouraged more mental math rather than counting dots. In our picture example, the yellow dice wins with 11, green comes in second with 10, white is third with 9, and blue is last with 7.
For older kids: This game can be adapted to use more dice for a greater challenge.
Subtraction: The Smaller Number Wins!
We haven't played this game yet. I imagine it going something like this:
Each player gets two dice of the same color. Everyone rolls their dice and each person's smallest number rolled is subtracted from the larger number rolled. Whoever gets the smallest number wins! In our picture example above, we have a tie for first: yellow and blue both have 1. Green comes in next with 2, and white loses with 3.
For older kids: This can also be a two player game with two dice of different colors each. Pick a color to always subtract from the other color. Note that this might give you negative numbers! The smallest number still wins.
More Math Fun with Dice!
During his childhood, my husband was given a dice game by his grandpa (he has no idea of what it is called). After his old game broke, John went on to design one for himself on his 3-D printer and uploaded it to Thingiverse (to share with other nerdy people). The goal of the game is to use mathematical operations (you know, please excuse my dear Aunt Sally's loud radio - the mathematical order on how you're supposed to solve complex problems parentheses, exponents, multiplication, division, addition, and subtraction from left to right) on the 5 white dice in order to get the result of the two black dice added together (so on the picture above: how would 2, 3, 3, 3, 6 make 42?). If you want more details on the game or want to print one of your own, visit the Dice Game Thingiverse page. This game is also great for older kids.
Do you have any fun math games you play with dice?
Labels:
J lessons,
math,
older kids,
preschool,
products we like,
toddler
Wednesday, January 22, 2014
Happy 3rd Blogiversary to Nerdy Science!
It's always fun to do an annual reflection on how things are going with this blog and my goals. Thanks for joining me on our science adventures.
My goals have always been to do simple, easy science at home and making science part of everyday life/conversation.
My goals from last year and how I met them:
- I want to be still blogging weekly about the wonderful scientific world around us.
**Blogging weekly has been a challenge this year. We're having a new nerdy addition joining our family in April, and though I've been blessed with no morning sickness, pregnancy is no walk in the park. We talk about math and science all of the time in our house. Translating interesting and thoughtful lessons to the blog became the bottleneck.
- I want to continue Science Saturdays in the Park, hopefully starting back in February or March.
**Science Saturdays have been a real gem in my life. I have so much fun sharing science and conversing with families who have similar passions. We had one per month from March - October (except May), with many new lessons including: Squishy Circuits, Magnet Detectives, and Ice Cream in a Bag to name a few. Every time we pass a park where we've had a lesson, J states that's a park for science and which science we've done there.
- As J grows, I want to establish worksheets, puzzles, and games that keep his mind active and help him learn new science and math concepts. These would be shared with my blog followers.
**I have not been able to much progress on this goal. I did make a worksheet for the M&M math for preschoolers.
- I want to learn how to draw to help with the worksheets and activities listed above.
**I still suck at drawing anything.
- I hope to have a website to go along with this blog.
**Ya, this goal was supposed to be completed by June 2012. I have all of these ideas of what I want it to look like, how I'd like it to function, and the features I'd like it to have. Unfortunately, the little html knowledge I have will not translate into a website that I can be proud of. I will maintain the domain name with hopes of one day having a website.
- I hope to have time to join the bigger community of Mommy Bloggers. There's so much we can learn from each other.
**Thanks to suggestions from my friend MaryAnne of Mamasmiles, I joined the Kid Blogger Network and have connected with many other parent bloggers.
2013 highlights
For 2014, my goals are:
Related Posts, Previous Year's Reflections:
My goals have always been to do simple, easy science at home and making science part of everyday life/conversation.
My goals from last year and how I met them:
- I want to be still blogging weekly about the wonderful scientific world around us.
**Blogging weekly has been a challenge this year. We're having a new nerdy addition joining our family in April, and though I've been blessed with no morning sickness, pregnancy is no walk in the park. We talk about math and science all of the time in our house. Translating interesting and thoughtful lessons to the blog became the bottleneck.
- I want to continue Science Saturdays in the Park, hopefully starting back in February or March.
**Science Saturdays have been a real gem in my life. I have so much fun sharing science and conversing with families who have similar passions. We had one per month from March - October (except May), with many new lessons including: Squishy Circuits, Magnet Detectives, and Ice Cream in a Bag to name a few. Every time we pass a park where we've had a lesson, J states that's a park for science and which science we've done there.
- As J grows, I want to establish worksheets, puzzles, and games that keep his mind active and help him learn new science and math concepts. These would be shared with my blog followers.
**I have not been able to much progress on this goal. I did make a worksheet for the M&M math for preschoolers.
- I want to learn how to draw to help with the worksheets and activities listed above.
**I still suck at drawing anything.
- I hope to have a website to go along with this blog.
**Ya, this goal was supposed to be completed by June 2012. I have all of these ideas of what I want it to look like, how I'd like it to function, and the features I'd like it to have. Unfortunately, the little html knowledge I have will not translate into a website that I can be proud of. I will maintain the domain name with hopes of one day having a website.
- I hope to have time to join the bigger community of Mommy Bloggers. There's so much we can learn from each other.
**Thanks to suggestions from my friend MaryAnne of Mamasmiles, I joined the Kid Blogger Network and have connected with many other parent bloggers.
2013 highlights
- The most popular posts: baking soda + vinegar blows up a balloon and water density and the floating egg.
- The most popular pin from Pinterest: model lungs in a bottle.
- The most popular Facebook post: melting ice and colors.
- The most searched for term: balloon racers.
- Most referring traffic: Hands On As We Grow
- Thanks for featuring me in the Top 10 Water Experiments for Kids
For 2014, my goals are:
- Give birth to a healthy baby girl.
- Show Miss Baby J the world through science, hoping to add on to my baby science tag.
- I secretly hope J gets in on the lesson creations for Miss Baby J. I just love how his mind works! And right now, there is nothing sweeter than him reading to the baby and explaining the pictures and what big words mean.
- To continue bringing simple, fun science to young children through Science Saturdays and community outreach programs.
- Develop some fun supplemental science and math worksheets.
- Blog more about science that does not need set-up/clean-up time: how science in our everyday life and how to think like a scientist.
- Continue to develop and grow the relationships that are formed by networking.
Related Posts, Previous Year's Reflections:
Monday, January 20, 2014
Order Numbers and Math
It's no secret that we love In N Out in our family. For those of you who are unfamiliar with this West Coast chain, it's probably the freshest fast food you can get, and it's often very crowded. You order at the counter, and they call your number when your food is ready. J's favorite thing has been to ask, "How many more till our number is called?"
You can do this quick and easy game to pass time at any restaurant where they shout out sequential numbers. At In N Out, the numbers go from 1-99.
John and I don't like to answer, but we turn the tables on J (age 4.5) and make him figure it out. It's hard for a four year old to mentally subtract the smaller number (what was called) from the bigger number (what we have), for example: they called 33 and we were 40; 40-33 = 7, and so we had 7 orders till ours. Instead, we've taught him to count up using his fingers starting with the next number, as in our example above: 33 was called and we want to get to 40, so he finger counts starting with 34 as 1 on his hand, 35 is 2, and so on. He'd stop at 40, which would be 7 fingers he placed up. He's starting to catch on that 30 is 10 away from 40, and he can do the 2-3 numbers away in his head. He loves having the right answer, and it excites me when he's excited about learning (especially math).
However, we only can have the math game when he wants it or else we get, "Mommy, [deep sigh] I don't want to do math right now."
**We've been heavy on the math recently mainly because it requires little-to-no prep work and mess for this pregnant mama. Math and science go hand-in-hand. I encourage you to make both math and science everyday topics of discussions in your household.
You can do this quick and easy game to pass time at any restaurant where they shout out sequential numbers. At In N Out, the numbers go from 1-99.
John and I don't like to answer, but we turn the tables on J (age 4.5) and make him figure it out. It's hard for a four year old to mentally subtract the smaller number (what was called) from the bigger number (what we have), for example: they called 33 and we were 40; 40-33 = 7, and so we had 7 orders till ours. Instead, we've taught him to count up using his fingers starting with the next number, as in our example above: 33 was called and we want to get to 40, so he finger counts starting with 34 as 1 on his hand, 35 is 2, and so on. He'd stop at 40, which would be 7 fingers he placed up. He's starting to catch on that 30 is 10 away from 40, and he can do the 2-3 numbers away in his head. He loves having the right answer, and it excites me when he's excited about learning (especially math).
However, we only can have the math game when he wants it or else we get, "Mommy, [deep sigh] I don't want to do math right now."
**We've been heavy on the math recently mainly because it requires little-to-no prep work and mess for this pregnant mama. Math and science go hand-in-hand. I encourage you to make both math and science everyday topics of discussions in your household.
Sunday, August 25, 2013
Recyclable Racers
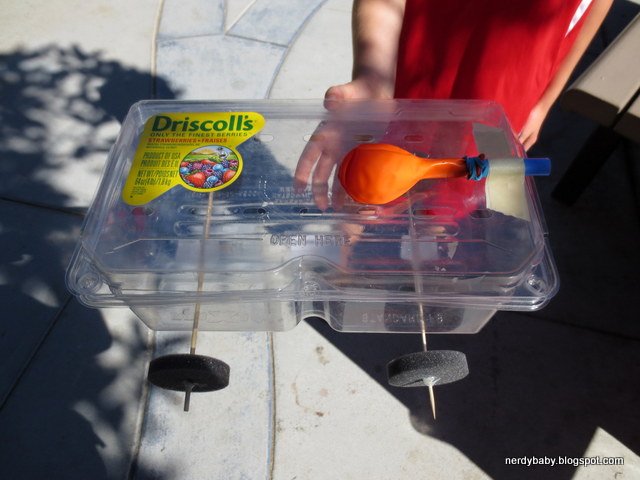
I can't tell you how many times a toilet paper tube has saved my sanity as a mom. Punching four holes with a simple hole punch and using a stirrer straw or a kabob skewer for axles takes 3 minutes max and can lead to hours of play. You can attach a balloon to a straw with a rubber band and then attach the straw to the recyclable via double sided masking tape. After blowing up the balloon, watch it race across your house, driveway, backyard, park, wherever! If your kid is too small for balloons, set up a cardboard box as a ramp and bring on the giggles. You can also add a sail to the car and watch the car move as your child blows on it. Sharing this knowledge was the goal of this month's Science Saturday.
We had a great turn out for our Science Saturday this month! We had it in a park with great sidewalks and access to sand (for weight), but unfortunately, we only one table to assemble things. It was crowded, but we sure had some fun. The goal was to learn about equal and opposite reactions, friction, and general engineering (tweaking your designs for better performance).
How to make your own recyclable racer:
1. Pick out a recyclable you think will make a great race car. I'm always fond of soda bottles. Water bottles nowadays are made with less plastic and are too squishy. I also wouldn't recommend aluminum cans since they are squishy and super light.
2. Attach two pieces of a normal size drinking straw (small pieces are fine, think cut into 4ths or more) to the underside of your recyclable. This will hold your axles for the wheels, allowing them to move without friction. Note, in previous versions of balloon racers, I used an awl and pre-punched holes into the bottles. Using straws gives you a lot more freedom with adjustments (I hardly ever punch straight holes) and is safer all around (luckily, no battle wounds from before). You want the straw pieces to be parallel to each other and as straight as possible (perpendicular to the direction you'd like the car to move).
3. Stick your axles through the straws. We used stirrer straws for the little recyclables and kabob sticks for the bigger ones. I'd recommend chopping off the points of the skewers before giving to a small child.
4. For wheels, we pre-drilled holes into bottle caps, I made some circular corrugated cardboard wheels using a compass-like tool for cutting circles (affiliate link), and I bought some foam discs. Nobody chose the cardboard wheels. It was split pretty 50/50 on foam and bottle cap wheels.
5. Attach your wheels to the axles. I recommend that the wheels not touch the recyclable since friction will slow down your race car. At this point, you can glue them into place with a hot/warmish glue gun. Whether you use a press fit or you glue the wheels, the wheels should spin with your axle. Make sure the wheels are straight or your car might veer.
6. Attach a balloon to a straw with a rubber band. I found the bubble tea straws (affiliate link) work really well (we cut them into 3rds to reduce costs - though I linked to Amazon, I found these at our local BB&Beyond for $2). You can use a standard straw, but you have to walk the fine line between the rubber band being too tight and crushing the straw or not being tight enough and you can't blow up the balloon.
7. Tape the balloon to the car. I recommend a place where it can hang off the back and you don't have to keep taking it off and on to blow it up.
8. Blow up your balloon and pinch tight, or put your finger over the straw to block the air. Set your car down and let go of the balloon.
9. If your car flips, consider weighing it down (washers or sand do a great job). You can also switch what direction of your car is front (ie. flip the balloon around so it points from the opposite end of the racer).
10. Make adjustments and see if your car can go even faster!
I was able to pull out my camera for video of a few racers we had in the middle of the activity. Parents had to help the little ones blow up the balloons, but fun was had by all:
I think these racers went further than last years balloon racers!
Related Posts:
We had a great turn out for our Science Saturday this month! We had it in a park with great sidewalks and access to sand (for weight), but unfortunately, we only one table to assemble things. It was crowded, but we sure had some fun. The goal was to learn about equal and opposite reactions, friction, and general engineering (tweaking your designs for better performance).
How to make your own recyclable racer:
1. Pick out a recyclable you think will make a great race car. I'm always fond of soda bottles. Water bottles nowadays are made with less plastic and are too squishy. I also wouldn't recommend aluminum cans since they are squishy and super light.
| Tape standard straws to the bottom of the recyclable Weigh down the car with washers or sand if necessary |
2. Attach two pieces of a normal size drinking straw (small pieces are fine, think cut into 4ths or more) to the underside of your recyclable. This will hold your axles for the wheels, allowing them to move without friction. Note, in previous versions of balloon racers, I used an awl and pre-punched holes into the bottles. Using straws gives you a lot more freedom with adjustments (I hardly ever punch straight holes) and is safer all around (luckily, no battle wounds from before). You want the straw pieces to be parallel to each other and as straight as possible (perpendicular to the direction you'd like the car to move).
3. Stick your axles through the straws. We used stirrer straws for the little recyclables and kabob sticks for the bigger ones. I'd recommend chopping off the points of the skewers before giving to a small child.
4. For wheels, we pre-drilled holes into bottle caps, I made some circular corrugated cardboard wheels using a compass-like tool for cutting circles (affiliate link), and I bought some foam discs. Nobody chose the cardboard wheels. It was split pretty 50/50 on foam and bottle cap wheels.
5. Attach your wheels to the axles. I recommend that the wheels not touch the recyclable since friction will slow down your race car. At this point, you can glue them into place with a hot/warmish glue gun. Whether you use a press fit or you glue the wheels, the wheels should spin with your axle. Make sure the wheels are straight or your car might veer.
6. Attach a balloon to a straw with a rubber band. I found the bubble tea straws (affiliate link) work really well (we cut them into 3rds to reduce costs - though I linked to Amazon, I found these at our local BB&Beyond for $2). You can use a standard straw, but you have to walk the fine line between the rubber band being too tight and crushing the straw or not being tight enough and you can't blow up the balloon.
7. Tape the balloon to the car. I recommend a place where it can hang off the back and you don't have to keep taking it off and on to blow it up.
8. Blow up your balloon and pinch tight, or put your finger over the straw to block the air. Set your car down and let go of the balloon.
9. If your car flips, consider weighing it down (washers or sand do a great job). You can also switch what direction of your car is front (ie. flip the balloon around so it points from the opposite end of the racer).
10. Make adjustments and see if your car can go even faster!
I was able to pull out my camera for video of a few racers we had in the middle of the activity. Parents had to help the little ones blow up the balloons, but fun was had by all:
Related Posts:
Labels:
older kids,
physics,
preschool,
Science Saturday,
toddler
Saturday, July 13, 2013
Science Saturday, Ice Cream!
I scream. You scream. We all scream for ice cream!
We had our best turn out for Science Saturday. The park was full of little chemists learning how to cool their ice cream mixture using salt + ice (it works by lowering the freezing point of water). Here's the basic ice cream in a bag lesson. We tried reducing the amount of cream and tried a single baggie for the ice cream mixture (instead of double). The recipe worked very well with all milk and with milk/cream combination. Some parents opted to go with a reduced sugar recipe (using 1 T instead of 2 T), and there were no complaints.
If you're doing this on a larger scale: For about 30 kids, we needed about 30 pounds of ice (1 lb/person), 12 lbs (three 4 lb boxes) of ice cream rock salt, 2 gallons of milk, and 1/2 gallon of cream. Since we used the remainder of our bulk vanilla, so I can't tell you how much. It was probably at least 2 oz. The recipe uses a pretty minimal amount of sugar, so a small box/bag of sugar will definitely suffice. We also had some mix-in like sprinkles and mini chocolate chips.
Experiment on your own! You can try other ice cream recipes. This method to make quick ice cream should work in theory on anything you'd put in an ice cream maker. Enjoy a cool summer treat while learning about science.
Sorry, I was too busy with ice cream making that I didn't get a chance to take pictures of the event. Trust me, we all had a good time!
We had our best turn out for Science Saturday. The park was full of little chemists learning how to cool their ice cream mixture using salt + ice (it works by lowering the freezing point of water). Here's the basic ice cream in a bag lesson. We tried reducing the amount of cream and tried a single baggie for the ice cream mixture (instead of double). The recipe worked very well with all milk and with milk/cream combination. Some parents opted to go with a reduced sugar recipe (using 1 T instead of 2 T), and there were no complaints.
If you're doing this on a larger scale: For about 30 kids, we needed about 30 pounds of ice (1 lb/person), 12 lbs (three 4 lb boxes) of ice cream rock salt, 2 gallons of milk, and 1/2 gallon of cream. Since we used the remainder of our bulk vanilla, so I can't tell you how much. It was probably at least 2 oz. The recipe uses a pretty minimal amount of sugar, so a small box/bag of sugar will definitely suffice. We also had some mix-in like sprinkles and mini chocolate chips.
Experiment on your own! You can try other ice cream recipes. This method to make quick ice cream should work in theory on anything you'd put in an ice cream maker. Enjoy a cool summer treat while learning about science.
Sorry, I was too busy with ice cream making that I didn't get a chance to take pictures of the event. Trust me, we all had a good time!
Labels:
chemistry,
older kids,
preschool,
Science Saturday,
toddler
Friday, July 5, 2013
Cornstarch in a kiddie pool
Did you ever want the feeling of walk on water?
It's not my idea, but thought I'd share. Our friends invited us over for this event. They had somehow acquired over 150 lbs of cornstarch**, which they promptly added to a kiddie pool filled with about 4 inches of water. The end result was a lot of fun. J had just as much fun playing on the goo than he has had at other parties with bounce houses. Think of our Goo experiment on a much larger scale. I call it goo, but I think the technical term for cornstarch and water is oobleck.
Oobleck is a Non-Newtonian fluid.
It's not my idea, but thought I'd share. Our friends invited us over for this event. They had somehow acquired over 150 lbs of cornstarch**, which they promptly added to a kiddie pool filled with about 4 inches of water. The end result was a lot of fun. J had just as much fun playing on the goo than he has had at other parties with bounce houses. Think of our Goo experiment on a much larger scale. I call it goo, but I think the technical term for cornstarch and water is oobleck.
Oobleck is a Non-Newtonian fluid.
Viscosity of a non-Newtonian fluid depends on the shear rate. The key is, keep moving. If you stop moving, you'll sink, and the liquid is so viscous, you'll get stuck. The best way out would be to move as quickly and forcefully as possible, ie. jump if you can (apply a shear force).
Science is fun!
Thanks to our friends who invited us over for the science fun.
**A quick search yielded 50 lb bags of cornstarch for $25. It's not an "every day" science type of experiment, but it's definitely fun to try if you get the chance.
Related Post:
*Stuck in Cornstarch!
Related Post:
*Stuck in Cornstarch!
Labels:
older kids,
physics,
preschool,
summertime blues,
toddler
Sunday, June 30, 2013
Follow-up: Baggie Ice Cream Temperatures
We made baggie ice cream again for dessert tonight (it's been a warm weekend and cold ice cream tastes so good).
My new thermometer (affiliate link) arrived last week, so I thought I'd report on the temperatures of the experiment.
The rock salt and the ice mixture started out around 31.7 degrees Fahrenheit (freezing temperature of water is 32 degrees F, so the salt was already starting to work). After 10 minutes of play, the temperature of the salt/ice mixture reached 18.0 degrees F. The ice/salt mixture was so cold that it froze the condensation that was coming off of the bag! Salt does lower the temperature of ice.
I didn't measure the temperature of the ice cream mixture because I didn't want to wash the probe before (lazy, I know). I'd recommend washing your thermometer after the salt/ice mixture measurements as salt can cause damage to some materials.
My new thermometer (affiliate link) arrived last week, so I thought I'd report on the temperatures of the experiment.
The rock salt and the ice mixture started out around 31.7 degrees Fahrenheit (freezing temperature of water is 32 degrees F, so the salt was already starting to work). After 10 minutes of play, the temperature of the salt/ice mixture reached 18.0 degrees F. The ice/salt mixture was so cold that it froze the condensation that was coming off of the bag! Salt does lower the temperature of ice.
I didn't measure the temperature of the ice cream mixture because I didn't want to wash the probe before (lazy, I know). I'd recommend washing your thermometer after the salt/ice mixture measurements as salt can cause damage to some materials.
Wednesday, June 26, 2013
Baggie Ice Cream!
We started off the week making ice cream in a ball, but as far as Science Saturdays go, ice cream made with the ball is not very feasible on a larger scale since it takes over 20 minutes and the balls are expensive.
Instead, we took some knowledge from the recipe book of the ice cream ball (the heavier the cream, the faster it'll freeze) and combined it with this ice cream science activity from 3M. The ball recommended heavy cream for the fastest freeze time, and the 3M activity says 1 cup of milk or half and half would work. Personally, I didn't like the taste of all cream ice cream, and all cream would get expensive on the larger scale. I tried 50/50 this time, but I think I'll still like the taste better with even less cream (I'm a lighter ice cream gal) - so even more experimenting here before Science Saturday next month.
J's a little young to understand the lowering of the freezing point of water using salt. It doesn't help that we live in a place where it doesn't freeze, so we don't need to salt our sidewalks during winter time. I also wanted a 10 minute maximum for attention needed. The mixing of ingredients and change of matter is scientific enough for my four year old, and the fact that he gets ice cream at the end of it kept his attention fairly well (in fact, it made him pretty hyper).
Ice Cream Recipe (adapted from 3M activity)
1/2 cup heavy whipping cream
1/2 cup milk
1/2 tsp vanilla
2 T sugar
-Combine all ingredients into a quart sized zipped baggie. Zip the baggie, letting out all possible air.
-3M says to double bag the ice cream so we did (again with no air bubbles since air acts as insulation). I'm sure this is just so the ice doesn't accidentally puncture the ice cream mixture. I'll take extra precaution to ensure non-watery+salty ice cream.
-Place ice cream in a gallon sized zipped baggie full of 4 cups of crushed ice and 1/2 cup of rock salt. Zip the gallon baggie, and 3M says to gently shake. J got a little excited with the shaking that by no means was it gentle.
We set a timer for 10 minutes and started shaking the baggie around on squishing/mixing the ice cream with our hands. However, after a minute or two, the ice + salt got too cold for our sensitive hands. Instead of reaching for our "winter gloves" which I just thought about, John grabbed a towel and wrapped the ice cream + ice in the towel. We tossed it around that way for a few minutes. We combined it with punching/kneading the baggie through the towel.
The timer dinged after 10 minutes and the ice cream was perfect! It was enough to even split between J and me. Despite our cold hands setback, this method was actually easier and less to clean up than the ice cream ball. All we had to do was toss the bags - no dishes other than the few measuring devices and the bowls we transferred the ice cream to. You could enjoy the ice cream right out of the baggie instead of bowls.
Discussion for younger kids:
*What ingredients are you mixing together? What if you vary the ingredients (ie the ratio of milk to cream or additives like cookie pieces or chocolate chips)? Do you think it will work the same? How do you think it will taste?
*Is the ice cream mixture solid, liquid, or gas when you mix it together? What about when it becomes ice cream?
*Is ice hot or cold? When we stick something in ice does it get hotter or colder? What about the ice; does it get hotter or colder?
*What happens if we just stick the ice cream mixture in the freezer? How long will it take to freeze? Does it taste the same as the ice cream you made in your baggie?
Add on discussion points for older kids:
*What did the salt do to the ice? Why did the salt melt the ice?
*Get a thermometer and measure the temperature of the ice cream mixture, the ice before adding salt, the ice immediately after adding ice, the ice cream after it freezes, the ice + salt mixture after the experiment is over. What did you observe? What's the freezing point of water? Is the ice + salt mixture below the freezing point of water?
All in all, baggie ice cream was a success, and I do think ice cream making would be feasible for the next Science Saturday. Tentatively, we're scheduling it for Saturday, July 13th (of course we depend on weather and family wellness). Shoot me an email if you want specific details. Hope to see you then!
Related Posts:
*Baggie ice cream follow-up: temperatures of ice+salt.
*Science Saturday in the park: ingredients needed for 30 kids.
*Make ice cream in a ball
Instead, we took some knowledge from the recipe book of the ice cream ball (the heavier the cream, the faster it'll freeze) and combined it with this ice cream science activity from 3M. The ball recommended heavy cream for the fastest freeze time, and the 3M activity says 1 cup of milk or half and half would work. Personally, I didn't like the taste of all cream ice cream, and all cream would get expensive on the larger scale. I tried 50/50 this time, but I think I'll still like the taste better with even less cream (I'm a lighter ice cream gal) - so even more experimenting here before Science Saturday next month.
J's a little young to understand the lowering of the freezing point of water using salt. It doesn't help that we live in a place where it doesn't freeze, so we don't need to salt our sidewalks during winter time. I also wanted a 10 minute maximum for attention needed. The mixing of ingredients and change of matter is scientific enough for my four year old, and the fact that he gets ice cream at the end of it kept his attention fairly well (in fact, it made him pretty hyper).
Ice Cream Recipe (adapted from 3M activity)
1/2 cup heavy whipping cream
1/2 cup milk
1/2 tsp vanilla
2 T sugar
-Combine all ingredients into a quart sized zipped baggie. Zip the baggie, letting out all possible air.
-3M says to double bag the ice cream so we did (again with no air bubbles since air acts as insulation). I'm sure this is just so the ice doesn't accidentally puncture the ice cream mixture. I'll take extra precaution to ensure non-watery+salty ice cream.
-Place ice cream in a gallon sized zipped baggie full of 4 cups of crushed ice and 1/2 cup of rock salt. Zip the gallon baggie, and 3M says to gently shake. J got a little excited with the shaking that by no means was it gentle.
We set a timer for 10 minutes and started shaking the baggie around on squishing/mixing the ice cream with our hands. However, after a minute or two, the ice + salt got too cold for our sensitive hands. Instead of reaching for our "winter gloves" which I just thought about, John grabbed a towel and wrapped the ice cream + ice in the towel. We tossed it around that way for a few minutes. We combined it with punching/kneading the baggie through the towel.
The timer dinged after 10 minutes and the ice cream was perfect! It was enough to even split between J and me. Despite our cold hands setback, this method was actually easier and less to clean up than the ice cream ball. All we had to do was toss the bags - no dishes other than the few measuring devices and the bowls we transferred the ice cream to. You could enjoy the ice cream right out of the baggie instead of bowls.
| The seal of approval |
| One satisfied scientist |
Discussion for younger kids:
*What ingredients are you mixing together? What if you vary the ingredients (ie the ratio of milk to cream or additives like cookie pieces or chocolate chips)? Do you think it will work the same? How do you think it will taste?
*Is the ice cream mixture solid, liquid, or gas when you mix it together? What about when it becomes ice cream?
*Is ice hot or cold? When we stick something in ice does it get hotter or colder? What about the ice; does it get hotter or colder?
*What happens if we just stick the ice cream mixture in the freezer? How long will it take to freeze? Does it taste the same as the ice cream you made in your baggie?
Add on discussion points for older kids:
*What did the salt do to the ice? Why did the salt melt the ice?
*Get a thermometer and measure the temperature of the ice cream mixture, the ice before adding salt, the ice immediately after adding ice, the ice cream after it freezes, the ice + salt mixture after the experiment is over. What did you observe? What's the freezing point of water? Is the ice + salt mixture below the freezing point of water?
All in all, baggie ice cream was a success, and I do think ice cream making would be feasible for the next Science Saturday. Tentatively, we're scheduling it for Saturday, July 13th (of course we depend on weather and family wellness). Shoot me an email if you want specific details. Hope to see you then!
Related Posts:
*Baggie ice cream follow-up: temperatures of ice+salt.
*Science Saturday in the park: ingredients needed for 30 kids.
*Make ice cream in a ball
Wednesday, June 19, 2013
Math Land Barbie
I'm a nerd. I've always been. I was forced to clean out my parent's house back in March. Since I'm the only one in my family with a kid of my own, I "inherited" all of the board games. Included in the games was one I only semi-remember making in 11th grade trigonometry/pre-calculus. I'm pretty sure it was an assignment though looking back at it, I went waaaaay overboard.
A friend gave me the Dream Date Barbie board game for my 10th bday. It barely got used. When we got this assignment, I thought it would be fun to have something smart related to Barbie. I was willing to sacrifice the board game for the math assignment. I combined it with a new version of Candy Land (which retails under $10) to make the one and only Math Land Barbie.
I used the Barbie and Ken pieces and pasted the Barbie themed tiles over the Candy Land graphics.
All of the Candy Land cards have word problems written on them. The double color cards have double problem sets. I believe they were color coded based on level of problem solving difficulty. I'm sad to admit that some of the questions will need references in order to solve again (luckily there's an answer key, with work shown, that comes with the game!! Time to relearn up through trig/pre-calc math).
Anyone up for a math challenge? Maybe we can play virtually. Otherwise, I'm considering giving the to my littlest bro-in-law who will be majoring in math in the fall for some nerdy dorm fun at college.
A special shout-out goes to Mrs. E. for the fun assignment and math memories.
A friend gave me the Dream Date Barbie board game for my 10th bday. It barely got used. When we got this assignment, I thought it would be fun to have something smart related to Barbie. I was willing to sacrifice the board game for the math assignment. I combined it with a new version of Candy Land (which retails under $10) to make the one and only Math Land Barbie.
I used the Barbie and Ken pieces and pasted the Barbie themed tiles over the Candy Land graphics.
All of the Candy Land cards have word problems written on them. The double color cards have double problem sets. I believe they were color coded based on level of problem solving difficulty. I'm sad to admit that some of the questions will need references in order to solve again (luckily there's an answer key, with work shown, that comes with the game!! Time to relearn up through trig/pre-calc math).
Anyone up for a math challenge? Maybe we can play virtually. Otherwise, I'm considering giving the to my littlest bro-in-law who will be majoring in math in the fall for some nerdy dorm fun at college.
A special shout-out goes to Mrs. E. for the fun assignment and math memories.
Friday, March 15, 2013
Goldie Blox - Engineering Toy
I was introduced to GoldieBlox via their Kickstarter campaign back in September. A friend had messaged me the link via Facebook since I'm very pro-science/engineering and also a Stanford alum. It turned out the inventor of GoldBlox graduated Stanford at the time I was entering grad school. Her back story also involves a lot of volunteer service and a desire to get young girls interested in engineering. Based on my desires to spread the love of science to the younger generation, I thought I'd support the cause just for that reason alone, even if I didn't have a young girl, let alone a kid in the targeted age group (6+).
J (almost 4) loves to read and is very excited when it comes to activities that involve science, so though it is geared towards girls (pink, light blue, main character is a girl), I figured J would still enjoy it. He has yet to distinguish between boys' and girls' toys (something I hope lasts as long as possible). I also wanted to show J what an engineer can do, especially since I am one.
I waited with anticipation for the box to arrive (he had no idea that I had purchased this toy). It arrived on our doorstep this Wednesday, the day after they shipped it out (a benefit of being in the same area as the company). It was so quick that I didn't even receive a shipment notice!
Our neighbors joined us for this toy debut in our household. We all had fun. I ended up reading the story aloud and supervising the kids as they followed directions. I noticed the peg board has a star design, so I used that star to assist for the overall 5 point star pattern. It kept their attention for about 45 minutes while we read through the story and tried the star design and two alternate designs (also included in the book). There were lots of "oooh's" and "aaaah's" and giggling coming from our household. It was a hit, for sure!
Minor room for improvements: The story is short, which is probably good for more of a toy than literature. Katinka (the pink dolphin) almost came off as cantankerous. As a mom, my first reaction is, "Who wants to give a grouchy character what they demand?" The crank (well, everything) falls off too easily from the wheels, and the grooves to connect everything should be a little deeper to omit frustration. The pegboard is very soft and already has scratches from the little playing we've done. I liked the star pattern, but I also wish the star pattern was drawn on the instruction pegboard in the book, so J could visualize what it looked like with the star as a reference.
Today, I stayed home with sick J, and he requested to do GoldieBlox. I asked if he wanted to read the book and try the star design again or work on the alternate designs it came with. He chose the alternate designs. He loved playing with the designs and learning how to do it himself while getting a grasp on the terminology. He also learned, "When things are a little bit hard, I can ask for help." This is a great engineering lesson since teamwork is a great engineering skill to have. He also told me, "This is science. It needs to go with the science stuff [and not in his game closet]." Success! Anything that is related to science is considered cool in our house.
Again, he has no idea this is a toy designed for girls, but he does know that it's fun. I know there is a disparity of female engineers (I was one of the two girls in my mechanical engineering graduating class of 20+ in undergrad). I think GoldieBlox should be marketed towards everyone since as a nation, we are falling behind in all areas of science, math, and engineering technology. My boy loved it. I'd hate for someone to tell him that it's just a girl's toy.
All-in-all, I am looking forward to future versions of GoldieBlox and seeing how the company grows and develops.
3/15/13 - Edit: Addition 6:30p - When John got home from work, J requested he played GoldieBlox. J set up his own design and called it a butterfly. He wound up Nacho's wheel and guided the ribbon around Katinka and the posts. He then attached the velcro'ed ribbon end to a wheel with the crank, and then he wound up the next wheel to use. I'm pretty impressed.
Now my husband got all excited that he can create things of his own with the toy too. He basically made a carnival ride:
However, he did note that the holes in the wheels are a different distance than the holes in the pegboard which actually limits some sideways building capabilities. However, I'm now excited to see what else we can come up with using this new family toy.
Disclosure: I purchased this toy with my own personal funds. All opinions are my own.
P.S. J has a sudden new interest in his blocks. I wonder if it's because of GoldieBlox.
J (almost 4) loves to read and is very excited when it comes to activities that involve science, so though it is geared towards girls (pink, light blue, main character is a girl), I figured J would still enjoy it. He has yet to distinguish between boys' and girls' toys (something I hope lasts as long as possible). I also wanted to show J what an engineer can do, especially since I am one.
I waited with anticipation for the box to arrive (he had no idea that I had purchased this toy). It arrived on our doorstep this Wednesday, the day after they shipped it out (a benefit of being in the same area as the company). It was so quick that I didn't even receive a shipment notice!
Our neighbors joined us for this toy debut in our household. We all had fun. I ended up reading the story aloud and supervising the kids as they followed directions. I noticed the peg board has a star design, so I used that star to assist for the overall 5 point star pattern. It kept their attention for about 45 minutes while we read through the story and tried the star design and two alternate designs (also included in the book). There were lots of "oooh's" and "aaaah's" and giggling coming from our household. It was a hit, for sure!
Minor room for improvements: The story is short, which is probably good for more of a toy than literature. Katinka (the pink dolphin) almost came off as cantankerous. As a mom, my first reaction is, "Who wants to give a grouchy character what they demand?" The crank (well, everything) falls off too easily from the wheels, and the grooves to connect everything should be a little deeper to omit frustration. The pegboard is very soft and already has scratches from the little playing we've done. I liked the star pattern, but I also wish the star pattern was drawn on the instruction pegboard in the book, so J could visualize what it looked like with the star as a reference.
Today, I stayed home with sick J, and he requested to do GoldieBlox. I asked if he wanted to read the book and try the star design again or work on the alternate designs it came with. He chose the alternate designs. He loved playing with the designs and learning how to do it himself while getting a grasp on the terminology. He also learned, "When things are a little bit hard, I can ask for help." This is a great engineering lesson since teamwork is a great engineering skill to have. He also told me, "This is science. It needs to go with the science stuff [and not in his game closet]." Success! Anything that is related to science is considered cool in our house.
| J made the GoldieBlox G |
Again, he has no idea this is a toy designed for girls, but he does know that it's fun. I know there is a disparity of female engineers (I was one of the two girls in my mechanical engineering graduating class of 20+ in undergrad). I think GoldieBlox should be marketed towards everyone since as a nation, we are falling behind in all areas of science, math, and engineering technology. My boy loved it. I'd hate for someone to tell him that it's just a girl's toy.
All-in-all, I am looking forward to future versions of GoldieBlox and seeing how the company grows and develops.
3/15/13 - Edit: Addition 6:30p - When John got home from work, J requested he played GoldieBlox. J set up his own design and called it a butterfly. He wound up Nacho's wheel and guided the ribbon around Katinka and the posts. He then attached the velcro'ed ribbon end to a wheel with the crank, and then he wound up the next wheel to use. I'm pretty impressed.
Now my husband got all excited that he can create things of his own with the toy too. He basically made a carnival ride:
However, he did note that the holes in the wheels are a different distance than the holes in the pegboard which actually limits some sideways building capabilities. However, I'm now excited to see what else we can come up with using this new family toy.
Disclosure: I purchased this toy with my own personal funds. All opinions are my own.
P.S. J has a sudden new interest in his blocks. I wonder if it's because of GoldieBlox.
Labels:
engineering,
older kids,
preschool,
products we like,
reviews
Thursday, March 14, 2013
Happy Pi Day 2013
Rest assure that I am currently sound asleep (or so I hope). I scheduled this to be posted at 1:59a to wish you a very Happy Pi Day (3.14159...)! If you miss it, it's ok to celebrate at 1:59p.
I will be sharing this I <3 Pi pie with my colleagues at work today. The minis will be given to friends.
J and John helped me make the pies. J had a blast with the pie crust: "It's like playdough!" I asked him if he wanted the I <3 Pi pie for his class or if he wanted the chocolate cream, thaw and serve, pie that I bought. Of course, there is no competing with chocolate when it comes to a 3 yr old. Good, because I promised my coworkers a mixed berry pie. I'm actually a little sad that I am missing J's school pi day for the first time since he's been able to eat pie. My normal lab meeting got moved an hour later, making me miss snacktime :-(. I'm sure J will represent Pi Day pretty well on his own (after all it was his first letter he recognized).
We're going to meet one of my good friends from high school for some pi(e) out after school/work today. It's nice to have nerdy friends.
I wish you the Nerdiest of Pi Days!
Sunday, February 3, 2013
Colored Celery Sticks
This colored celery experiment has been on my pinterest list for a long time. I finally decided to buy some celery, and we had some free time last weekend to try a 24 hr experiment. I also consulted this celery experiment for toddlers post our experiment to see their results.
Basic take home message:
Plants need water and use it during photosynthesis (plants need water and light to grow). We can see how the plants take in the water if we use colored water. It also turns the celery different, cool colors!
The experimental set-up:
We decided on 3 colors for the celery experiment: yellow, red, and blue. We filled the cups 3/4 full and used 4-5 drops per color.
J was a great helper.
We also at the last minute decided to add a control, which is something we can use to compare the other celery sticks to when the experiment is over. This celery stick had just water with no food coloring. We only had a small celery stick left at this point.
Hypothesis:
Big J and I asked J to guess what was going to happen. He had no idea why we colored the water, and his hypothesis had nothing to do with the colors. He did guess that the water was going to go down.
I thought that was a great hypothesis, and I wanted to make sure that J was able to see if he was right. You can barely see it in the beginning, but we used a dry erase marker on the cups to mark just above the water line (it's green on the yellow cup). The dry erase markers washed off in the end, in case you are worried.
Methods continued:
The experiment I pinned on pinterest ended up waiting 24 hrs, but we weren't seeing great results. We documented results at 24 hrs and 48 hrs.
Results, aka what happened:
At 24 hours we were able to see blue spots on the celery in blue water.
Our celery in red had a scratch on it. The scratch turned red and you could see the water leaking out, but there were no colors on the leaves at 24 hrs.
After 2 days (48 hrs), we extracted (took out) all of the celery sticks from the water. Here they are from left to right, no color, yellow, blue, red:
The control (no color) ended up looking healthier after 2 days. It was the smallest and weakest looking celery stick at the beginning. Yellow didn't really have anything to report on. You could see a little yellow in the celery veins leading up to the leaves, but there were no spots on the leaves.
Blue was our favorite. Here's a close-up of a leaf with blue spots and a blue vein behind it, so neat:
Red also gave us some interesting results. Here's a close-up of minor red spots:
And I (carefully) dissected the celery stick to get a better picture of the innards of the celery:
As for J's hypothesis:
All of the colors of water went down. J hypothesis was correct! We didn't compare which one went down more than others, maybe next time. Looking at the pictures from the experiment, there was no super visible difference between the three colors.
Note, that I took the celery out. The height of the water was slightly higher with the celery stick in it, but it was definitely visibly lower than the initial height of the water.
Potential problems with our experiment:
We didn't put the celery sticks in direct light (no space for it in our small apartment). Maybe if we repeat this experiment, I can clear out a space next to the windows.
For older kids:
Definitely don't forget the control. Preferably, your control will look like your other celery before you start. It would make for better comparisons when the experiment is over.
Dissect (cut apart) your results and document everything you see.
Repeat the experiment in different places. Try a dark closet, a window sill, and normal room lighting.
Try different plants. This site says carnations also work.
Basic take home message:
Plants need water and use it during photosynthesis (plants need water and light to grow). We can see how the plants take in the water if we use colored water. It also turns the celery different, cool colors!
The experimental set-up:
We decided on 3 colors for the celery experiment: yellow, red, and blue. We filled the cups 3/4 full and used 4-5 drops per color.
J was a great helper.
We also at the last minute decided to add a control, which is something we can use to compare the other celery sticks to when the experiment is over. This celery stick had just water with no food coloring. We only had a small celery stick left at this point.
Hypothesis:
Big J and I asked J to guess what was going to happen. He had no idea why we colored the water, and his hypothesis had nothing to do with the colors. He did guess that the water was going to go down.
I thought that was a great hypothesis, and I wanted to make sure that J was able to see if he was right. You can barely see it in the beginning, but we used a dry erase marker on the cups to mark just above the water line (it's green on the yellow cup). The dry erase markers washed off in the end, in case you are worried.
Methods continued:
The experiment I pinned on pinterest ended up waiting 24 hrs, but we weren't seeing great results. We documented results at 24 hrs and 48 hrs.
Results, aka what happened:
At 24 hours we were able to see blue spots on the celery in blue water.
Our celery in red had a scratch on it. The scratch turned red and you could see the water leaking out, but there were no colors on the leaves at 24 hrs.
After 2 days (48 hrs), we extracted (took out) all of the celery sticks from the water. Here they are from left to right, no color, yellow, blue, red:
The control (no color) ended up looking healthier after 2 days. It was the smallest and weakest looking celery stick at the beginning. Yellow didn't really have anything to report on. You could see a little yellow in the celery veins leading up to the leaves, but there were no spots on the leaves.
Blue was our favorite. Here's a close-up of a leaf with blue spots and a blue vein behind it, so neat:
Red also gave us some interesting results. Here's a close-up of minor red spots:
And I (carefully) dissected the celery stick to get a better picture of the innards of the celery:
As for J's hypothesis:
All of the colors of water went down. J hypothesis was correct! We didn't compare which one went down more than others, maybe next time. Looking at the pictures from the experiment, there was no super visible difference between the three colors.
Note, that I took the celery out. The height of the water was slightly higher with the celery stick in it, but it was definitely visibly lower than the initial height of the water.
Potential problems with our experiment:
We didn't put the celery sticks in direct light (no space for it in our small apartment). Maybe if we repeat this experiment, I can clear out a space next to the windows.
For older kids:
Definitely don't forget the control. Preferably, your control will look like your other celery before you start. It would make for better comparisons when the experiment is over.
Dissect (cut apart) your results and document everything you see.
Repeat the experiment in different places. Try a dark closet, a window sill, and normal room lighting.
Try different plants. This site says carnations also work.
Wednesday, January 9, 2013
Why do we have brains?
This was the first question from my 3 year old this morning. My immediate answer (while I was getting ready for work) was, “Our brains help us do everything we want to do. Without your brain you wouldn’t be able to move, eat, speak, think, and lots more.” I of course then said, "We need to do all we can to protect our brains, so we can continue to move eat, speak, and think. If we injure our brains, we won't be able to do the things we want to do." In other words, I think helmet wearing is super important. J responded, "We wear helmets to protect our brains!"
Thinking about it from a biomedical engineering prospective (older kids/adults), our brains are the most amazing command center controlling our bodies! As we grow and learn, connections from one part of your brain to another are formed. Sometimes connections are easier than others (ie, when you are young, you can learn a foreign language better). Regions of the brains are responsible for different things, so if you injure specific regions of your brain, you might lose different abilities to do things.
On a personal note, I was 25 yrs old and experiencing some pretty persistent, bad migraines that were giving me "mass effects" like blurred vision and numbness. I was diagnosed with a defect called arteriovenus malformation (AVM) in my brain. It's where the veins and the arteries are directly connected, basically a useless vein since the oxygenated blood doesn't go through the capillaries to my tissues, just straight to the vein and back to my heart. Part of the problem is that the arteries are a high pressure system and veins are low pressure. The high to low pressure switch can cause eddies (turbulent flow), which can lead to the formation of aneurysms (where the artery wall balloons out) and bleeds. Talk about a scary diagnosis! Luckily (if there's something to be lucky about), it's a birth defect (so I've lived peacefully with it for a long time), it's gigantic and "diffuse" (5x5x5 cm), and I have inherently low blood pressure.
Here's a picture. You can see the AVM in both views here (look for asymmetry and squiggly lines). The AVM is in my left frontal and parietal lobes of my brain. 5x5x5 cm is a pretty large portion of the brain, and I've been declared neurologically normal, which to me is amazing proof of the adaptability of the human brain (and cardiovascular system too)...
Despite its quirkiness, I love my brain.
**Edited on 1/12/13 to add:
AVMs can be found anywhere in your body. AVMs in the brain are particularly scary since a problem there can lead to a very big problem. I think they are more common than we know. Many people live their lives with AVMs and don't even know they have it. I could have treatments to get rid of the AVM, but the risks of treatment outweigh the benefits since I do not have aneurysms.
Thinking about it from a biomedical engineering prospective (older kids/adults), our brains are the most amazing command center controlling our bodies! As we grow and learn, connections from one part of your brain to another are formed. Sometimes connections are easier than others (ie, when you are young, you can learn a foreign language better). Regions of the brains are responsible for different things, so if you injure specific regions of your brain, you might lose different abilities to do things.
On a personal note, I was 25 yrs old and experiencing some pretty persistent, bad migraines that were giving me "mass effects" like blurred vision and numbness. I was diagnosed with a defect called arteriovenus malformation (AVM) in my brain. It's where the veins and the arteries are directly connected, basically a useless vein since the oxygenated blood doesn't go through the capillaries to my tissues, just straight to the vein and back to my heart. Part of the problem is that the arteries are a high pressure system and veins are low pressure. The high to low pressure switch can cause eddies (turbulent flow), which can lead to the formation of aneurysms (where the artery wall balloons out) and bleeds. Talk about a scary diagnosis! Luckily (if there's something to be lucky about), it's a birth defect (so I've lived peacefully with it for a long time), it's gigantic and "diffuse" (5x5x5 cm), and I have inherently low blood pressure.
Here's a picture. You can see the AVM in both views here (look for asymmetry and squiggly lines). The AVM is in my left frontal and parietal lobes of my brain. 5x5x5 cm is a pretty large portion of the brain, and I've been declared neurologically normal, which to me is amazing proof of the adaptability of the human brain (and cardiovascular system too)...
Despite its quirkiness, I love my brain.
**Edited on 1/12/13 to add:
AVMs can be found anywhere in your body. AVMs in the brain are particularly scary since a problem there can lead to a very big problem. I think they are more common than we know. Many people live their lives with AVMs and don't even know they have it. I could have treatments to get rid of the AVM, but the risks of treatment outweigh the benefits since I do not have aneurysms.
Labels:
2-minute lessons,
About Me,
biology,
biomedical engineering,
older kids,
preschool
Monday, October 29, 2012
Science Saturday - Pumpkin Catapults
This was the last Science Saturday of 2012 (mainly due to holidays), but it was fun to go out with a bang! Thanks to the families that came out! We had a beautiful morning in the park. I took some pictures of our friends and the craziness of having 10 catapults shooting at the same target, but I haven't gotten permissions from parents to post. Here's the non-identifiable rundown.
I took 10 minutes the night before to cut and paste some Halloween themed characters made out of construction paper onto the back of a 36-pack of Diet Pepsi (ya, I haven't quit my drinking habit) and made some arbitrary point system that the kids loved! Who doesn't love scoring 50 points vs 25 or 10? Yay, math!
And I arbitrarily set up three cones, which the kids moved throughout the day. As long as they were having fun, learning science, and not bored, I didn't really care where they shot their catapults from.
I covered a paper box with construction paper and drew a spider web to hold our ammo.
Here's our ammo of various sizes and weights; we also used candy corn pumpkins:
Big J and I spent the week before gluing sets of 3 Popsicle sticks together to use for the catapult structure and 5 Popsicle sticks for the launching stick, using wood glue - white glue works well too (both have to dry for ~24 hrs before applying load/playing). Catapult directions (note we only used 3 sticks instead of 4 for the structure sides to save Popsicle sticks and time and it worked well). Since we do these events at the park and there are times little kids grab things that are hot (be it knowingly/unknowingly), I invested in some Ultra Low Temp Battery Power Glue Guns. They worked well for the two hours we needed them. They use a lot of their "special" type of expensive glue sticks, but we didn't have burns or complaints. The batteries also pop out really easily, so I'd recommend taping the battery case shut. Also, since the glue doesn't do a great job (just a so-so job), I'd recommend reinforcing what you glued with masking tape.
Big and Little J launching pumpkins. Little J being a tad bit over dramatic.
A friend playing the target game.
We only had one friend who ventured outside of the example catapult design. He modeled his new design off of one Big J had 3D printed and brought to the event. I love it when kids challenge themselves.
Remember the science behind catapults? It's the transfer of energy, from elastic energy (which is a form of potential energy - it will potentially do something once you let go after stretching it) to kinetic (a fancy term for motion) energy.
Humans also need energy to "go" - can you name how we get our energy? Hint, it's not elastic.
I took 10 minutes the night before to cut and paste some Halloween themed characters made out of construction paper onto the back of a 36-pack of Diet Pepsi (ya, I haven't quit my drinking habit) and made some arbitrary point system that the kids loved! Who doesn't love scoring 50 points vs 25 or 10? Yay, math!
And I arbitrarily set up three cones, which the kids moved throughout the day. As long as they were having fun, learning science, and not bored, I didn't really care where they shot their catapults from.
I covered a paper box with construction paper and drew a spider web to hold our ammo.
Here's our ammo of various sizes and weights; we also used candy corn pumpkins:
Big J and I spent the week before gluing sets of 3 Popsicle sticks together to use for the catapult structure and 5 Popsicle sticks for the launching stick, using wood glue - white glue works well too (both have to dry for ~24 hrs before applying load/playing). Catapult directions (note we only used 3 sticks instead of 4 for the structure sides to save Popsicle sticks and time and it worked well). Since we do these events at the park and there are times little kids grab things that are hot (be it knowingly/unknowingly), I invested in some Ultra Low Temp Battery Power Glue Guns. They worked well for the two hours we needed them. They use a lot of their "special" type of expensive glue sticks, but we didn't have burns or complaints. The batteries also pop out really easily, so I'd recommend taping the battery case shut. Also, since the glue doesn't do a great job (just a so-so job), I'd recommend reinforcing what you glued with masking tape.
Big and Little J launching pumpkins. Little J being a tad bit over dramatic.
A friend playing the target game.
We only had one friend who ventured outside of the example catapult design. He modeled his new design off of one Big J had 3D printed and brought to the event. I love it when kids challenge themselves.
Remember the science behind catapults? It's the transfer of energy, from elastic energy (which is a form of potential energy - it will potentially do something once you let go after stretching it) to kinetic (a fancy term for motion) energy.
Humans also need energy to "go" - can you name how we get our energy? Hint, it's not elastic.
Labels:
holidays,
older kids,
physics,
preschool,
Science Saturday
Subscribe to:
Posts (Atom)


s.jpg)