Note: This post contains Amazon affiliate links, which means I get paid for clicks/purchases on the Amazon links (in term supporting my blog and future Science Saturdays).
Last summer, we had a Science Saturday where we experimented with race cars out we made out of LEGOs.
Using our Pepsi Refresh Grant, here was what we purchased to make our LEGO Race Cars for around 20-25 cars:
3 sets of LEGO Education Wheel Sets
1 set of LEGO Bricks & More Deluxe Brick Box
4 sets of LEGO Bricks & More Builders of Tomorrow Set
There were no instructions, we just let the kids build whatever kind of car they wanted (first come first serve on the size of wheels though, which affected the drive too). If they had time, they were encouraged to test and redesign their cars to see if they could make them go faster and further down the ramp/landing strip.
We used particle boards as race car ramps and placed them at different heights. Quickly, the kids learned the biggest ramp yielded the most desirable results. The link above has a good rundown on how the experiment went with our friends. It was one of our most popular Science Saturday event and will most likely be repeated in 2014.

Everyday science for families with young children.
Showing posts with label Science Saturday. Show all posts
Showing posts with label Science Saturday. Show all posts
Saturday, November 23, 2013


Saturday, November 16, 2013
Science Saturday: Halloween Goo!
We had our last Science Saturday of 2013 the weekend before Halloween and decided it would be most fun to celebrate Halloween with Goo! Here's the original silly putty science post. This Science Saturday activity was a repeat of this Silly Putty Science Saturday from last year.
I encouraged friends to dress up in Halloween costumes and then realized that it was going to get messy. Luckily, I found these disposable aprons on Amazon (affiliate link). We only had one casualty, an adult sweater sleeve, but I think he got enough goo out and it was recoverable.
In honor of the Halloween spirit, here's my Capt. Hook and Smee before the festivities:

We had fun mixing glue, liquid starch, and colors to make our silly putty. I'm still surprised about how much little kids love mixing colors and telling you what the combination of colors make. We had green, purple, orange, and all of the primary colors represented.
Our friends also had fun examining the physical properties of silly putty. If you pull it really fast, it rips pretty cleanly:

If you pull it slowly:

You can make a jump rope!
Thanks to everyone who showed up and had fun! I'm hoping to find a community room/center, so we can start Science Saturday back up in January or February (to make up for the 1-2 mo I'll be out of commission in the spring).
I encouraged friends to dress up in Halloween costumes and then realized that it was going to get messy. Luckily, I found these disposable aprons on Amazon (affiliate link). We only had one casualty, an adult sweater sleeve, but I think he got enough goo out and it was recoverable.
In honor of the Halloween spirit, here's my Capt. Hook and Smee before the festivities:

We had fun mixing glue, liquid starch, and colors to make our silly putty. I'm still surprised about how much little kids love mixing colors and telling you what the combination of colors make. We had green, purple, orange, and all of the primary colors represented.
Our friends also had fun examining the physical properties of silly putty. If you pull it really fast, it rips pretty cleanly:

If you pull it slowly:

You can make a jump rope!
Thanks to everyone who showed up and had fun! I'm hoping to find a community room/center, so we can start Science Saturday back up in January or February (to make up for the 1-2 mo I'll be out of commission in the spring).
Wednesday, September 25, 2013
M&M Math - Science Saturday
Sorry for the delay. I had a pretty wicked migraine last week that took me out most of the week.
To recap our September Science Saturday: we had a beautiful Saturday afternoon on the 14th and a great turnout of math lovers (my kind of people).
Now, I created this lesson from a second grade lesson that I only remember had to do with M&M and math (yes, 20+ years ago, when I was in 2nd grade). I wanted to bring it down to the preschool level: basic counting, addition, and I introduced the concept of division (sharing the M&Ms) just to see how well it went over.
Here's what I created as worksheets:
M&M Math Lesson for Preschoolers
M&M Bar Graph
I chose a paper cup full of M&Ms instead of a bag of M&Ms. I was pretty good at scooping out right around 40 M&Ms/cup. The parents guided the kids through the worksheets - surprisingly, the kids were patient enough to do the math before eating the M&Ms.
I had the kids count their M&Ms. The best method was to dump them all out and count them as you put the M&Ms back in the cup:

Then, the kids sorted their M&Ms by color and counted the amount in each color:

Then I had the kids add the primary colors (red, blue, yellow) and then the secondary colors (orange and green since there is no purple). This was exciting for most of the preschoolers since they knew what primary and secondary colors were.
The wild cards were the concept of division and the bar graph. I introduced division as sharing their M&Ms. If you split your M&Ms equally between everyone in your family, how many would each person get? I suggest getting a paper cup for each family member and putting M&Ms one at a time in everyone's cup until the M&Ms are gone. Then count the piles to make sure they are equal. If they aren't, how many are left?

For the bar graph, I made it optional since I wasn't sure of the attention span on the beautiful Saturday. Most kids wanted to do it. I recommend transcribing your color counts below the labels on the x-axis (the colors) and using the same color crayon as M&M to color how many M&Ms of that color you have. I told the kids to find the number on the graph (y-axis), draw a line at that number, and color from 0-the number of M&Ms in that color (I have the axis counting by 5's and put on a minor axis of 1's). The kids were then able to visually assess which color(s) had the most M&Ms.
I hope this is successful for you. We had a lot of fun! It's just in time for Halloween, so feel free to use packets of M&Ms instead of cups of M&Ms. Cups were pretty easy for the bulk necessary for Science Saturday (and most likely classrooms).
P.S. I was asked by parents of really young kids how kids learn how to count (like without skipping numbers or getting stuck in transitions between decades). My answer: practice. J had a hard time, and we just practiced. He can now count to over 100 before getting bored, without mistakes most of the time. Hopefully, you can find and state the patterns as you go along (like from 20-100 everything goes decade+next number ie. twenty-one, twenty-two...and 40-90 sounds just like their unit digit (four-ty, six-ty, etc. though fifty is hard since it's not five-ty)).
Related Posts:
To recap our September Science Saturday: we had a beautiful Saturday afternoon on the 14th and a great turnout of math lovers (my kind of people).
Now, I created this lesson from a second grade lesson that I only remember had to do with M&M and math (yes, 20+ years ago, when I was in 2nd grade). I wanted to bring it down to the preschool level: basic counting, addition, and I introduced the concept of division (sharing the M&Ms) just to see how well it went over.
Here's what I created as worksheets:
M&M Math Lesson for Preschoolers
M&M Bar Graph
I chose a paper cup full of M&Ms instead of a bag of M&Ms. I was pretty good at scooping out right around 40 M&Ms/cup. The parents guided the kids through the worksheets - surprisingly, the kids were patient enough to do the math before eating the M&Ms.
I had the kids count their M&Ms. The best method was to dump them all out and count them as you put the M&Ms back in the cup:

Then, the kids sorted their M&Ms by color and counted the amount in each color:

Then I had the kids add the primary colors (red, blue, yellow) and then the secondary colors (orange and green since there is no purple). This was exciting for most of the preschoolers since they knew what primary and secondary colors were.
The wild cards were the concept of division and the bar graph. I introduced division as sharing their M&Ms. If you split your M&Ms equally between everyone in your family, how many would each person get? I suggest getting a paper cup for each family member and putting M&Ms one at a time in everyone's cup until the M&Ms are gone. Then count the piles to make sure they are equal. If they aren't, how many are left?

For the bar graph, I made it optional since I wasn't sure of the attention span on the beautiful Saturday. Most kids wanted to do it. I recommend transcribing your color counts below the labels on the x-axis (the colors) and using the same color crayon as M&M to color how many M&Ms of that color you have. I told the kids to find the number on the graph (y-axis), draw a line at that number, and color from 0-the number of M&Ms in that color (I have the axis counting by 5's and put on a minor axis of 1's). The kids were then able to visually assess which color(s) had the most M&Ms.
I hope this is successful for you. We had a lot of fun! It's just in time for Halloween, so feel free to use packets of M&Ms instead of cups of M&Ms. Cups were pretty easy for the bulk necessary for Science Saturday (and most likely classrooms).
P.S. I was asked by parents of really young kids how kids learn how to count (like without skipping numbers or getting stuck in transitions between decades). My answer: practice. J had a hard time, and we just practiced. He can now count to over 100 before getting bored, without mistakes most of the time. Hopefully, you can find and state the patterns as you go along (like from 20-100 everything goes decade+next number ie. twenty-one, twenty-two...and 40-90 sounds just like their unit digit (four-ty, six-ty, etc. though fifty is hard since it's not five-ty)).
Related Posts:
Sunday, September 8, 2013
Science Saturday, Sept 14 - afternoon
I haven't been feeling well over the last month and this Saturday (Sept 14) is our only free Saturday of the month for Science Saturday. I was hoping for something quick, fun, and easy with minimal prep needed on my part.
I'm very excited about M&M math since math is my first love. We'll have small tupperware cups that can be filled to the parent's desires for M&M math. There would be a worksheet about counting, addition and subtraction, and making a bar graph.
Details: Sept 14 3-5p
SF Bay Area, CA (email me using the address on the side bar << for specific details)
I'm still thinking of ideas for October. We might do silly putty/goo or volcanoes. Hopefully, I start feeling better soon.
Edited: 6:30p 9/8/13 with the decision for M&M math over paper airplanes.
I'm very excited about M&M math since math is my first love. We'll have small tupperware cups that can be filled to the parent's desires for M&M math. There would be a worksheet about counting, addition and subtraction, and making a bar graph.
Details: Sept 14 3-5p
SF Bay Area, CA (email me using the address on the side bar << for specific details)
I'm still thinking of ideas for October. We might do silly putty/goo or volcanoes. Hopefully, I start feeling better soon.
Edited: 6:30p 9/8/13 with the decision for M&M math over paper airplanes.
Sunday, August 25, 2013
Recyclable Racers
I can't tell you how many times a toilet paper tube has saved my sanity as a mom. Punching four holes with a simple hole punch and using a stirrer straw or a kabob skewer for axles takes 3 minutes max and can lead to hours of play. You can attach a balloon to a straw with a rubber band and then attach the straw to the recyclable via double sided masking tape. After blowing up the balloon, watch it race across your house, driveway, backyard, park, wherever! If your kid is too small for balloons, set up a cardboard box as a ramp and bring on the giggles. You can also add a sail to the car and watch the car move as your child blows on it. Sharing this knowledge was the goal of this month's Science Saturday.
We had a great turn out for our Science Saturday this month! We had it in a park with great sidewalks and access to sand (for weight), but unfortunately, we only one table to assemble things. It was crowded, but we sure had some fun. The goal was to learn about equal and opposite reactions, friction, and general engineering (tweaking your designs for better performance).
How to make your own recyclable racer:

1. Pick out a recyclable you think will make a great race car. I'm always fond of soda bottles. Water bottles nowadays are made with less plastic and are too squishy. I also wouldn't recommend aluminum cans since they are squishy and super light.
2. Attach two pieces of a normal size drinking straw (small pieces are fine, think cut into 4ths or more) to the underside of your recyclable. This will hold your axles for the wheels, allowing them to move without friction. Note, in previous versions of balloon racers, I used an awl and pre-punched holes into the bottles. Using straws gives you a lot more freedom with adjustments (I hardly ever punch straight holes) and is safer all around (luckily, no battle wounds from before). You want the straw pieces to be parallel to each other and as straight as possible (perpendicular to the direction you'd like the car to move).
3. Stick your axles through the straws. We used stirrer straws for the little recyclables and kabob sticks for the bigger ones. I'd recommend chopping off the points of the skewers before giving to a small child.

4. For wheels, we pre-drilled holes into bottle caps, I made some circular corrugated cardboard wheels using a compass-like tool for cutting circles (affiliate link), and I bought some foam discs. Nobody chose the cardboard wheels. It was split pretty 50/50 on foam and bottle cap wheels.
5. Attach your wheels to the axles. I recommend that the wheels not touch the recyclable since friction will slow down your race car. At this point, you can glue them into place with a hot/warmish glue gun. Whether you use a press fit or you glue the wheels, the wheels should spin with your axle. Make sure the wheels are straight or your car might veer.
6. Attach a balloon to a straw with a rubber band. I found the bubble tea straws (affiliate link) work really well (we cut them into 3rds to reduce costs - though I linked to Amazon, I found these at our local BB&Beyond for $2). You can use a standard straw, but you have to walk the fine line between the rubber band being too tight and crushing the straw or not being tight enough and you can't blow up the balloon.
7. Tape the balloon to the car. I recommend a place where it can hang off the back and you don't have to keep taking it off and on to blow it up.
8. Blow up your balloon and pinch tight, or put your finger over the straw to block the air. Set your car down and let go of the balloon.
9. If your car flips, consider weighing it down (washers or sand do a great job). You can also switch what direction of your car is front (ie. flip the balloon around so it points from the opposite end of the racer).
10. Make adjustments and see if your car can go even faster!
I was able to pull out my camera for video of a few racers we had in the middle of the activity. Parents had to help the little ones blow up the balloons, but fun was had by all:
I think these racers went further than last years balloon racers!
Related Posts:
We had a great turn out for our Science Saturday this month! We had it in a park with great sidewalks and access to sand (for weight), but unfortunately, we only one table to assemble things. It was crowded, but we sure had some fun. The goal was to learn about equal and opposite reactions, friction, and general engineering (tweaking your designs for better performance).
How to make your own recyclable racer:

1. Pick out a recyclable you think will make a great race car. I'm always fond of soda bottles. Water bottles nowadays are made with less plastic and are too squishy. I also wouldn't recommend aluminum cans since they are squishy and super light.
 |
| Tape standard straws to the bottom of the recyclable Weigh down the car with washers or sand if necessary |
2. Attach two pieces of a normal size drinking straw (small pieces are fine, think cut into 4ths or more) to the underside of your recyclable. This will hold your axles for the wheels, allowing them to move without friction. Note, in previous versions of balloon racers, I used an awl and pre-punched holes into the bottles. Using straws gives you a lot more freedom with adjustments (I hardly ever punch straight holes) and is safer all around (luckily, no battle wounds from before). You want the straw pieces to be parallel to each other and as straight as possible (perpendicular to the direction you'd like the car to move).
3. Stick your axles through the straws. We used stirrer straws for the little recyclables and kabob sticks for the bigger ones. I'd recommend chopping off the points of the skewers before giving to a small child.
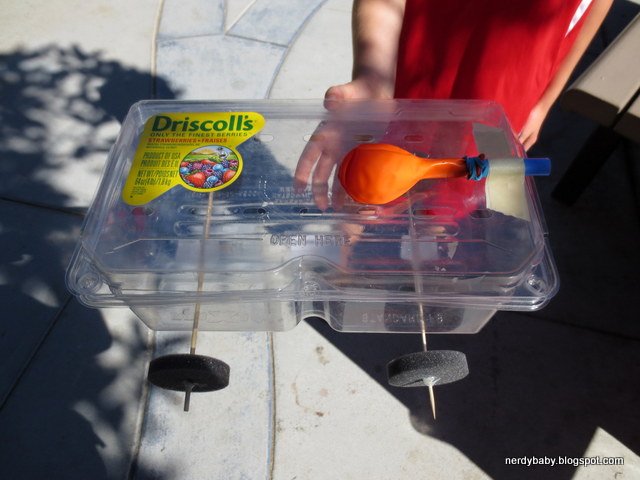
4. For wheels, we pre-drilled holes into bottle caps, I made some circular corrugated cardboard wheels using a compass-like tool for cutting circles (affiliate link), and I bought some foam discs. Nobody chose the cardboard wheels. It was split pretty 50/50 on foam and bottle cap wheels.
5. Attach your wheels to the axles. I recommend that the wheels not touch the recyclable since friction will slow down your race car. At this point, you can glue them into place with a hot/warmish glue gun. Whether you use a press fit or you glue the wheels, the wheels should spin with your axle. Make sure the wheels are straight or your car might veer.
6. Attach a balloon to a straw with a rubber band. I found the bubble tea straws (affiliate link) work really well (we cut them into 3rds to reduce costs - though I linked to Amazon, I found these at our local BB&Beyond for $2). You can use a standard straw, but you have to walk the fine line between the rubber band being too tight and crushing the straw or not being tight enough and you can't blow up the balloon.
7. Tape the balloon to the car. I recommend a place where it can hang off the back and you don't have to keep taking it off and on to blow it up.
8. Blow up your balloon and pinch tight, or put your finger over the straw to block the air. Set your car down and let go of the balloon.
9. If your car flips, consider weighing it down (washers or sand do a great job). You can also switch what direction of your car is front (ie. flip the balloon around so it points from the opposite end of the racer).
10. Make adjustments and see if your car can go even faster!
I was able to pull out my camera for video of a few racers we had in the middle of the activity. Parents had to help the little ones blow up the balloons, but fun was had by all:
Related Posts:
Sunday, August 18, 2013
Next Science Saturday and Apologies
The next Science Saturday is this Saturday, August 24, 2013.
We'll be making race cars out of recyclables and learning about gravity and equal and opposite reactions. You can make balloon racers, sail cars, or figure out how to make your car run using forms of energy (elastic, potential, etc). It'll be tons of fun! Bring your own recyclable or use some of the ones we'll bring.
Email me using the link on the left <<, and I can give you detailed information of Science Saturday.
In other news, I apologize for taking a little bit of a blogging break. We still have been doing science at our house. I have two lessons half way composed. Hopefully, one of them will make it to the blog by the end of the week.
We'll be making race cars out of recyclables and learning about gravity and equal and opposite reactions. You can make balloon racers, sail cars, or figure out how to make your car run using forms of energy (elastic, potential, etc). It'll be tons of fun! Bring your own recyclable or use some of the ones we'll bring.
Email me using the link on the left <<, and I can give you detailed information of Science Saturday.
In other news, I apologize for taking a little bit of a blogging break. We still have been doing science at our house. I have two lessons half way composed. Hopefully, one of them will make it to the blog by the end of the week.
Saturday, July 13, 2013
Science Saturday, Ice Cream!
I scream. You scream. We all scream for ice cream!
We had our best turn out for Science Saturday. The park was full of little chemists learning how to cool their ice cream mixture using salt + ice (it works by lowering the freezing point of water). Here's the basic ice cream in a bag lesson. We tried reducing the amount of cream and tried a single baggie for the ice cream mixture (instead of double). The recipe worked very well with all milk and with milk/cream combination. Some parents opted to go with a reduced sugar recipe (using 1 T instead of 2 T), and there were no complaints.
If you're doing this on a larger scale: For about 30 kids, we needed about 30 pounds of ice (1 lb/person), 12 lbs (three 4 lb boxes) of ice cream rock salt, 2 gallons of milk, and 1/2 gallon of cream. Since we used the remainder of our bulk vanilla, so I can't tell you how much. It was probably at least 2 oz. The recipe uses a pretty minimal amount of sugar, so a small box/bag of sugar will definitely suffice. We also had some mix-in like sprinkles and mini chocolate chips.
Experiment on your own! You can try other ice cream recipes. This method to make quick ice cream should work in theory on anything you'd put in an ice cream maker. Enjoy a cool summer treat while learning about science.
Sorry, I was too busy with ice cream making that I didn't get a chance to take pictures of the event. Trust me, we all had a good time!
We had our best turn out for Science Saturday. The park was full of little chemists learning how to cool their ice cream mixture using salt + ice (it works by lowering the freezing point of water). Here's the basic ice cream in a bag lesson. We tried reducing the amount of cream and tried a single baggie for the ice cream mixture (instead of double). The recipe worked very well with all milk and with milk/cream combination. Some parents opted to go with a reduced sugar recipe (using 1 T instead of 2 T), and there were no complaints.
If you're doing this on a larger scale: For about 30 kids, we needed about 30 pounds of ice (1 lb/person), 12 lbs (three 4 lb boxes) of ice cream rock salt, 2 gallons of milk, and 1/2 gallon of cream. Since we used the remainder of our bulk vanilla, so I can't tell you how much. It was probably at least 2 oz. The recipe uses a pretty minimal amount of sugar, so a small box/bag of sugar will definitely suffice. We also had some mix-in like sprinkles and mini chocolate chips.
Experiment on your own! You can try other ice cream recipes. This method to make quick ice cream should work in theory on anything you'd put in an ice cream maker. Enjoy a cool summer treat while learning about science.
Sorry, I was too busy with ice cream making that I didn't get a chance to take pictures of the event. Trust me, we all had a good time!
Sunday, June 16, 2013
Science Saturday: Stomp Rockets Revisited
Stomp rockets was one of the more successful Science Saturdays last year, so I thought it would be fun to revisit again this year. We had a few repeat visitors who wanted to do stomp rockets again, but we also had a lot of fun with new friends!
We had 4 store bought stomp rockets (affiliate link) set up for immediate action/reaction gratification. Basically the harder you jumped, the higher/further the rocket flew!

I also set up targets using our space cutouts from our Straw Rocket lesson we also did at last year's event.
Then for those who wanted the extra challenge, we made our own stomp rockets which we launched via the homemade stomp rocket launcher (the directions on how to build the stomp rocket launcher and rockets to fly off of them are found on that link). In short, for the rockets, you roll a piece of construction paper around a pipe of the same size as your launcher. You want it to be tight enough so you don't lose air through the paper gaps, but you also want it to be loose enough to come off of the launcher when you stomp. To close off the paper tube, you want to make a nose cone. I found the easiest way was to fold the corners down and tape it to make a triangle. Then you add wings.
Here's my sample rocket:

We had some interesting wing designs. This one started with cylinder wings:

We had a few request for heart shaped wings, so we tried half hearts:

The paper rockets can fly high! J almost made a basket with his orange rocket using our homemade launcher.
We had 4 store bought stomp rockets (affiliate link) set up for immediate action/reaction gratification. Basically the harder you jumped, the higher/further the rocket flew!

I also set up targets using our space cutouts from our Straw Rocket lesson we also did at last year's event.
Then for those who wanted the extra challenge, we made our own stomp rockets which we launched via the homemade stomp rocket launcher (the directions on how to build the stomp rocket launcher and rockets to fly off of them are found on that link). In short, for the rockets, you roll a piece of construction paper around a pipe of the same size as your launcher. You want it to be tight enough so you don't lose air through the paper gaps, but you also want it to be loose enough to come off of the launcher when you stomp. To close off the paper tube, you want to make a nose cone. I found the easiest way was to fold the corners down and tape it to make a triangle. Then you add wings.
Here's my sample rocket:

We had some interesting wing designs. This one started with cylinder wings:

We had a few request for heart shaped wings, so we tried half hearts:

The paper rockets can fly high! J almost made a basket with his orange rocket using our homemade launcher.
The plastic rockets fly very high and work very well but they are not durable. I'm disappointed in the quality of the plastic rockets that come with the set. I'd like to replace them, but it is actually cheaper to buy whole new sets! It just seems so wasteful. The homemade rockets also launched ok from the store bought launchers. They were a little big since the store bought launcher tube is smaller than the homemade one. We'll have to find something smaller to use to roll the paper rocket if we go solely into paper rocket territory after the plastic ones get too beaten up.
Thanks for all those who spent this beautiful Saturday morning with us. I look forward to the next Science Saturday. We're tentatively thinking the morning of July 13th if you are looking to save the date. If you want more specific details, feel free to email me using the address on the sidebar to the left (<<), and I'll add you to the email list.
Sunday, April 21, 2013
Science Saturday: Squishy Circuits
We had a successful Science Saturday for April! Thanks to everyone who attended.
Preparation for fun:
I made 4 batches of conductive dough: purple (left over from our trial-run of Squishy Circuits), blue, green, and yellow. I also made 3 batches of the insulating dough, without color. Per Squishy Circuits recommendation, I purchased small Safety Glasses from Amazon (affiliate link).
I bought out two local Radio Shack's inventory for buzzers and vibrating motors to end up with 5 of each. These were great because they already had wires on them. Less work for me!
I bought 10 of the 4-AA battery holder with snap connector from Fry's with the 9-volt snap connector. This was also great since I didn't have to solder wires, and I can remove the snaps and store the battery packs without worrying about shorts.
John and I crimped terminals (not exactly what we used, but think something like this) onto each wire. This allowed greater surface area contact for the connections. We also hot glued where the wire connected to the crimped plastic to reduce the pull-out possibilities (kids are hard on things). We also hot glued the joints of the LEDs after we broke one during our trial-run.
All of this preparation paid off. We didn't break the legs of any LED and no wire was pulled out from the crimper. Since everything survived, I now have a classroom set of small electrical components.
The table set-up:
I put down a plastic disposable tablecloth. This helped keep the play dough from acquiring dirt and other park related gross things. Safety glasses were required to participate (provided by us).

My favorite find from cleaning out my parent's house a few weeks ago was this drawer set, which is perfect for electrical components (previous use: Barbie's shoe sorter). Those are original stickers my sister and I put on in the 1980s. It just screams science fun!

Reminder about circuits and shorts:
The battery does not liked to be plugged into the same piece of play dough. There needs to be space or insulative dough between at least two separate conductive dough pieces.
We briefed everyone on "shorts" and how to prevent them. I also made wearing the safety glasses mandatory. We, thankfully, didn't have any shorts.
Totally awesome creations:
I did a happy face (the "hot dog" circuitry is on the underside and the wires stick through the insulative dough to the conductive dough underneath):

Doggy wagging his tail, a vibrating motor (by my husband, John- note the tail flying off at the end):
A few butterflies:

A rocket ship:

An airplane:

A train (that whistled):

Flowers:

Problems we encountered:
The biggest problem was that the dough dried out as we were playing and wasn't conducting well. Reforming/reworking the dough or switching the connector locations solved this problem.
The sunlight drowned out the LED lights, but if we cupped our hands over the play dough circuit, creating shade, the lights burned bright.
During the experiment, we shorted 2 LEDs. Lesson learned: don't connect the LEDs directly to the battery wires. They need resistance which is provided through the play dough.
Please note that due to crazy May scheduling, we will not hold a Science Saturday. We are tentatively thinking about repeating Stomp Rockets for June, with a date TBD.
Preparation for fun:
I made 4 batches of conductive dough: purple (left over from our trial-run of Squishy Circuits), blue, green, and yellow. I also made 3 batches of the insulating dough, without color. Per Squishy Circuits recommendation, I purchased small Safety Glasses from Amazon (affiliate link).
I bought out two local Radio Shack's inventory for buzzers and vibrating motors to end up with 5 of each. These were great because they already had wires on them. Less work for me!
I bought 10 of the 4-AA battery holder with snap connector from Fry's with the 9-volt snap connector. This was also great since I didn't have to solder wires, and I can remove the snaps and store the battery packs without worrying about shorts.
John and I crimped terminals (not exactly what we used, but think something like this) onto each wire. This allowed greater surface area contact for the connections. We also hot glued where the wire connected to the crimped plastic to reduce the pull-out possibilities (kids are hard on things). We also hot glued the joints of the LEDs after we broke one during our trial-run.
All of this preparation paid off. We didn't break the legs of any LED and no wire was pulled out from the crimper. Since everything survived, I now have a classroom set of small electrical components.
The table set-up:
I put down a plastic disposable tablecloth. This helped keep the play dough from acquiring dirt and other park related gross things. Safety glasses were required to participate (provided by us).


Reminder about circuits and shorts:
The battery does not liked to be plugged into the same piece of play dough. There needs to be space or insulative dough between at least two separate conductive dough pieces.
We briefed everyone on "shorts" and how to prevent them. I also made wearing the safety glasses mandatory. We, thankfully, didn't have any shorts.
Totally awesome creations:
I did a happy face (the "hot dog" circuitry is on the underside and the wires stick through the insulative dough to the conductive dough underneath):

Doggy wagging his tail, a vibrating motor (by my husband, John- note the tail flying off at the end):
A few butterflies:

A rocket ship:

An airplane:

A train (that whistled):

Flowers:

Problems we encountered:
The biggest problem was that the dough dried out as we were playing and wasn't conducting well. Reforming/reworking the dough or switching the connector locations solved this problem.
The sunlight drowned out the LED lights, but if we cupped our hands over the play dough circuit, creating shade, the lights burned bright.
During the experiment, we shorted 2 LEDs. Lesson learned: don't connect the LEDs directly to the battery wires. They need resistance which is provided through the play dough.
Please note that due to crazy May scheduling, we will not hold a Science Saturday. We are tentatively thinking about repeating Stomp Rockets for June, with a date TBD.
Friday, March 8, 2013
An Awesome Review, Thanks Stroller Hikes
One day, when Nerdy Science was a baby (ie. Nerdy Baby), I was at the park with my son trying to get the wiggles out after school, before coming home for dinner. I ran into a friend and was telling her about this brand new blog adventure and how I was getting little sleep between setting it up and J waking up between 4-5a (it was pretty awful). I guess the passion for this science blog showed through my words (and maybe my baggy eyes). Another person playing with her daughter happened to overhear and told me about Stroller Hikes, a non-profit organization that encourages family outdoor activities together. She had done some web work for the group and put me in touch with the organizer. I was hoping to help write some of their science curricula, but it turned out that I went into hyper drive with the Pepsi Refresh campaign, then the grant, and now Science Saturdays (sorry, Stroller Hikes). They still have tons of information for parents about fun activities in the outdoors, including science activities. I highly suggest checking them out whether you are a Bay Area Local or not.
Since our Science Saturdays happen to take place in local parks, I decided to see if they would be interested in our science activities. They wrote a fantastic blurb about Nerdy Science's Science Saturdays on their website. I look forward to meeting more parents as the activities continue. If you would like to join in on the Science Saturday fun, please email me using the link to the left and I'll add you to our email list. Since we depend on weather and our family's health, we can only predict about 5 days in advance when the next Science Saturday will be. So far, April's activity is looking like April 20th or 27th. Stay tuned.
Since our Science Saturdays happen to take place in local parks, I decided to see if they would be interested in our science activities. They wrote a fantastic blurb about Nerdy Science's Science Saturdays on their website. I look forward to meeting more parents as the activities continue. If you would like to join in on the Science Saturday fun, please email me using the link to the left and I'll add you to our email list. Since we depend on weather and our family's health, we can only predict about 5 days in advance when the next Science Saturday will be. So far, April's activity is looking like April 20th or 27th. Stay tuned.
Saturday, March 2, 2013
The Magnet Detectives
Science Saturdays for 2013 started off with a bang! The weather brought us 70 degrees and partly cloudy, and it was a perfect morning for being outside and having some science fun!


Our lesson this month was on materials things are made out of. There are lots of materials on earth, but only a select few are attracted to magnets - those materials have iron in them (think steels). Many kids hypothesize that all metals stick to magnets. This is a good educated guess, but it's wrong (and it's ok to be wrong at this level of science understanding - that's how we learn).
I got the idea to bury things in the sandbox from J's preschool, where they bury paper/sequence in their school playground and the kids go find "treasures" (which we cannot throw away no matter how many times they fall on the floor and the Roomba threatens to vacuum them up).
The materials I buried:
- Matchbox cars
- Tin/jar lids (ie. Altoid boxes)
- Sponges
- Aluminum foil
- Cheap Ikea baby silverware spoons
- Milk caps
- Candles
- Popsicle sticks
- Straws
- Balloons
- Marbles
- Pennies
- Bobby pins
- Paper clips
- Pipe cleaners
- Army men
- Rubber bands
- Giant metal washers
- Colored plastic chips with a metal band around them (they came in a magnet activity)
*note, I stayed away from anything sharp since burying nails in a public playground doesn't sit well with me as a mom.
As the kids dug up a treasure, they had to say what they thought it was made out of and whether or not it'll be attracted to a magnet. A good way to test would be to place the item on top of the magnet, then flip the magnet over. If the item sticks, it's attracted. If not, it's made up of a different material.

For those who were still interested in playing science after 15 minutes (seriously people, sometimes science day feels like a flash mob, but the adrenaline rush is awesome and the kids always have fun), I showed them that the magnet itself doesn't stick to cardboard, but the magnet has a field which can go through cardboard. I made up a dancing bug activity on the fly. It went over super well. All you need: a few pipe cleaners, a magnet, and a piece of cardboard. Place the magnet under the cardboard and watch your pipe cleaner bug move magically!

Big J (my husband), came up with the game, how many washers can your magnet hold. I also heard they were playing pass the washers with their magnetic wands as they ran around the playground.
One more game with magnets on playgrounds: hide the magnet. It's like hide-n-seek, only you're hiding the magnet (hopefully a larger, visible one) somewhere on the playground (preferably on a metal structure to narrow things down). Then the kids have to find it based on their knowledge of where they think it could be sticking.
Thanks for everyone who came to our fun Science Saturday. If you live in the Bay Area and would like to join us, shoot me an email using the link over to the left, and I'll add you to the email list for Science Saturdays. I try to hold them at least once a month and give at least a 5 day notice of events. They do depend on weather and our overall family's health (we love sharing, but not the flu).
**These are the magnetic wands we used: Learning Resources Magnetic Wands**
**These are the magnetic wands we used: Learning Resources Magnetic Wands**
Monday, October 29, 2012
Science Saturday - Pumpkin Catapults
This was the last Science Saturday of 2012 (mainly due to holidays), but it was fun to go out with a bang! Thanks to the families that came out! We had a beautiful morning in the park. I took some pictures of our friends and the craziness of having 10 catapults shooting at the same target, but I haven't gotten permissions from parents to post. Here's the non-identifiable rundown.
I took 10 minutes the night before to cut and paste some Halloween themed characters made out of construction paper onto the back of a 36-pack of Diet Pepsi (ya, I haven't quit my drinking habit) and made some arbitrary point system that the kids loved! Who doesn't love scoring 50 points vs 25 or 10? Yay, math!

And I arbitrarily set up three cones, which the kids moved throughout the day. As long as they were having fun, learning science, and not bored, I didn't really care where they shot their catapults from.

I covered a paper box with construction paper and drew a spider web to hold our ammo.

Here's our ammo of various sizes and weights; we also used candy corn pumpkins:

Big J and I spent the week before gluing sets of 3 Popsicle sticks together to use for the catapult structure and 5 Popsicle sticks for the launching stick, using wood glue - white glue works well too (both have to dry for ~24 hrs before applying load/playing). Catapult directions (note we only used 3 sticks instead of 4 for the structure sides to save Popsicle sticks and time and it worked well). Since we do these events at the park and there are times little kids grab things that are hot (be it knowingly/unknowingly), I invested in some Ultra Low Temp Battery Power Glue Guns. They worked well for the two hours we needed them. They use a lot of their "special" type of expensive glue sticks, but we didn't have burns or complaints. The batteries also pop out really easily, so I'd recommend taping the battery case shut. Also, since the glue doesn't do a great job (just a so-so job), I'd recommend reinforcing what you glued with masking tape.
Big and Little J launching pumpkins. Little J being a tad bit over dramatic.

A friend playing the target game.

We only had one friend who ventured outside of the example catapult design. He modeled his new design off of one Big J had 3D printed and brought to the event. I love it when kids challenge themselves.

Remember the science behind catapults? It's the transfer of energy, from elastic energy (which is a form of potential energy - it will potentially do something once you let go after stretching it) to kinetic (a fancy term for motion) energy.
Humans also need energy to "go" - can you name how we get our energy? Hint, it's not elastic.
I took 10 minutes the night before to cut and paste some Halloween themed characters made out of construction paper onto the back of a 36-pack of Diet Pepsi (ya, I haven't quit my drinking habit) and made some arbitrary point system that the kids loved! Who doesn't love scoring 50 points vs 25 or 10? Yay, math!

And I arbitrarily set up three cones, which the kids moved throughout the day. As long as they were having fun, learning science, and not bored, I didn't really care where they shot their catapults from.

I covered a paper box with construction paper and drew a spider web to hold our ammo.

Here's our ammo of various sizes and weights; we also used candy corn pumpkins:

Big J and I spent the week before gluing sets of 3 Popsicle sticks together to use for the catapult structure and 5 Popsicle sticks for the launching stick, using wood glue - white glue works well too (both have to dry for ~24 hrs before applying load/playing). Catapult directions (note we only used 3 sticks instead of 4 for the structure sides to save Popsicle sticks and time and it worked well). Since we do these events at the park and there are times little kids grab things that are hot (be it knowingly/unknowingly), I invested in some Ultra Low Temp Battery Power Glue Guns. They worked well for the two hours we needed them. They use a lot of their "special" type of expensive glue sticks, but we didn't have burns or complaints. The batteries also pop out really easily, so I'd recommend taping the battery case shut. Also, since the glue doesn't do a great job (just a so-so job), I'd recommend reinforcing what you glued with masking tape.
Big and Little J launching pumpkins. Little J being a tad bit over dramatic.

A friend playing the target game.

We only had one friend who ventured outside of the example catapult design. He modeled his new design off of one Big J had 3D printed and brought to the event. I love it when kids challenge themselves.

Remember the science behind catapults? It's the transfer of energy, from elastic energy (which is a form of potential energy - it will potentially do something once you let go after stretching it) to kinetic (a fancy term for motion) energy.
Humans also need energy to "go" - can you name how we get our energy? Hint, it's not elastic.
Sunday, October 7, 2012
Pumpkin Catapults
We're testing the waters for our fun Halloween Themed Science Saturday in the Park and launching candy corn pumpkins via a home made popsicle stick catapult.

I made this catapult lesson for an outreach event for middle school girls. The main concept: transfer of energy. Energy is stored as elastic energy (a form of potential energy) when you pull down the catapult arm. When you release, the energy is transferred to kinetic (fancy word for "motion") energy. If you pull down further, more energy is stored (be careful though, the sticks may snap) and the item should go further and faster in ideal conditions.
 |
| J launching a pumpkin |
*Glue or masking tape 4 popsicle/craft sticks together - lay two sticks end-to-end and glue one stick on top so it is glued to both sticks, flip it over and glue one stick on the other side.
****Please use caution when using hot glue around kids. You can white glue them for a better bond, but you'd have to let them sit/dry overnight.****
*Repeat the stick assembly from above 5 times, so you have 6 total longer sticks.
*Assemble 3 of the longer sticks you just created (from above) to form the base - a triangle (a good and strong shape). Glue/tape the corners together.
*Take the remaining 3 longer sticks and glue them to each corner and gathering on top (forming a pyramid shape).
*Catapult arm assembly: glue/tape 5 popsicle/craft sticks together three on the bottom, end-to-end and two on top. Flip over after gluing so the 3 sticks are on top. Glue a Dixie cup (to go salsa containers can work well too) to one side of the catapult arm.
*Take a rubber band and loop it around the top of one of the catapult sides using a girth hitch knot.
*Stick the arm of the catapult through the rubber band and glue/tape it to one corner of the base (we both glued and taped).
*Stick launching item into the cup, pull back on the catapult arm and release.
Launching items:
*Candy Corn Pumpkins!
*Bite sized candy bars - great because you can launch many times, unwrap and eat
*Gummy fruits
*Uncooked beans
*Small softer toys
Warnings: I don't recommend harder objects like rocks, at least indoors. Also, make sure the flight path is clear from all faces (including the launcher). Eat unwrapped, launched candy at your own risk.
Science play ideas:
*How far can you launch your item?
*Try different sized items. How do they compare?
*Try multiples of the same item. How do they compare to your first launch of only one of that item?
*Try releasing the catapult arm at different heights. What happens if you release close to the top of the catapult vs. when you pull it all the way down to the ground?
*Play a game where you hit targets.
*Try different rubber bands (you can always stretch them over the cup to attach to the catapult arm). How does the rubber band affect your catapult?
*What happens if you don't hold down the front of your catapult while you try to launch your item?
This is what we'll be doing for Science Saturday. Come join us if you can! Shoot me an email, and I'll give you more specific details.
Related Posts:
Friday, October 5, 2012
Save the Date - Science Saturday, Halloween Theme
Save the date for the next Science Saturday in the park.
Sat. Oct 27, 2012
10-noon
SF Bay Area
Park location to be given upon RSVP
I'm in the planning stages and need to test-run my ideas, but I'm excited about it!
It'll involve fun science and prizes. Kids could come in their Halloween costume, as long as they have their face showing (ie no masks, it might interfere with the project) since I like the idea of using a costume more than one night during the year. I might even have prizes for the nerdiest costumes.
Are you excited yet?
Sat. Oct 27, 2012
10-noon
SF Bay Area
Park location to be given upon RSVP
I'm in the planning stages and need to test-run my ideas, but I'm excited about it!
It'll involve fun science and prizes. Kids could come in their Halloween costume, as long as they have their face showing (ie no masks, it might interfere with the project) since I like the idea of using a costume more than one night during the year. I might even have prizes for the nerdiest costumes.
Are you excited yet?
Monday, October 1, 2012
Science Saturday in the Park: Elbows and Muscles
Wow, we had quite a turn out this Saturday to learn about elbows and muscles. Thanks everyone for coming!
I repeated the Elbows and Muscles lesson I did at Kid's Day since I had leftover material (and it's a fun one!). The detailed instructions on how to make the elbows are here: younger kids elbow lesson, while the more advanced lesson can be found here: middle+high school elbow lesson.
Since the science days are attended by neighbor hood preschool aged kids, I decided to add a new trick to help with conceptualizing how muscles really work.
I tied a string to a rock.

I then asked the kids to move the rock with the string (9 times out of 10 they intuitively pulled the string towards them). I then asked them to push the rock to me using the string. It never worked! Strings don't push, they only pull.
Then if I still had their interest, we continued on to making elbow models (lessons described in the above links). Some kids, depending on their interest level, got anatomy lessons about the bones and muscle names (major muscles: biceps (flexion/bending), triceps (extension/straightening); arm bones: humerus (upper arm), radius and ulna (lower arm)). We also brought up tendons, which attach muscles to bones (our string muscle was attached to our ruler bone with a paperclip "tendon").
One participant had an awesome question about making a punching motion. Punching motions use more than one joint! I discussed the way the shoulder moves (many, many degrees of freedom) that helps you raise your arm forward and pull it back, combined with the bending/straightening of the elbow (+rotational degree of freedom of the radio-ulnar joint) helps you punch. To model this, you would need two more joints on top of the basic flexion/extension elbow we just made. Your body has many muscles, bones, and joints that work together as a team to move you in the way you'd like to move.
P.S. To the parents: I don't endorse nor did I come up with the idea of the karate chopping elbows. Sorry if your kids have figured out they can sock their sibling with the elbow model.
Link to bulk purchase of rulers: Charles Leonard Inc. Ruler, 12 Inch, Wood, 36 rulers
I repeated the Elbows and Muscles lesson I did at Kid's Day since I had leftover material (and it's a fun one!). The detailed instructions on how to make the elbows are here: younger kids elbow lesson, while the more advanced lesson can be found here: middle+high school elbow lesson.
Since the science days are attended by neighbor hood preschool aged kids, I decided to add a new trick to help with conceptualizing how muscles really work.
I tied a string to a rock.

I then asked the kids to move the rock with the string (9 times out of 10 they intuitively pulled the string towards them). I then asked them to push the rock to me using the string. It never worked! Strings don't push, they only pull.
Then if I still had their interest, we continued on to making elbow models (lessons described in the above links). Some kids, depending on their interest level, got anatomy lessons about the bones and muscle names (major muscles: biceps (flexion/bending), triceps (extension/straightening); arm bones: humerus (upper arm), radius and ulna (lower arm)). We also brought up tendons, which attach muscles to bones (our string muscle was attached to our ruler bone with a paperclip "tendon").
One participant had an awesome question about making a punching motion. Punching motions use more than one joint! I discussed the way the shoulder moves (many, many degrees of freedom) that helps you raise your arm forward and pull it back, combined with the bending/straightening of the elbow (+rotational degree of freedom of the radio-ulnar joint) helps you punch. To model this, you would need two more joints on top of the basic flexion/extension elbow we just made. Your body has many muscles, bones, and joints that work together as a team to move you in the way you'd like to move.
P.S. To the parents: I don't endorse nor did I come up with the idea of the karate chopping elbows. Sorry if your kids have figured out they can sock their sibling with the elbow model.
Link to bulk purchase of rulers: Charles Leonard Inc. Ruler, 12 Inch, Wood, 36 rulers
Monday, August 27, 2012
Silly Putty Saturday Science in the Park
We are still organizing and recovering from our move, but I wanted to keep up the momentum with Science Saturdays in the park. I didn't want to miss August (it seemed like everyone scheduled something for Saturday, August 25th, including me). We squeezed it in during the morning (sorry to those I promised that it would happen in the afternoon - my afternoon was pretty jam packed) in a different park than normal (they upped the reservation fees at the park we were using).
I decided to keep it simple and do something easy, fun, and I know works: silly putty!

I was busy baking a koala summer cake Friday night for Saturday afternoon's event that I didn't get the chance to write up the recipe for the table. I did get plastic tablecloths though for this event since the silly putty picks up everything and park tables are filthy! I thought on the fly and wrote the recipe with Sharpie on the table cloth. It worked nicely! I didn't even have to worry about taping down paper or paper getting wet and messy (this was a super messy event). Before you start, have plenty of wipes handy.

The ingredients that you add to a zipped baggy:

Once in the bag, zip the bag, and shake, squish, and knead:

Some were over excited and wanted to experiment to see what happens if you mix all of the colors:
Once the white in the bag is mostly gone, take out the putty and continue to squish, knead, stretch, and pull in your hands until it becomes silly putty texture.


Place the silly putty in a clean bag to take home!
Some discussion points:
** It seems as though an email list from Lego Race Cars in the park was shredded before I got to put the names on the email list. If you thought you were on the email list but didn't get the email about Silly Putty this past weekend, please use the email on the left side navigation bar to let me know. Also, if you haven't had the chance and want to be on the email list, please let me know too!
I decided to keep it simple and do something easy, fun, and I know works: silly putty!

I was busy baking a koala summer cake Friday night for Saturday afternoon's event that I didn't get the chance to write up the recipe for the table. I did get plastic tablecloths though for this event since the silly putty picks up everything and park tables are filthy! I thought on the fly and wrote the recipe with Sharpie on the table cloth. It worked nicely! I didn't even have to worry about taping down paper or paper getting wet and messy (this was a super messy event). Before you start, have plenty of wipes handy.

The ingredients that you add to a zipped baggy:

Once in the bag, zip the bag, and shake, squish, and knead:

Some were over excited and wanted to experiment to see what happens if you mix all of the colors:
 |
| You get a poop color |


Place the silly putty in a clean bag to take home!
Some discussion points:
- How does the silly putty feel? You can ask this at different stages of this project.
- What do you think will happen when we mix glue and starch? Do you think something new will be made?
- What are we using to measure the ingredients? We use less starch than glue (about 1/2 as much) - bring up fractions if you think your kid would like the introduction.
- What are the different colors?
- What do we get when we mix colors?
- What happens if we place silly putty shaped in a ball on the table for a few minutes?
- What happens if we pull the silly putty slow?
- What happens if we pull the silly putty fast?
- Does silly putty bounce?
** It seems as though an email list from Lego Race Cars in the park was shredded before I got to put the names on the email list. If you thought you were on the email list but didn't get the email about Silly Putty this past weekend, please use the email on the left side navigation bar to let me know. Also, if you haven't had the chance and want to be on the email list, please let me know too!
Thursday, August 2, 2012
Marble Roller Coasters
I will start out that I did not come up with this concept on my own, but I do LOVE the project. I was introduced to Marble Roller Coasters through a Society of Women Engineers colleague in 2008. We did it as part of their Designing Women event for middle school girls. We did a modified version of the project linked above two years in a row and it was a complete hit with the girls!
Fast forward to ~1 year ago, we went to J's Great Grandpa's house, and he was fascinated by an old marble track toy. Since he didn't try to eat the marbles, I figured he was old enough to play with marble roller coasters.

Materials (cost, ~$5 for 10 halved pieces of foam track):
*Foam pipe insulation (from hardware stores like OSH or Home Depot, ~$1/6ft piece, which will be cut in half to make two tracks)
*Masking tape
*Furniture, towers, anything you can use to prop your coaster up.
*Marbles
Take away lesson:
*Transfer of energy (this topic makes me giddy - yes, nerd). Total Energy = Potential Energy + Kinetic Energy (+losses due to things like friction, for the older kids)
---When something is sitting high, it has stored energy called Potential Energy (I like to think that it'll potentially fall). If it's at rest at a height, kinetic energy in the equation above starts at 0 and all of the energy is potential. Once it's set into motion it begins to have Kinetic Energy (kinetic is a fancy term for motion). A falling object has a combination of potential and kinetic until the object reaches the ground/a place where it won't fall any more and it's all kinetic energy (potential = 0 in the equation above).

How do build your coasters:


Other fun thing to try (special thanks to N, age 4 - not pictured, who found this out while playing at the park):
Fast forward to ~1 year ago, we went to J's Great Grandpa's house, and he was fascinated by an old marble track toy. Since he didn't try to eat the marbles, I figured he was old enough to play with marble roller coasters.

Materials (cost, ~$5 for 10 halved pieces of foam track):
*Foam pipe insulation (from hardware stores like OSH or Home Depot, ~$1/6ft piece, which will be cut in half to make two tracks)
*Masking tape
*Furniture, towers, anything you can use to prop your coaster up.
*Marbles
Take away lesson:
*Transfer of energy (this topic makes me giddy - yes, nerd). Total Energy = Potential Energy + Kinetic Energy (+losses due to things like friction, for the older kids)
---When something is sitting high, it has stored energy called Potential Energy (I like to think that it'll potentially fall). If it's at rest at a height, kinetic energy in the equation above starts at 0 and all of the energy is potential. Once it's set into motion it begins to have Kinetic Energy (kinetic is a fancy term for motion). A falling object has a combination of potential and kinetic until the object reaches the ground/a place where it won't fall any more and it's all kinetic energy (potential = 0 in the equation above).

How do build your coasters:
- Start up high. Why? Because the higher you start, the more energy you'll have to play with.
- This also could get tricky as you might have too much energy and will have to switch your design to account for that too.
- I like to tape my roller coaster to a chair or a wall.
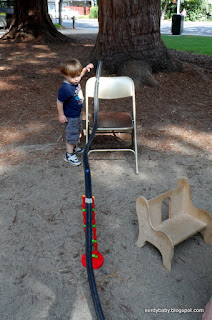
- Play with the drop angle, give your roller coasters bumps, twist and turns, and loops. Use other furniture/blocks to support the track (see pic below). We use a lot of stools, chairs, side tables, wall space, blocks.
 |
| We used Zoob structures for height/support |
- Tape a paper cup to the end of your track to catch the marble.

Trouble shooting:
- My marble flies off of the track
- Adjust your track to go where the marble wants to go.
- Add a bump or a bank (twist/turn) to get the marble to slow down.
- Start the marble at a lower height.

- My marble falls off of during the loop
- Situation 1: you don't have enough energy to clear the loop. Start the marble higher or shorten the height of the loop.
- Situation 2: the loop is too tight and the marble has too much energy to go where you want it to go. Adjust the loop height (taller) or width (separate the loop ends slightly so the track isn't touching on the bottom of the loop).

Other fun thing to try (special thanks to N, age 4 - not pictured, who found this out while playing at the park):
- Line up 3-4 marbles at the end of the track and watch what happens as another marble you release on the track bumps into the 3-4 marbles at the end of the track.
Feel free to share your pics of hours of roller coaster fun with me.
Subscribe to:
Posts (Atom)