Friday, April 27, 2012

Gardening with no space

For the past 3 years, we've been gardening behind our carport in our apartment complex.  Nothing really ever came from it.  I think it's a combination of bugs, bad soil, and not enough sunlight.   We got just enough to encourage us to try again with some adjustments.

This year, we decided to just do potted plants on our balcony.  It's turning out a lot better than I imagined (we even got one more strawberry than we did last year!).  Let me preface this post by saying that our apartment gets a lot of sun, which is why when it's 75 degrees and beautiful outside, our apartment heats up into the 90s.  We figured the corner of our building gets the most sun.  It sees the morning sun and is definitely in the blaring afternoon sun (until past 7p).  We might as well see if we can take advantage of it!

We started our garden in the middle of March.  It was super cold and windy (for the Bay Area at least) after we planted that we didn't know if our plants would survive.  The poor tomato plant was looking very sad for a few weeks.

J scooping in the soil.

Luckily, with the warmer weather, the tomato plant has begun to thrive.  I'm hoping we get more than our crop last year, 2 tomatoes - which ended up disappearing before they ripened.  We decided to gamble on the 50/50 reviews of the Topsy Turvy for the tomatoes.  Most of the negative reviews on Amazon were from warmer climates (like AZ).  Our particular bag explicitly stated that it won't work in warmer climates.  We'll see how it goes, and I'll report back whether it was worth the $10 (we would have had to buy a pot, most likely more expensive one at that, anyways).


Gardening from a seed:
-Learn what it takes for a seed to grow (soil, water, sunlight)
-Hopefully eat what you grow!  Learn where food really comes from.
-Start the discussion on nutrition.
-For older kids, you might try to introduce the concept of photosynthesis, converting sunlight into energy to help the plant grow.  We eat food to give us energy.  The plants take the sun as their "food" that they need.
-For older kids, take measurements of your plants and track your progress.  Create a nice line graph/plot by hand or via a favorite spreadsheet program.  See if you can guess how big it will get.

I found these grow kits at Target in the $1 section.  I figured it would be fun for J.  Plus, I never grew sunflowers, so it would be a learning experience for me.


The kits came with an "add water" pellet to make soil, which I thought was interesting.


Once hydrated, J stirred it and potted his own plants.


We then put them on a window seal and sprayed them with water daily to keep them "moist".


I loved that sunflowers germinated (popped up) so quickly!  Within 2 days, we were seeing growth.

When they reached ~2.5 inches tall (~2 weeks), we transplanted them into a bigger pot that now sits in the sunlight.  We rotate the pot frequently to try to evenly distribute the light between the plants.  I honestly don't know what kind of sunflowers these are, so it'll be a surprise to see how big they get.

Sunflowers, week 5

And yes, we (well, J) enjoyed our first strawberry yesterday!  Woohoo for an unseasonably warm week in April to jump-start our berry season. Our strawberry planter that we love: Akro-Mils Mini Stack-A-Pot, 14-Quart (affiliate link).


J enjoyed it so fast that we didn't get a picture of him eating it.  But it sure looked delicious!

Tuesday, April 24, 2012

Balloon Racers in the Park

We had our first family science day in the park on Saturday.  It was so much fun.  We had lots of friends show up and make balloon race cars.

Here's J and Big J making a prototype before everyone showed up.  J decided on the recyclable, balloon, straw, and where to attach it.


J's race car:

We got so engrossed in balloon racer making that we didn't get a chance to take photos of everyone making their race cars.  However, we got some shots of fantastic racers:


And the races!

The off-roader

This one won the distance challenge
There weren't rules against double balloons

A 4 yr old friend let's the smallest balloon racer go
It was weighed down by sand.

It decided it wanted to play in the sand

Go, go, go

Lessons learned:
  • Balloon racers don't always behave as you want them to behave.
  • Wheel alignment is a key to straight travel.
  • More balloons = more power!
  • Sweep the ground before trying your racers.
  • Make sure your cars are directed downhill (might as well work with gravity).
  • If your balloon is too powerful, add weight to help drive your car (sand, rocks, etc).
  • Don't eat ranch that has been around 15 little kids who double dip.
  • Kids LOVE cones!


We're so thankful for everyone who came to enjoy science with us this weekend.  I am hoping to make family science day a regular occurrence (hopefully with a snazzier name too).  If you are interested in joining our fun, I'm compiling an email list for our science family days in the park in the SF Bay Area.  Please email me (see link on << side bar) to request to be on this email list.

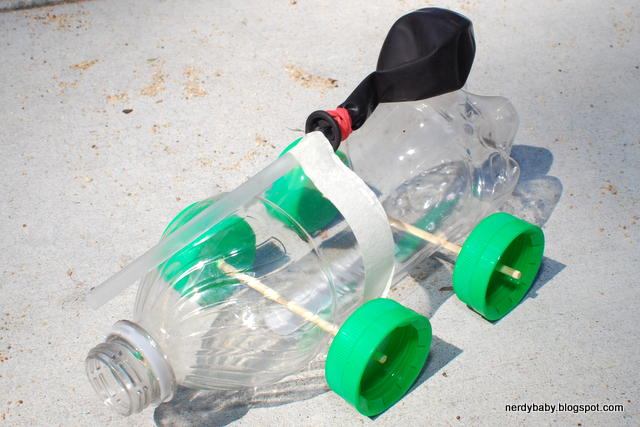
P.S. Here's a how to for our original balloon racer and why we went with the recyclables we chose.

Related Post:

Monday, April 16, 2012

Balloon Racers

I've been meaning to play with quick and easy materials to find a fun balloon racer to make at home.

Here's what I came up with:


Strawberry containers:

Benefits:
  • Many holes = less work for me!
  • Basket for the balloon to sit in/attach to easily (I attached it with a rubber band using a girth hitch knot).
  • The basket can also carry weights if you chose some of the variation activities.
Cons:
  • Lightweight, easily flips over.

Salsa containers (wheels):

Benefits:
  • Due to my lack of motivation for cooking and the easiness of a nearby take-out Mexican fast food chain, we have PLENTY of these around the house.
  • They are round-ish and bigger than bottle caps.
Cons:
  • Hard to poke holes into (cheap plastic).  We tried to drill, ended up with a gentle poke of an awl.
*We used wooden skewers as axles and attached the salsa cups via press fit (you could glue them into place too).


Balloon and straw:
  • I used a standard size birthday balloon.
  • I attached the balloon to a cheap, standard bendy straw with a rubber band.
    • Be careful not to squish the straw with the rubber band being too tight.


Here's how my balloon racer runs:


Variations:
  • Try different sized balloons.
  • Try attaching it to different size straws (vary diameter and length).
  • Add weights (easy with a strawberry basket).
  • Try to see if your racer runs on different surfaces (tile, carpet, sidewalk, asphalt).
  • Use different materials.  You'd be surprised at what you can make from your recyclables collection.
  • Steer your vehicle by placing the straw at different locations/angles and see what happens.

Here's what happens with a bigger straw and our basket:


Why?  The straw wasn't connected straight (hence the crazy sideways motion) and the forces from the straw were so great that the light basket just flipped over!


Lessons learned:
  • Newton's third law: for every action, there's an equal and opposite reaction

J's Quote:
  • I used making a cool science balloon race car as a bribe for him eating his dinner.  He held me responsible.
    • (Passing me the strawberry basket that's been on our counter for a week) "Mommy, let's do science!"
    • We got so excited about science that we forgot about dessert.

Wednesday, April 11, 2012

Hoppy Spring


The nerd in me couldn't resist the pun. I thought I'd share our spring celebration cake that a colleague and I made for the rest of the lab yesterday. Science is great fun, but so is being creative in an artistic way (especially using yummy cake).  I've pinned a fondant recipe for marshmallow fondant on Pinterest.  Many similar recipes are out there.  This particular one had a decent picture to be pinned (the ingredients).  I also like the author's take on cake is meant to be eaten, so don't worry about it too much.

I liken marshmallow fondant to edible playdough.  Get to playing; it's so much fun :-).

Hope your spring is off to a hoppin' start.  Teehee.

Monday, April 9, 2012

Biomedical Engineering - Elbows and muscles

Last month, I was asked to lead the Biomedical Engineering workshop of a full-day event introducing engineering to 100 high school girls.  This was my third time leading the biomedical engineering workshop for the local chapter of the Society of Women Engineers.  I didn't want to repeat any lessons quite yet.  I have also been incredibly busy in my personal and professional life, so I hesitated leading.  I was hoping to mentor a younger biomedical engineer into leading a workshop (letting her take the ropes and lead with my guidance), but nobody stepped up as a lead.  Anyways, I decided to do something very easy in terms of preparation and conceptually.  Initially, I thought it might be too easy for high school girls, but it turned out perfect!

MUSCLES - we all have them, why not learn about them.

In particular, my lesson was about muscles for movement.

Time breakdown (total time 50 minutes):
  • 7 minute presentation introducing biomedical engineering, giving a brief background of my job as a gait analyst (gait = fancy term for walking), the importance of modeling motion, and giving a very brief lesson on anatomy.
    • Anatomy lesson included
      • Naming how many bones in the body.
      • Showing a picture/diagram the musculoskeletal system, highlighting some of the bigger, more well known muscles (quadriceps, biceps, triceps, etc.).  Muscles have an origin on one bone, cross a joint, and insert on a different bone.  Muscles work in tension only to move the body.  Different muscles move the body in different ways, so flexing is done by one set of muscles whereas extending is done by another set of muscles.
      • Briefly describing ligaments and their function to connect bones to bones.
      • Introducing tendons, which attach muscles to bones.
    • Then we focused specifically on the arm with the elbow joint.
      • 3 main bones: humerus, radius, ulna.
        • For simplicity, we treated the elbow joint as a hinge.
      • Flexor muscles: biceps, brachialis, brachioradialis, their attachment points, and their function(s).  Demonstrated that when I flex my arm, my biceps are activated, but when I release my biceps muscle, my arm doesn't flop down.  I need something to pull it back down.  That's where the extensors come in.
      • Extensor muscles: triceps, anconeus, their attachment points, and their function(s).
    • Introduced the challenge.
  • 35-40 minute challenge exercise.
  • 5-10 minute post-activity discussion.


The challenge was to make a model arm that could flex and extend.

I created this arm model worksheet for the girls to use/complete during the activity.  They worked in groups of 2.  Here's a run down with more specifics than the sheet provides (it was a big verbal instruction and feedback activity).

Easy set-up and materials

Materials:
  • 3 rulers (one per arm bone) with small holes
  • 1 large brad
  • 3 paperclips
  • 2 pieces of ~50 cm length string

Set-up for flexing the arm

Assembly:
  • Place the three rulers one on top of each other and attach a brad through one of the holes on the end
    • Pick a hole that the brad won't slide through.
  • Open a paperclip, making a hook, and attach a string to the paperclip with a knot.
    • Repeat for the second string and paper clip.
  • Attach the paperclip (tendon) to the radius/ulna (lower part) of the arm and thread the string through the top most hole on the humerus (upper part).  Pull on the string from the top hole and watch the lower arm move up (flexing).

Flexing the arm
Activities:
  • Play with origins and insertion points (put the string through different holes on both the upper and lower arm) and note how the lower arm reacts with different attachment points.
  • Now that the arm is up (flexed), can you think of ways to extend it?
    • I needed to give them some anatomical guidance/feedback here.
      • Reminding them how the triceps are attached (behind the elbow).
      • Reminding them that our joints are virtually frictionless (when they had decided to wrap the string around the brad or tightly around the back of the ruler).


Feedback:
  • All girls were able to complete and understood the flexing of the arm.
  • All girls could point to the direction the forces were pulling or needed to pull for flexion/extension (along the line of the string).
  • 1/3 of the girls got the arm to successfully extend (they received a cool shopping bag donated by one of our sponsors).
    • Redirecting forces was a tough concept for the girls.  The key to extension was to pull down but still have the muscle located "up" in the arm.  Many understood attaching the muscle from below, but when they attached it to the upper arm, the forces were still pointing upwards.
      • This was something I had to think about on the fly and explain it to the girls in their individual groups as they were trying to solve the problem.  I tried to explain it in terms of a pulley system.  If I attach a string to a box, I can lift something directly up, right?  That's basically what the flexor muscle is doing.  But I can also pull down on something to lift it up if I have a pulley.  We need something that will pull the "arm" down when we pull up with the muscle.
    • Methods for extension included making a pulley-like system, where force was redirected around the elbow:
      • Attach a paperclip (why I suggested 3 paperclip) to the back of the ruler.
      • Attach the brad to the little hole next to the big hole in the ruler and use the big hole as the pulley (they flipped the rulers opposite that the ones pictured in this blog).
  • Holding the arm horizontally while flexing/extending works best.  That way gravity isn't extending the arm on its own.
  • Attachment points: the bigger the muscle length, the easier movement was.  Think of it in terms of lever arms.  It's hard to lift 100 lbs straight up, but if you put it 4 ft away and create a fulcrum/lever system, I bet you can lift it fairly easily.
  • This is a simplified version of an elbow.  How would someone change their model if they were going to account for rotation of the lower arm?  The key is that the elbow is actually two joints: the humeroulnar joint (what we modeled) is a hinge.  The radioulnar joint is the one that can rotate (pivot).
  • The girls really enjoyed this lesson.  It was complex enough to get them thinking outside of the box but structured enough to where they didn't give up.

**This lesson was adapted from page 16 of these biomedical engineering activities.


Little kid adaptation:

J loved seeing the ruler arm go up and down, and kept asking about it.  I figured it's a good time to start the discussion about anatomy and movement.

It's easy to introduce muscles and that our muscles move our bodies:
  • I can bend and straighten my elbows and knees thanks to muscles.
  • Point out your bicep muscle.  Have your child touch it when you aren't flexing and then when you are flexing.  How does it feel different?
  • See if your child can flex their own muscles.  
  • When we exercise, our muscles get big and strong.
  • If we are sick or injured, our muscles get weak.

We also talked about bones too.
  • Our bones are hard and help us stand up.
  • We need calcium for our bones to grow big and strong.  We can get calcium from milk, cheeses, and yogurt.
  • We can break our bones if we're not careful.  If that happens, we'll be put in a cast, and we can't use that bone until it heals.
J liked playing with the strings and trying to move the rulers.  It could be fun if you have a marionette to show how different strings move different parts of the body.

Material note, we used these rulers: Charles Leonard Inc. Ruler, 12 Inch, Wood, 36 rulers

End of super long post, whew!

Related Posts: