Sunday, January 15, 2012

Balloon Rockets, part 1

This is a great way to get the kids to giggle (and exercise your lungs).

Take a balloon blow it up (you'll probably be doing this over and over and over again since your small child won't have the lung capacity to do it on his/her own)***.

Before you demonstrate the awesomeness of our crazy balloon, ask your child if he/she knows what will happen if you let go of the balloon.  Wait for an answer.  It gets them hypothesizing (making educational guesses).

Let go of the balloon and see what happens.

Things to try:

  • Different size balloons (you can do this also without different balloons, just blow up half way, full, etc).
  • Different shaped balloons (round, oval, long balloons used for making animals).
  • Different colors of the same type of balloon (trust me, colors are important to little kids).
Discuss:  What happened?  How do the balloons react each time?

Then try:
  • Can you put something on the balloon to slow down the reaction?
  • Can you aim the balloon to try to hit a target?


***This might be a good time to invest in a balloon pump too because inevitably your child will try to blow up the balloon, give up, and pass it over to you to blow up.

Also, please be careful of balloons with really small kids.  They are a choking hazard, especially popped balloon pieces.

And, if you noticed this is Part 1 of Balloon Rockets, you'll just have to stay tuned for part 2 which is known and on tap for experimentation later in the month.

Saturday, January 14, 2012

Video for Celebration Helicopters

Sorry it took two weeks to pull the (dark, sorry) video from my camera.

Here's the addendum for Celebration Helicopters.  Happy New Year!


"You get up high..."  Twirly twirly twirly.

Friday, January 6, 2012

Toilet Paper Tube Sail Cars

My previous post on sail cars made it onto Pinterest (edited: I'm now on Pinterest!).  I feel so crafty though it was such a clunky car.  It was a really simple car to make on the fly and could be made out of things lying around the house (ie. a contact sol'n box).  It can also occupy kids' attention for some time.

I've been debating about my next lesson with the preschoolers at J's school.  I really want to do sail cars, but I'd have to make 12-15 of them (and make them look identical so we don't have 15 grumpy 2-3 yr olds).  The little voice in my head kept saying cafeteria milk cartons, but they aren't easy to come by if you don't have older kids in school.  I thought about it some more and played with what we had lying around the house.  Enter in my new sail car made from recycled materials that are plentiful: toilet paper tubes and empty tissue boxes.


I actually think this one works much better than the quick sail car I threw together in October.

Materials:
Toilet paper tube (or paper towel tube cut in 1/2 or 1/3)
Empty tissue box
Wooden dowel (I use skewer sticks with the tips cut off)
Popsicle stick (preferably a clean craft stick)
Scissors
Masking tape

Methods:
-Trace a circular object onto the tissue box cardboard (4 times) for the wheels***
-Cut out the 4 wheels
-Cut the two dowels 1/2 to 1 inch more than the diameter of the paper tube.
-Attach one wheel to each dowel (I press fit then masking tape it in place to the dowel) - make sure the wheels are straight.
-Single hole punch 4 holes for the axles - 2 in the front and 2 in the back (make the holes relatively straight across from each other and the front in line with the back holes).
-Insert wooden dowels in the holes and attach the other wheels (masking taping the wheels to the dowels if you so choose).

*Now you should have a car you can push around (even blow on the front of the tube to get it to move).  Test it to make sure your wheels are straight and the tube isn't touching the wheels.  You can also build a small cardboard ramp to let gravity drive the car.

Methods (cont):
-Cut out a sail shape from the tissue box.
-Attach sail to a popsicle stick via masking tape (tape front and back of sail to the popsicle stick).
-Carefully puncture the top of the tube with one pointy side of an opened pair of scissors.  I prefer the puncture to be perpendicular (90 deg) to the length. With only the top of the tube punctured, the sail won't be dragging on the floor slowing the car down.
-This new puncture should be just the right size to insert a popsicle stick.
-Reinforce mast with masking tape.

*Now blow on the sail and watch the car effortless glide across smooth surfaces (it still doesn't work well on carpet).


More fun activities with sail cars:
  • Put your car on a long coffee table.  Can you give it enough power to drive over the edge?
  • Navigate an obstacle course.
  • Have a friend stand on the opposite side of the table.  Blow on opposite sides of the sail.  Watch the car go back and forth between you two.  Have a competition on who can get the car to fall off first.

***I used a compass this time around for wheel drawing, which was nice since I had a pin prick where the center of the circle was.  In turn, my wheels seem to turn better this time time than last when I think I used playdough containers as my circle guide.  Yay for being a little bit of a hoarder when it comes to old math tools.  I don't think I've used it since high school.

Related Posts:

Tuesday, January 3, 2012

Colors + Light follow-up

Here's a fun website to learn more about colors and lights: The Physics Classroom.

Mixing light is different than paint.  For example red + green = yellow (instead of brownish) and blue + red =  magenta (instead of purple)

White = all primary light colors (R+G+B)

vs.

Black = all primary paint colors (R+B+Y)

Mixing light is additive where as mixing paint is subtractive.

Experiment!
Mix different colors of paint
Shine/mix similar colors of light
Compare and contrast

Alternate equipment:
Instead of flashlights, we also have small LED lights of red, blue, and green.  This seems to be less of a hassle than taping cellophane to flashlights.  Big J bought them a few years ago for a Cub Scout activity about photography and light.  Just remember not to stare into LED lights.

Monday, January 2, 2012

Flashlight colors

Woohoo!  Happy New Year!!

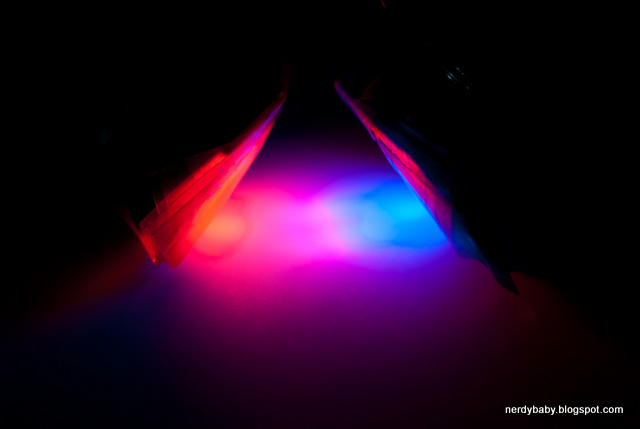
Today we taped some cellophane to flashlights and mixed colors.  Yay, visible light!


Tips and tricks:

  • Use lots of cellophane - if you think you need more, you probably do (for example, the blue flashlight pictured above needs more cellophane).
  • So we didn't have 3 rolls of cellophane in our small living space, we purchased red and yellow cellophane bags for 99 cents (and have lots left over) - a blue bag wasn't available in bag form at our local craft store, so we bought a roll of blue.
  • Scotch tape works just fine to hold the cellophane to the flashlights.
  • It works best if the two flashlights are the same type and size (see yellow and red above).  We ended up switching the flashlight for the blue/red pictures below.
  • Shine the lights on a piece of white paper.
  • Shine the lights on non-white surfaces - which works better?
  • Turn down the surrounding lights.

It's actually really hard to take a picture of the mixing light, so here's the best we could do.

Red and Yellow = Orange


Red and Blue = Purple-ish (magenta)


Blue and Yellow didn't make a good picture, sorry.