One of Miss J's favorite things recently is being flipped upside down. She'll crawl up to me and put her head in my lap as a sign to flip her upside down.
I love caving in and letting her hang upside down. Why?
She is developing a hypothesis. I'm not so sure what hypothesis/hypotheses she is forming. Maybe it's if I put my head in Mommy's lap, she'll flip me upside down. Most of the time I'll swing her upside down. Every once in a while, I'll do something else, like tickle her to see her reaction.
The world also looks different while hanging upside down. People seem to be hanging from the ceiling! It's not really so, but it looks like it when you're upside down.
Your body feels different! Blood rushes to your head, and endorphins kick in. You try it - handstand on the couch, I won't tell anyone.
Babies are discovering the world around them. Help them out a little bit.
Simple science experiments that babies do on their own - and how you can embrace the science:
*Squish their food - How does that feel on your hands? Give them something else to squish with a different texture. How does that feel? How does it feel on your face? How does it feel on your hair? (It's inevitable, you'll have to hose them down anyways).
*Prefer one food - Give the baby a few different food items on the tray and watch him/her pick up the preferred items first. Once the preferred items are gone, watch which item disappears next. It's a form of sorting, the bin is just his/her mouth!
*Drop things - Where did it go? Did you hear it hit the ground? Give the item back to them (assuming you're ok with whatever condition the floor is in). Whoa, did it happen again? Was it the same? Then offer something different (i.e. plastic, wooden, metal spoons). Did that sound different? How about this sippy cup? Whoops, the lid fell off. Did you hear the water splash on the ground? (you'll have to wait a few minutes while I clean it up!)
Little Miss J is now 9 months! As you can probably tell by this post, we're well into the feeding craziness of babyhood. Oh, being a parent is fun!
Felt and fleece work really well when it comes to adhering to other materials using friction alone. This is a great, quick science lesson to hypotheses about what will and won't stick vertically on things. Would the pillow stick to the wall? What about a heavier pillow? Would silky objects stick to the couch? Would silky objects stick to the wall? What if the materials were wet? Experiment and have some fun!
*Shadows
*Light
*Pictures (perception, depth, light, colors)
*Looking through a window (perception, depth, light, colors)
*The baby in the mirror above her swing (reflections)
It's amazing how quickly babies grow and develop. According to my "What is your baby doing this week?" email, at 7 weeks, she should be seeing more colors and in 3D. We've definitely noticed her focusing on objects at a distance. She definitely enjoys contrast. Blinds are some of her favorite things to stare at, and if I raise the blinds, she gets so excited to look out the window and explore the world with her new, sweet eyes. The best thing we can do is safely facilitate her curious interests (ie. don't let her stare into the sun b/c she likes light) and discuss what she sees.
This Dancing Raisins experiment came from our Magic School Bus Science Club kit on solids, liquids, and gases. It involves raisins, tap water, and soda water. Concepts to discuss are density (what sinks, what floats), forces, and buoyancy.
We started out placing raisins in tap water. They did nothing. Note that I left the sound on this video. J wanted to take over and conduct his own sink/float experiment.
We didn't have soda water, but the kit came with an alkaseltzer tablet. We tried it. It was supposed to be for another experiment in the packet that we ended up observing/conducting on our own. It wasn't the best. The raisins bounced up and down a few times, but mainly it smelled as the gases were released from the tablet. J really didn't like the smell. Yay, science.
We put the experiment on hold while we walked down the street for dinner. The restaurant happened to have soda water available, so we took a cup of it home. We weren't 100% sure the carbonation would survive the 10 minute walk, but we repeated the experiment using soda water. It worked! This is what happened, note I left sound on for J's commentary:
So what happens is the gases in the soda water get stuck in the crevices of the raisins and give the raisins enough air (forces/buoyancy) to float to the top of the water. Once at the top, some bubbles pop and go into the air, and the raisin sinks back down to the bottom. Pretty neat, huh?
Notes:
I paid for the Magic School Bus Science Club Kits and have no affiliation with them.
I'm taking a brief break from the blog to focus on my family. I'm sure we'll have tons of scientific discussions. I'll try to post some insights to our Facebook Page or Twitter as they come and catch up on the blog once I come up for air.
I promised J some science after naptime. I decided to nap too instead of prepare a science lesson. He awoke pretty excited, so I asked him what kind of science he wanted to do. Since he was close to our stored, small helium tank while waking me up, he pulled that out. Not wanting to repeat the hover balloon lesson, I had to think of something else with balloons on the fly (which is harder to do in a sleepy stupor and with preggo brain). It's also been bothering me from the scientific standpoint that a post is going around Pinterest saying that our baking soda + vinegar reaction blowing up a balloon is a good alternative to helium.
I decided that we should play with the weight of the balloons and that this could be a good lesson for J in making hypotheses (educated guesses about what he thinks will happen when conducting the experiment).
Objectives:
*To determine what three different balloons will do: sink or float. The three balloons would be filled with 1. air (blown up with our mouths); 2. helium; 3. carbon dioxide (CO2) which is the gas product of the chemical reaction between baking soda and vinegar.
*To determine which gas is heavier: air, helium, or carbon dioxide.
J's Hypotheses:
*Hypothesis 1:
1. Air will sink.
2. Helium will float.
3. Carbon dioxide will sink.
*Hypothesis 2:
1. Air is heavier than carbon dioxide.
2. Helium is lighter than air.
Experiment:
*Fill 1 balloon with air from your mouth.
*Fill (or obtain) 1 balloon with helium.
*Conduct the baking soda + vinegar reaction (see link above) and tie off the balloon once it's full of carbon dioxide gas.
*Hypothesize about what the balloon will do when dropped: sink or float?
*Drop each balloon and observe what happened.
*Make conclusions on your observations: where your guesses correct?
*Now using what you just learned from your balloon dropping observations, make hypotheses about which balloon is heavier or lighter.
*Weigh the balloons on the scale/balance (like the one we used in our balance game), or create your own balance from office supplies.
Results:
*Helium floated.
*Air balloon sank.
*Carbon dioxide balloon sank.
*Air balloon is heavier than helium:
*Carbon dioxide balloon is barely heavier than the air balloon, but it is also smaller.
*The air balloon is slightly heavier than a deflated balloon (but not by much).
Discussion:
*There is a difference in balloon volume between the air and the carbon dioxide. We didn't have a large enough reaction to really blow the balloon up to the same size as the one we blew up with our mouth. Even with a smaller balloon volume, the carbon dioxide balloon is heavier than the balloon we filled up with our air.
*It's also important to note that carbon dioxide is a product of what we exhale when we breathe (or blow up a balloon). However, there are a lot of other gases mixed in with the carbon dioxide.
*We couldn't figure out a good way to measure the weight of the helium, so we tied it to the scale, which immediately raised the scale on the side of the helium balloon, but helium is lighter than air.
Some other fun we had:
*We played, what can we tie the helium balloon to in order to keep it from floating to the ceiling.
- We ended up using a Cootie Bug.
After the experiment, J thought it would be fun to launch balloons with our balance/scale.
- I always recommend well-supervised free play time after experiments.
- Kids are awesome at finding fun new ways to explore their world.
- Don't forget to explain what's happening as they make new discoveries.
I've been really behind on posting science experiments. Most of my days are spent at work and then tending to J's needs. By the time he goes to bed, I'm spent and rarely want to spend more time at the computer, let alone trying to make coherent posts.
Anyways, this morning, in the hustle and bustle of getting ready for church, J excitingly proclaims that he has a science lesson for me. Of course, I stopped in my tracks to listen to my four year old. He shined his finger light (LED of sorts) on the wall and showed me what happens when he was close to the wall versus when he was further away from the wall.
After dinner, I asked him to demonstrate again, so I can record it:
What is happening:
*The light is more concentrated the closer it is to the wall. The light is approximately the size of the LED finger light. Though it is small, it is very bright.
*As you move further away from the wall with the light, you have the same amount of light spread out over a bigger area (the more diffuse the light gets). The light may get bigger in size, but it's not as focused and bright. The light has more space to move through and spread out.
Other fun things you can do:
*Have fun with shadows. Hold a light source at a set distance from the wall. Make shadow puppets. How do the shadows look when your close to the light? How do the shadows look when you are close to the wall?
Related Posts:
If you like my son's experiment he came up with all on his own, check out some other science lessons he has made up: J Lessons. One of my favorites include a finger counting lesson.
We're not huge on celebrating Thanksgiving (despite J and I being Mayflower descendants). I feel like kind of a Thanksgiving scrooge (we're not cooking a feast this year).
To reduce the scroogey feeling, I really wanted to do something Thanksgiving themed for science. I decided to adapt the toilet paper sail cars into a turkeymobile by adding a turkey to the mast!
Turkey details:
I remember from my elementary school days turning hand prints into turkeys. I traced J's hands, and we cut them out in yellow, orange, and red. Originally, I was going to add half of a toilet paper tube on top for a head and use the handprints as feathers behind the head, but J was so excited to make his thumb the head of the turkey. We went with J's idea (I think it's ultimately easier). He even gave it an eye and a beak.
J and his turkey:
Action shot!
J wants to bring to to his Thanksgiving themed share day (think Show and Tell) coming up on Wednesday. Score!
Note: This post contains Amazon affiliate links, which means I get paid for clicks/purchases on the Amazon links (in term supporting my blog and future Science Saturdays).
There were no instructions, we just let the kids build whatever kind of car they wanted (first come first serve on the size of wheels though, which affected the drive too). If they had time, they were encouraged to test and redesign their cars to see if they could make them go faster and further down the ramp/landing strip.
We used particle boards as race car ramps and placed them at different heights. Quickly, the kids learned the biggest ramp yielded the most desirable results. The link above has a good rundown on how the experiment went with our friends. It was one of our most popular Science Saturday event and will most likely be repeated in 2014.
J loves popping all of our packaging bubbles (luckily for him, we do a lot of online shopping). He has experimented with the most efficient and satisfying way to pop the bubbles. One day, I decided to record his tactics:
He figured out that popping works best with a quick jump on the bubble, but he had a hard time popping the bubbles with his hands? Why?
With jumping:
1. He gets all of his weight (and then some - biomechanics, yay!) on the bubble.
2. The time he exerts the force is short.
With his hands:
1. Not all of his weight is transferred to the bubble (ie, he's not doing a handstand on it). Some of his weight remains on the ground while his legs hold him up.
2. The time he exerts the force is a lot longer when he uses his hands (the bubble takes time to deforms before it pops).
What simple science experiments have you done this week?
Objectives:
*Measuring temperature
*Phases of water
*Hypothesis formation
Background:
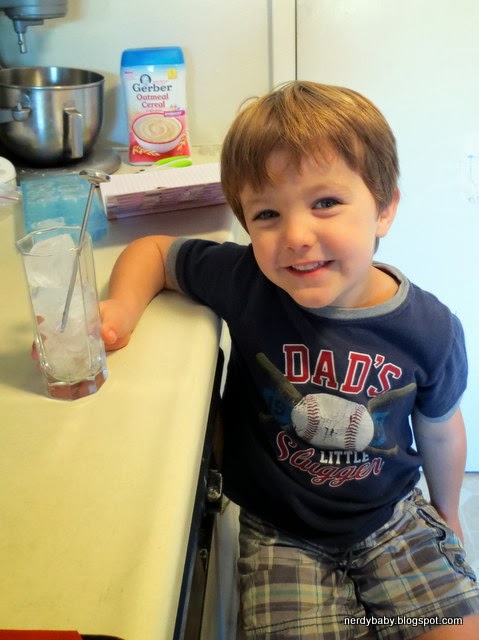
J wanted to do science, and I have been a slacker the last few weeks/months. I wanted to see how well J did with reading a thermometer and making hypotheses (educated guesses), so I put together a melting ice science project on the fly. We even put it in J's Science Lab Notebook.
Methods and Materials:
Basically this project consists of filling a clear glass full of ice and taking the temperature throughout the day as it melts.
Hypthesis formation:
I asked J, "What will happen to the ice?"
-He replied, "The ice will met to water."
I then asked, "How much water will be in the glass?"
-He stated, "To the top of the glass!"
Taking the measurements:
We set up the experiment and ran a few errands and took naps. I'm pretty sure we have a digital thermometer, but analog is more fun. J was able to tell what numbers the thermometer read (at least to the nearest 10).
10:35a: 20 deg F
11:00a: 30 deg F - ice is beginning to melt
1:00p: 32 deg F - ice is 1/2 way melted
3:00p: 60 deg F - ice is melted
5:45p: 70 deg F - water is now room temperature.
Note, the ice melted to water and the glass was half full (or half empty?). Volumetrically, ice takes up more space than water, which is why when you don't get free refills on your drink, you want less ice so you end up with more liquid.
J was pretty disappointed that he guessed wrong, but I told him that's ok. It's why we experiment, so we can learn more. Next time he'll know the answer. He was pretty excited for this impromptu science lesson.
Stay tuned for our colored ice cube experiment which we set up yesterday to do sometime soon.
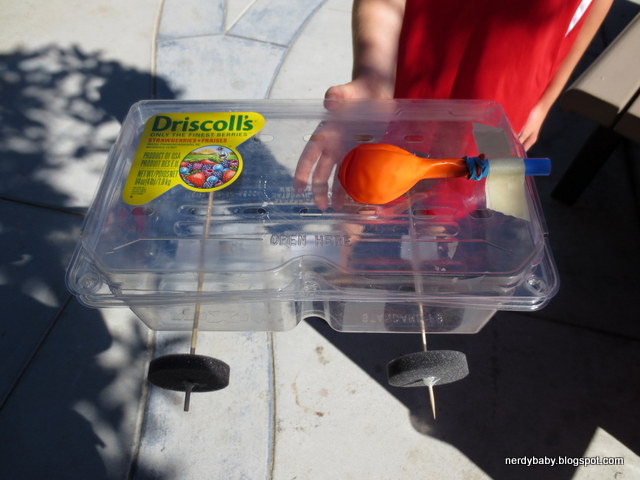
I can't tell you how many times a toilet paper tube has saved my sanity as a mom. Punching four holes with a simple hole punch and using a stirrer straw or a kabob skewer for axles takes 3 minutes max and can lead to hours of play. You can attach a balloon to a straw with a rubber band and then attach the straw to the recyclable via double sided masking tape. After blowing up the balloon, watch it race across your house, driveway, backyard, park, wherever! If your kid is too small for balloons, set up a cardboard box as a ramp and bring on the giggles. You can also add a sail to the car and watch the car move as your child blows on it. Sharing this knowledge was the goal of this month's Science Saturday.
We had a great turn out for our Science Saturday this month! We had it in a park with great sidewalks and access to sand (for weight), but unfortunately, we only one table to assemble things. It was crowded, but we sure had some fun. The goal was to learn about equal and opposite reactions, friction, and general engineering (tweaking your designs for better performance).
How to make your own recyclable racer:
1. Pick out a recyclable you think will make a great race car. I'm always fond of soda bottles. Water bottles nowadays are made with less plastic and are too squishy. I also wouldn't recommend aluminum cans since they are squishy and super light.
Tape standard straws to the bottom of the recyclable
Weigh down the car with washers or sand if necessary
2. Attach two pieces of a normal size drinking straw (small pieces are fine, think cut into 4ths or more) to the underside of your recyclable. This will hold your axles for the wheels, allowing them to move without friction. Note, in previous versions of balloon racers, I used an awl and pre-punched holes into the bottles. Using straws gives you a lot more freedom with adjustments (I hardly ever punch straight holes) and is safer all around (luckily, no battle wounds from before). You want the straw pieces to be parallel to each other and as straight as possible (perpendicular to the direction you'd like the car to move).
3. Stick your axles through the straws. We used stirrer straws for the little recyclables and kabob sticks for the bigger ones. I'd recommend chopping off the points of the skewers before giving to a small child.
4. For wheels, we pre-drilled holes into bottle caps, I made some circular corrugated cardboard wheels using a compass-like tool for cutting circles (affiliate link), and I bought some foam discs. Nobody chose the cardboard wheels. It was split pretty 50/50 on foam and bottle cap wheels.
5. Attach your wheels to the axles. I recommend that the wheels not touch the recyclable since friction will slow down your race car. At this point, you can glue them into place with a hot/warmish glue gun. Whether you use a press fit or you glue the wheels, the wheels should spin with your axle. Make sure the wheels are straight or your car might veer.
6. Attach a balloon to a straw with a rubber band. I found the bubble tea straws (affiliate link) work really well (we cut them into 3rds to reduce costs - though I linked to Amazon, I found these at our local BB&Beyond for $2). You can use a standard straw, but you have to walk the fine line between the rubber band being too tight and crushing the straw or not being tight enough and you can't blow up the balloon.
7. Tape the balloon to the car. I recommend a place where it can hang off the back and you don't have to keep taking it off and on to blow it up.
8. Blow up your balloon and pinch tight, or put your finger over the straw to block the air. Set your car down and let go of the balloon.
9. If your car flips, consider weighing it down (washers or sand do a great job). You can also switch what direction of your car is front (ie. flip the balloon around so it points from the opposite end of the racer).
10. Make adjustments and see if your car can go even faster!
I was able to pull out my camera for video of a few racers we had in the middle of the activity. Parents had to help the little ones blow up the balloons, but fun was had by all:
I think these racers went further than last years balloon racers! Related Posts:
Wedding receptions can be tricky with a four year old. Luckily, J loves science!
I think J accidentally dropped something in his lemonade, and instead of making a fuss about it, we turned it into a game/science lesson. Thankfully, the reception was outside, and this game wasn't too messy.
*Note that an item being more dense than water/lemonade doesn't necessarily mean it is heavier. However, heavier and lighter are terms a four year old can understand.
I love when we can find an impromptu science lesson.
Last week, our friends invited us over for some oobleck fun with cornstarch in a kiddie pool. I figure the video is still appropriate since J keeps bringing up how much fun it was. I finally uploaded a video from John's phone that shows what happens when you stop moving while walking on cornstarch+water.
Poor J. Don't worry, he was rescued and lived to tell the tale of being stuck in goo.
It's not my idea, but thought I'd share. Our friends invited us over for this event. They had somehow acquired over 150 lbs of cornstarch**, which they promptly added to a kiddie pool filled with about 4 inches of water. The end result was a lot of fun. J had just as much fun playing on the goo than he has had at other parties with bounce houses. Think of our Goo experiment on a much larger scale. I call it goo, but I think the technical term for cornstarch and water is oobleck.
Viscosity of a non-Newtonian fluid depends on the shear rate. The key is, keep moving. If you stop moving, you'll sink, and the liquid is so viscous, you'll get stuck. The best way out would be to move as quickly and forcefully as possible, ie. jump if you can (apply a shear force).
Science is fun!
Thanks to our friends who invited us over for the science fun.
**A quick search yielded 50 lb bags of cornstarch for $25. It's not an "every day" science type of experiment, but it's definitely fun to try if you get the chance.
Stomp rockets was one of the more successful Science Saturdays last year, so I thought it would be fun to revisit again this year. We had a few repeat visitors who wanted to do stomp rockets again, but we also had a lot of fun with new friends!
We had 4 store bought stomp rockets (affiliate link) set up for immediate action/reaction gratification. Basically the harder you jumped, the higher/further the rocket flew!
I also set up targets using our space cutouts from our Straw Rocket lesson we also did at last year's event.
Then for those who wanted the extra challenge, we made our own stomp rockets which we launched via the homemade stomp rocket launcher (the directions on how to build the stomp rocket launcher and rockets to fly off of them are found on that link). In short, for the rockets, you roll a piece of construction paper around a pipe of the same size as your launcher. You want it to be tight enough so you don't lose air through the paper gaps, but you also want it to be loose enough to come off of the launcher when you stomp. To close off the paper tube, you want to make a nose cone. I found the easiest way was to fold the corners down and tape it to make a triangle. Then you add wings.
Here's my sample rocket:
We had some interesting wing designs. This one started with cylinder wings:
We had a few request for heart shaped wings, so we tried half hearts:
The paper rockets can fly high! J almost made a basket with his orange rocket using our homemade launcher.
The plastic rockets fly very high and work very well but they are not durable. I'm disappointed in the quality of the plastic rockets that come with the set. I'd like to replace them, but it is actually cheaper to buy whole new sets! It just seems so wasteful. The homemade rockets also launched ok from the store bought launchers. They were a little big since the store bought launcher tube is smaller than the homemade one. We'll have to find something smaller to use to roll the paper rocket if we go solely into paper rocket territory after the plastic ones get too beaten up.
Thanks for all those who spent this beautiful Saturday morning with us. I look forward to the next Science Saturday. We're tentatively thinking the morning of July 13th if you are looking to save the date. If you want more specific details, feel free to email me using the address on the sidebar to the left (<<), and I'll add you to the email list.
I am at times an impulse shopper, especially if the item can be used towards many days of science fun. I was searching Amazon for cheap cardboard or reusable wheels that could be used with our sail/balloon cars. I did not find something compatible at first search, but I did find this product that seemed interesting: Rolobox Reuseable Wheel Kit for Boxes (affiliate link). It's just another tool we can add to our imagination and science play with boxes.
I like the minimal reusable packaging
I purchased Rolobox over the weekend and it arrived at my doorstep this afternoon, so we played a little bit after dinner. I'll admit that I didn't read the product description thoroughly before purchasing. The wheels are much larger than I expected. The wheels and axles are easy to assemble though parents should do the hole punching into the cardboard. Rolobox website shows a pencil for puncturing, but our shoe box needed scissors. Please use caution when cutting holes into cardboard (I am clumsy, which one reason I recommend hole punch + skewer sticks for axles when it comes to our toilet paper racers).
J and his new race car
Surprisingly, we had a shoebox handy (one that has outlasted the pair of shoes that came with them). I also thought a Cars box was pretty relevant for a (race) car science demonstration. It seems like it would work with tissue boxes and any corrugated cardboard box.
Sciency things to do with makeshift car and Rolobox Wheels:
Attach the wheels so you can put things in the box. How does the car move with different items in them? How does the car move when loaded down with rocks? How does the car move when loaded with tissues?
How does the car roll on carpet vs. wood floor vs. linoleum/tile?
Flip the box so the bottom of the box is the top of the car. Add a sail, balloon(s), or fan/motor(s). Can you get your car to move without pulling on the included string?
Cut your car into a more aerodynamic shape (think "teardrop" or more like a triangle). Test it using gravity on a makeshift ramp (we use particle board as ramps) How does a more aerodynamic vehicle move in comparison to a boxy vehicle?
Now if only I could find reusable wheels small enough to attach to our toilet paper rolls (our most plentiful recyclable) that would also be light enough to move with simple kid power (blowing)...
Disclosure: I purchased Rolobox Wheels with my own money. Opinions are my own.
I mentioned earlier in the week that I started a new birthday tradition of volunteering in the classroom. Marble Roller Coasters is my all time favorite lesson, so I thought the bigger kids at J's school would have fun with it. They did!
The main takeaway of the lesson was classifying if they had too much or too little energy. I did a small demonstration where I told them about potential energy and how things up high potentially fall down. If something is close to the ground, it doesn't have a lot of energy. If it's way up high, it has a lot of energy.
With that guidance, everyone started their roller coasters up high.
We also learned that there wasn't enough energy for the marble to make it all the way back up the track if the track was shaped like a "U".
They also learned if their drop was too steep, the marble would have too much energy and jump the track. They had to modify where they started the marble or the angle of the drop in order to keep the marble on the track because nobody wants to be on a roller coaster that jumps the track. That would be scary!
Most groups made roller coaster drops, some as long as half the length of the room. One group made a loop with their roller coaster.
Some groups crisscrossed their tracks with other groups.
All in all, the kids had a great time. I consider my birthday lesson a success!
We were introduced to Squishy Circuits at last year's Maker Faire. I thought they were very interesting, but J was a little too young as a new 3 yr old. Almost a year later, I've decided that J's old enough to try playing with circuits.
What is a circuit?
It's a connection of electrical items through wires/conductive material. Metal, water, human skin are all examples of conductive materials. Metal is intuitive when it comes to conducting electricity. You can feel electricity conduct through your skin if you rub your feet on the carpet and then touch someone else or something metal (static electricity is shocking). You also don't want to be in the water during a lightning storm since water conducts electricity.
How do circuits work?
Each circuit needs a power source (ie. a battery pack) and at least one component (ie an LED, motor, buzzer, etc). Basically, the items in a circuit all need to "hold hands" in some way, without the battery pack being connected to the same side of a component or itself, without a component. If a connection is missing/broken, the circuit won't work. Electricity is also lazy. It likes to take the easiest path around the circuit. If there are two wires, one has a component and one does not, the electricity will go through the wire without the component since it's less work (be careful since this can also "short" your circuit - read below).
Making the Squishy Dough
The "conductive dough" is basically the standard homemade play dough recipe we've been using for J. The salt + tap water makes it conductive.
The "insulating dough" is basically pie crust. It uses distilled water which doesn't conduct electricity. There is also no salt in the insulating dough.
Prepping the components
Per the suggestion of Squishy Circuits, we crimped terminals onto our wires to increase the contact area for better conduction. For consistency, we made all of our positive (+) wires red and negative (-) wires black. The LEDs did not get crimped terminals.
Constructing circuits Please closely supervise your kids to prevent short circuits. The circuit gets grumpy if you try to plug both ends of the battery into the same wire/piece of dough or the electricity goes around a path without a component. This causes a short circuit. The battery can get very hot or explode when shorted.
The best way we found to start with the circuits was to make a "hot dog". We rolled out two "worms" of conductive dough (ours was colored purple) and one "worm" of insulating dough (ours wasn't colored, kind of whitish in color). We made the insulating dough longer than the conductive dough, so the conductive dough didn't accidentally touch. Touching conductive dough pieces together is bad and could cause a short circuit.
With the + (red) side of the battery plugged into on side of the hot dog bun and the - (black) side of the battery plugged into the other side of the hot dog bun, we placed an LED straddling the insulating dough, with a leg in each of the buns. Note that LEDs are directional and only work in the proper orientation. The longer side of the LED is +. If the LED does not work, flip it around. If it still doesn't work, check your connections and make sure everything is properly attached (or "holding hands").
You can add rows of LEDs down the hot dog. We made ours look like a stoplight with red, yellow, and green lights. These lights are in parallel. If I remove a light, all of the other lights remain lit at the same level as they were before I removed the light.
Now if we were to make a "Big Mac" with 3 buns, we can connect the lights in series. If you remove a light, the other light is affected.
You can also add motors, buzzers, and vibrators to your circuits too to see what they do and how they react.
J and his friends' favorite thing was trying to make a face with a light-up nose. We connected a side of the battery to each eye and then connected the LED for the light-up nose. We used extra dough for eyebrows and smiley faces.
So what does this cost?
The dough cost is pretty minimal. We had everything except distilled water in our cupboards.
LEDs run under $1/light. I found 60 larger ones for $20 at a local store.
Motors, buzzers, and vibrators are ~$2-4/piece. Some of these components came with wires already attached.
The battery pack was $1.30. We had leftover wires from our homemade shake table.
The dough is supposed to keep in a zipped baggie for a few weeks. J has already requested to play circuits 4 times since yesterday. Remember, this is a closely supervised activity for the kids. Short circuits are easy to come by and can be quite dangerous. Please do not let your kid do this activity alone.
We'll be doing Squishy Circuits at the next Science Saturday (tentatively April 20th, morning). If you'd like specific details of when and where, please email me using the address on the sidebar << . I give details the week of the event since we depend on the weather.
Update December 2018:
Remember to clean off your component leads before you store for any length of time. Salt of the dough corrodes the metal. Use rubbing alcohol to clean any parts that touch the conducting dough. The little boy above is now a cub scout doing the science elective for Webelos!
This experiment was suggested by a fan of Nerdy Science, Stephanie, as a fun experiment to do with eggs.
Experimental Questions:
Are eggs denser than plain water? Are eggs denser than salt water?
Background:
When things are more dense than water, they sink when placed in water. If they are less dense than water, they float.
Test your knowledge to form your hypothesis (educated "guess"):
Gather a few items from around the house and see if they sink or if they float. Which items are more dense than water? Which items are less dense than water? Can you guess what will happen to the egg when placed in water? Do you think anything different will happen to the egg when placed in salt water?
Materials:
-1 glass of plain tap water
-1 glass of plain tap water + salt (amount varies)
-1 or 2 raw eggs, non-cracked
Methods:
-Gently drop an egg into the tap water. What happened?
-Gently drop an egg into the salt water. What happened?
-Add more salt to the salt water. Did that change any of your results?
Our Results:
Our egg in plain water sank to the bottom of the cup.
Our first attempt at the salt water resulted in our egg being neutrally buoyant and hovering above the bottom of the cup:
So, we took a guess about what would happen if we added more salt. Based on the semi-floating egg above result, J guessed that the egg will "really float" when we added more salt.
He was right!
Conclusions (via J's own words):
-"Water can't hold up the egg."
-"Water with salt CAN hold up the egg. Science is amazing!"
The egg is more dense than plain water, but with enough salt, the egg is less dense than salt water.
Thanks, Stephanie, for this fun addition to our egg experiments!






 . It's just another tool we can add to our imagination and science play with


