Sunday, December 15, 2013

J's lesson on light

I've been really behind on posting science experiments. Most of my days are spent at work and then tending to J's needs. By the time he goes to bed, I'm spent and rarely want to spend more time at the computer, let alone trying to make coherent posts.

Anyways, this morning, in the hustle and bustle of getting ready for church, J excitingly proclaims that he has a science lesson for me. Of course, I stopped in my tracks to listen to my four year old. He shined his finger light (LED of sorts) on the wall and showed me what happens when he was close to the wall versus when he was further away from the wall.

After dinner, I asked him to demonstrate again, so I can record it:


What is happening:
*The light is more concentrated the closer it is to the wall. The light is approximately the size of the LED finger light. Though it is small, it is very bright.
*As you move further away from the wall with the light, you have the same amount of light spread out over a bigger area (the more diffuse the light gets). The light may get bigger in size, but it's not as focused and bright. The light has more space to move through and spread out.

Other fun things you can do:
*Have fun with shadows. Hold a light source at a set distance from the wall. Make shadow puppets. How do the shadows look when your close to the light? How do the shadows look when you are close to the wall?

Related Posts:
  • If you like my son's experiment he came up with all on his own, check out some other science lessons he has made up: J Lessons. One of my favorites include a finger counting lesson.

Sunday, December 8, 2013

In case you are wondering...

The new baby born in April will be a GIRL. I'm so excited to share this world with her. Hopefully, she too will be science and math oriented (she does have mechanical engineers for parents and a big brother who loves to experiment). I'm looking forward to exploring more science with babies (since J was toddler age when I started the blog).

We plan on another J name. Luckily, I have some time to determine how I will distinguish them on the blog. After maternity leave, I still plan on continuing to work fulltime. Wish me luck.

Monday, November 25, 2013

Turkey Sail Cars

We're not huge on celebrating Thanksgiving (despite J and I being Mayflower descendants). I feel like kind of a Thanksgiving scrooge (we're not cooking a feast this year).

To reduce the scroogey feeling, I really wanted to do something Thanksgiving themed for science. I decided to adapt the toilet paper sail cars into a turkeymobile by adding a turkey to the mast!


Turkey details:
I remember from my elementary school days turning hand prints into turkeys. I traced J's hands, and we cut them out in yellow, orange, and red. Originally, I was going to add half of a toilet paper tube on top for a head and use the handprints as feathers behind the head, but J was so excited to make his thumb the head of the turkey. We went with J's idea (I think it's ultimately easier). He even gave it an eye and a beak.

J and his turkey:


Action shot!


J wants to bring to to his Thanksgiving themed share day (think Show and Tell) coming up on Wednesday. Score!

Saturday, November 23, 2013

LEGO Race Car Purchasing and Lesson Information

Note: This post contains Amazon affiliate links, which means I get paid for clicks/purchases on the Amazon links (in term supporting my blog and future Science Saturdays).

Last summer, we had a Science Saturday where we experimented with race cars out we made out of LEGOs.

Using our Pepsi Refresh Grant, here was what we purchased to make our LEGO Race Cars for around 20-25 cars:
3 sets of LEGO Education Wheel Sets
1 set of LEGO Bricks & More Deluxe Brick Box
4 sets of LEGO Bricks & More Builders of Tomorrow Set

There were no instructions, we just let the kids build whatever kind of car they wanted (first come first serve on the size of wheels though, which affected the drive too). If they had time, they were encouraged to test  and redesign their cars to see if they could make them go faster and further down the ramp/landing strip.

We used particle boards as race car ramps and placed them at different heights. Quickly, the kids learned the biggest ramp yielded the most desirable results. The link above has a good rundown on how the experiment went with our friends. It was one of our most popular Science Saturday event and will most likely be repeated in 2014.

Friday, November 22, 2013

Impulse and packaging bubbles

J loves popping all of our packaging bubbles (luckily for him, we do a lot of online shopping). He has experimented with the most efficient and satisfying way to pop the bubbles. One day, I decided to record his tactics:


He figured out that popping works best with a quick jump on the bubble, but he had a hard time popping the bubbles with his hands? Why?

With jumping:
1. He gets all of his weight (and then some - biomechanics, yay!) on the bubble.
2. The time he exerts the force is short.

With his hands:
1. Not all of his weight is transferred to the bubble (ie, he's not doing a handstand on it). Some of his weight remains on the ground while his legs hold him up.
2. The time he exerts the force is a lot longer when he uses his hands (the bubble takes time to deforms before it pops).

What simple science experiments have you done this week?

Saturday, November 16, 2013

Science Saturday: Halloween Goo!

We had our last Science Saturday of 2013 the weekend before Halloween and decided it would be most fun to celebrate Halloween with Goo! Here's the original silly putty science post. This Science Saturday activity was a repeat of this Silly Putty Science Saturday from last year.

I encouraged friends to dress up in Halloween costumes and then realized that it was going to get messy. Luckily, I found these disposable aprons on Amazon (affiliate link). We only had one casualty, an adult sweater sleeve, but I think he got enough goo out and it was recoverable.

In honor of the Halloween spirit, here's my Capt. Hook and Smee before the festivities:


We had fun mixing glue, liquid starch, and colors to make our silly putty. I'm still surprised about how much little kids love mixing colors and telling you what the combination of colors make. We had green, purple, orange, and all of the primary colors represented.

Our friends also had fun examining the physical properties of silly putty. If you pull it really fast, it rips pretty cleanly:


If you pull it slowly:


You can make a jump rope!

Thanks to everyone who showed up and had fun! I'm hoping to find a community room/center, so we can start Science Saturday back up in January or February (to make up for the 1-2 mo I'll be out of commission in the spring).

Monday, November 4, 2013

Rosie Revere, Engineer - Review

A few weeks ago we were browsing our local bookstore. While J was busy reading Curious George, I found this new book, Rosie Revere, Engineer (affiliate link). It caught my attention mainly because there is engineering paper on the cover! I picked it up and couldn't put it down. I even cried! It's now part of our picture book collection.

It starts with an introduction of a shy little girl who collects trash and recyclables (someone after my own heart!). She builds innovative contraptions for relatives, but they don't always turn out as planned. Her Great Great Aunt Rose (aka "Rosie the Riveter") gives her some sound advice about not giving up though her design didn't turn out (this is what had me in tears - sometimes we put our heart and soul into something and it fails, which sucks).

It was fun that this book makes a historical connection and has a great flow/rhyming rhythm. I recently read it aloud to J, who immediately wanted to find his book about building Handcrafted Playgrounds (from 1975, gifted to us by a dear friend) and start to design and build his own things (aka engineering). He was also pretty interested in the historical afterward the book provides about women in WWII and asked some questions about that (luckily, I am pretty fond of history too).

All in all, I love the message of the book that it's ok that your designs don't work right the first time, just as long as you don't give up trying. I'm also all for strong female engineering characters. I highly recommend this book as an addition to your nerdy library.


Disclaimer: I purchased Rosie Revere, Engineer, and opinions expressed in this review are my own.

Saturday, November 2, 2013

Does it dissolve?

We subscribed to the Magic School Bus Science Club when I found a half off coupon (making each kit ~$10/mo). J is a little young for the intended age group, but many of the experiments he can do with guidance. He gets so excited when he sees the Magic School Bus package on the doorstep. We usually do an experiment the following weekend (though we haven't done more than 1-2 before the next month arrives - they are saved for later use of course).

This month's experiment packet was on water. The experiment that we chose was Substances Dissolving in Water. We used their recommended mixtures and added another (see details of the experiment below). We also didn't use test tubes standing up in clay, as they recommended. Instead, we used custard bowls and mixed the substances with clean spoons.


Materials:
*6 custard dishes filled half way with water
*vegetable oil
*food coloring
*salt
*sugar
*sand

Hypotheses:
*Guess whether the material will dissolve (go away) when combined with water. A good way to think of it would be: can you separate out the material to get just water + material after you combined them? If you can't the material dissolved.

J's Hypotheses: Does the material dissolve?
*Water and oil: Yes
*Water and salt: No
*Water and sand: No
*Water and food coloring: Yes
*Water and sugar: Yes

Directions:
*Add a few drops of oil to one cup and stir.
*Add a few drops of food coloring to one cup and stir.
*Add a teaspoon of salt to one cup and stir.
*Add a teaspoon of sugar to one cup and stir.
*Add a teaspoon of sand to one cup and stir.
*Observe your matter. Did each one dissolve in water?
*Record your observations.

Results:
*Water and oil: No
*Water and salt: Yes
*Water and sand: No
*Water and food coloring: Yes
*Water and sugar: Yes

Oil at the top, water below (not dissolved)
J loved this simple science experiment. His hypotheses were all over the place, but now if he does this experiment in school, he'll know which material dissolves in water.

I can't wait to try other experiments from the Magic School Bus.

Monday, October 21, 2013

Melting Ice and Colors!

I've seen this activity a few places, but this ice and color lesson caught my attention on Pinterest last year.

I thought I'd share our experience with melting ice and colors and how we conducted the experiment. J had a great time, and he really directed the lesson. I was happy with how it turned out!

We tried to fill the ice cube trays with primary colors (red, blue, yellow) food coloring and then added the water, and it was a disaster. I rinsed out and started over. We filled our ice cube tray 1/2 full of water (to give us a little wiggle room putting into the freezer) and then added the primary food coloring drops (4 drops per cube). We stirred each color with its own spoon (so we didn't cross contaminate colors before we even started our experiment).


We froze the ice and then placed them into clear custard bowls. We put two ice cubes in each dish, making sure each of the colors mixed (yellow/blue, red/blue, red/yellow). J predicted/hypothesized what was going to happen in terms of colors using little note cards in front of each dish, using markers for his predictions of colors.


I particularly like the yellow, which didn't show up in the wide shot above (see close-up below). I also liked the purple heart and the orange pumpkin.


Now, let me warn you that cheap food coloring is hard to wash off of hands. Both J and I were dyed for a day or two (surprisingly, the clothes remained unscathed):


We let the ice sit through naptime and brought out the paint brushes to see if his hypotheses were correct. He was spot on with his predictions:


Now, J was thinking like a true scientist, "What if..." He wanted to know what would happen if he mixed all of the colors. He tried dipping his brush into all the colors and then painting, but that would just end up the color of the last color he dipped in. Grandma suggested doing dots of each color and spreading them around:


It made brown! However, J wasn't super satisfied or convinced. He wanted to combine all the colors into one big bowl.


He painted with it, and he ended up at the same solution: brown (see brown line above the red line, below)


I loved making this experiment our own, how simple it was, and how excited J got about experimentation.

Sunday, October 13, 2013

Why I've been slacking


Time to announce why I've been feeling so bad for the last few months. I'm hoping to have some more energy soon. We're all excited.

Sunday, October 6, 2013

Melting Ice

Objectives:
*Measuring temperature
*Phases of water
*Hypothesis formation

Background:
J wanted to do science, and I have been a slacker the last few weeks/months. I wanted to see how well J did with reading a thermometer and making hypotheses (educated guesses), so I put together a melting ice science project on the fly. We even put it in J's Science Lab Notebook.

Methods and Materials:

Basically this project consists of  filling a clear glass full of ice and taking the temperature throughout the day as it melts.


Hypthesis formation:

I asked J, "What will happen to the ice?"
-He replied, "The ice will met to water."

I then asked, "How much water will be in the glass?"
-He stated, "To the top of the glass!"

Taking the measurements:

We set up the experiment and ran a few errands and took naps. I'm pretty sure we have a digital thermometer, but analog is more fun. J was able to tell what numbers the thermometer read (at least to the nearest 10).

10:35a: 20 deg F
11:00a: 30 deg F - ice is beginning to melt
1:00p: 32 deg F - ice is 1/2 way melted
3:00p: 60 deg F - ice is melted
5:45p: 70 deg F - water is now room temperature.


Note, the ice melted to water and the glass was half full (or half empty?). Volumetrically, ice takes up more space than water, which is why when you don't get free refills on your drink, you want less ice so you end up with more liquid.

J was pretty disappointed that he guessed wrong, but I told him that's ok. It's why we experiment, so we can learn more. Next time he'll know the answer. He was pretty excited for this impromptu science lesson.

Stay tuned for our colored ice cube experiment which we set up yesterday to do sometime soon.

Wednesday, September 25, 2013

M&M Math - Science Saturday

Sorry for the delay. I had a pretty wicked migraine last week that took me out most of the week.

To recap our September Science Saturday: we had a beautiful Saturday afternoon on the 14th and a great turnout of math lovers (my kind of people).

Now, I created this lesson from a second grade lesson that I only remember had to do with M&M and math (yes, 20+ years ago, when I was in 2nd grade). I wanted to bring it down to the preschool level: basic counting, addition, and I introduced the concept of division (sharing the M&Ms) just to see how well it went over.

Here's what I created as worksheets:
M&M Math Lesson for Preschoolers
M&M Bar Graph

I chose a paper cup full of M&Ms instead of a bag of M&Ms. I was pretty good at scooping out right around 40 M&Ms/cup. The parents guided the kids through the worksheets - surprisingly, the kids were patient enough to do the math before eating the M&Ms.

I had the kids count their M&Ms. The best method was to dump them all out and count them as you put the M&Ms back in the cup:


Then, the kids sorted their M&Ms by color and counted the amount in each color:


Then I had the kids add the primary colors (red, blue, yellow) and then the secondary colors (orange and green since there is no purple). This was exciting for most of the preschoolers since they knew what primary and secondary colors were.

The wild cards were the concept of division and the bar graph. I introduced division as sharing their M&Ms. If you split your M&Ms equally between everyone in your family, how many would each person get? I suggest getting a paper cup for each family member and putting M&Ms one at a time in everyone's cup until the M&Ms are gone. Then count the piles to make sure they are equal. If they aren't, how many are left?


For the bar graph, I made it optional since I wasn't sure of the attention span on the beautiful Saturday. Most kids wanted to do it. I recommend transcribing your color counts below the labels on the x-axis (the colors) and using the same color crayon as M&M to color how many M&Ms of that color you have. I told the kids to find the number on the graph (y-axis), draw a line at that number, and color from 0-the number of M&Ms in that color (I have the axis counting by 5's and put on a minor axis of 1's). The kids were then able to visually assess which color(s) had the most M&Ms.

I hope this is successful for you. We had a lot of fun! It's just in time for Halloween, so feel free to use packets of M&Ms instead of cups of M&Ms. Cups were pretty easy for the bulk necessary for Science Saturday (and most likely classrooms).

P.S. I was asked by parents of really young kids how kids learn how to count (like without skipping numbers or getting stuck in transitions between decades). My answer: practice. J had a hard time, and we just practiced. He can now count to over 100 before getting bored, without mistakes most of the time. Hopefully, you can find and state the patterns as you go along (like from 20-100 everything goes decade+next number ie. twenty-one, twenty-two...and 40-90 sounds just like their unit digit (four-ty, six-ty, etc. though fifty is hard since it's not five-ty)).

Related Posts:

Wednesday, September 11, 2013

Telling Time for Beginners

We picked up this Dr. Seuss foam clock from Target. It was something that J really wanted, and I was hoping we can learn a little more about time from an analog (non-digital) clock.


J has always been an early riser in the morning. We got a digital clock when he was around 18 months, so he can start recognizing numbers, in hopes that he would understand not making a peep until 7:00 am on Saturday mornings. It worked to an extent.

At 4, he can tell us what time the digital clock reads. He is able to say if his school is closed if it's after 6:00 pm. However, he still doesn't understand that the next numbers in minutes after 59 is 00.

So when we saw the clock at Target for $0.50, I figured whynot? It'll at least start the discussion about time.

Points we've discussed so far:
1. The hour hand is the little arrow. Wherever the little hand is first, that's the first number you say. On real analog clocks, the little hand moves slowly to the next number as the big hand ticks away the minutes. This is a little too advance for my 4 year old at this moment. If your kid is grumpy about the little hand not being exactly on 3 when it's 3:30, explain that you take the number you come across before the arrow when going around the clock (ie. if it's between 3 and 4, you get to 3 first when tracing the edge of the clock with your fingers, clockwise).


2. Each of the numbers represents 5. Starting at 1, we are learning to count by 5's around the clock. This is a really hard concept. I don't know how best to explain the numbers and that 1 really means 5 minutes and 2 really means 10 minutes, etc. If you have insight on helping pretty little kids understand minutes of the clock or counting by 5's, I'd appreciate any help.

Reception: J likes to learn about the clock. He'll bring it to me with a time that he sets and asks me to tell him what time it is. We'll work through the problem together, and he typically asks for another time problem. We have yet to get past two separate time telling problems at a time.

You can make your own clock with a paper plate, two arrows (print them out from Word or the internet), and a brad. If you make your own, you can decorate it however you and your child desires.

How have you introduced time telling in your family? Have you been successful?

Sunday, September 8, 2013

Science Saturday, Sept 14 - afternoon

I haven't been feeling well over the last month and this Saturday (Sept 14) is our only free Saturday of the month for Science Saturday. I was hoping for something quick, fun, and easy with minimal prep needed on my part.

I'm very excited about M&M math since math is my first love. We'll have small tupperware cups that can be filled to the parent's desires for M&M math. There would be a worksheet about counting, addition and subtraction, and making a bar graph.

Details: Sept 14 3-5p
SF Bay Area, CA (email me using the address on the side bar << for specific details)

I'm still thinking of ideas for October. We might do silly putty/goo or volcanoes. Hopefully, I start feeling better soon.

Edited: 6:30p 9/8/13 with the decision for M&M math over paper airplanes.

Sunday, August 25, 2013

Recyclable Racers

I can't tell you how many times a toilet paper tube has saved my sanity as a mom. Punching four holes with a simple hole punch and using a stirrer straw or a kabob skewer for axles takes 3 minutes max and can lead to hours of play. You can attach a balloon to a straw with a rubber band and then attach the straw to the recyclable via double sided masking tape. After blowing up the balloon, watch it race across your house, driveway, backyard, park, wherever! If your kid is too small for balloons, set up a cardboard box as a ramp and bring on the giggles. You can also add a sail to the car and watch the car move as your child blows on it. Sharing this knowledge was the goal of this month's Science Saturday.

We had a great turn out for our Science Saturday this month! We had it in a park with great sidewalks and access to sand (for weight), but unfortunately, we only one table to assemble things. It was crowded, but we sure had some fun. The goal was to learn about equal and opposite reactions, friction, and general engineering (tweaking your designs for better performance).

How to make your own recyclable racer:


1. Pick out a recyclable you think will make a great race car. I'm always fond of soda bottles. Water bottles nowadays are made with less plastic and are too squishy. I also wouldn't recommend aluminum cans since they are squishy and super light.

Tape standard straws to the bottom of the recyclable
Weigh down the car with washers or sand if necessary

2. Attach two pieces of a normal size drinking straw (small pieces are fine, think cut into 4ths or more) to the underside of your recyclable. This will hold your axles for the wheels, allowing them to move without friction. Note, in previous versions of balloon racers, I used an awl and pre-punched holes into the bottles. Using straws gives you a lot more freedom with adjustments (I hardly ever punch straight holes) and is safer all around (luckily, no battle wounds from before). You want the straw pieces to be parallel to each other and as straight as possible (perpendicular to the direction you'd like the car to move).

3. Stick your axles through the straws. We used stirrer straws for the little recyclables and kabob sticks for the bigger ones. I'd recommend chopping off the points of the skewers before giving to a small child.


4. For wheels, we pre-drilled holes into bottle caps, I made some circular corrugated cardboard wheels using a compass-like tool for cutting circles (affiliate link), and I bought some foam discs. Nobody chose the cardboard wheels. It was split pretty 50/50 on foam and bottle cap wheels.

5. Attach your wheels to the axles. I recommend that the wheels not touch the recyclable since friction will slow down your race car. At this point, you can glue them into place with a hot/warmish glue gun. Whether you use a press fit or you glue the wheels, the wheels should spin with your axle. Make sure the wheels are straight or your car might veer.

6. Attach a balloon to a straw with a rubber band. I found the bubble tea straws (affiliate link) work really well (we cut them into 3rds to reduce costs - though I linked to Amazon, I found these at our local BB&Beyond for $2). You can use a standard straw, but you have to walk the fine line between the rubber band being too tight and crushing the straw or not being tight enough and you can't blow up the balloon.

7. Tape the balloon to the car. I recommend a place where it can hang off the back and you don't have to keep taking it off and on to blow it up.

8. Blow up your balloon and pinch tight, or put your finger over the straw to block the air. Set your car down and let go of the balloon.

9. If your car flips, consider weighing it down (washers or sand do a great job). You can also switch what direction of your car is front (ie. flip the balloon around so it points from the opposite end of the racer).

10. Make adjustments and see if your car can go even faster!

I was able to pull out my camera for video of a few racers we had in the middle of the activity. Parents had to help the little ones blow up the balloons, but fun was had by all:


I think these racers went further than last years balloon racers!

Related Posts:

Sunday, August 18, 2013

Next Science Saturday and Apologies

The next Science Saturday is this Saturday, August 24, 2013.

We'll be making race cars out of recyclables and learning about gravity and equal and opposite reactions. You can make balloon racers, sail cars, or figure out how to make your car run using forms of energy (elastic, potential, etc). It'll be tons of fun! Bring your own recyclable or use some of the ones we'll bring.

Email me using the link on the left <<, and I can give you detailed information of Science Saturday.

In other news, I apologize for taking a little bit of a blogging break. We still have been doing science at our house. I have two lessons half way composed. Hopefully, one of them will make it to the blog by the end of the week.

Saturday, August 10, 2013

Pocket Frog

J's school has been doing some cool themed weeks this summer. They've had two weeks learning about the ocean, and the last two weeks were spent learning about the rain forest. On Wednesdays, they have an opportunity to bring something to share with the class that is related to the theme (think "show and tell").

Lucky for J, I was one of those Beanie Baby collectors (not hard core, and J has since ripped off most of the tags). I think we've found a different Beanie Baby to share each week for the past month (thank you McD's). Anyways, this past Wednesday as I was dropping him off at school, J insisted on keeping his "red eyed tree frog" in his pocket instead of his cubbie. Immediately, I thought of this engineer and the frog joke, and left school with a gigantic smile on my face. I made a mental note to share with you in case you haven't heard it.

I love my mini-nerd.

Tuesday, August 6, 2013

Which cookie would you choose?

We made cookies for dessert, and J got to select the one he wanted. He took his cookie before I got the picture, but he definitely knows if you only get one cookie, you better select the biggest one for the most pleasureful experience. There was one larger, standout cookie that was the cookie that got the excess batter at the end of the batch.

While helping me dish out how many cookies fit on a pan, we counted 4 rows of 3, which made 12 cookies!


Or is it 3 rows of 4? It's still 12 cookies!!

I love incorporating math into our everyday lives.

Wednesday, July 31, 2013

Wedding Reception Science: Sink or Float

Wedding receptions can be tricky with a four year old. Luckily, J loves science!


I think J accidentally dropped something in his lemonade, and instead of making a fuss about it, we turned it into a game/science lesson. Thankfully, the reception was outside, and this game wasn't too messy.

*Note that an item being more dense than water/lemonade doesn't necessarily mean it is heavier. However, heavier and lighter are terms a four year old can understand.

I love when we can find an impromptu science lesson.

Related Posts:
*Sink/Float
*Submarine Sink/Float

Monday, July 22, 2013

Curly Green Bean and Garden Update

I love the differences in nature.


Remember our garden? It was so great that the neighbor rodents were enjoying the cucumbers more than us! We would leave the cucumbers to get just a little bigger, and then they'd disappear overnight! The biggest ones were getting to be about half of the size of grocery cucumbers:


I was getting very frustrated. Right around the same time, MaryAnne at Mama Smiles posted about keeping animals away from your garden with pepper. I tried it, and we got a few more cucumbers, but these animals were relentless. I finally got frustrated enough to buy netting. We put it all around our planter and made a few holes, which we tied up with twisty ties (so we can access our produce easier). The sneaky animals have found a way to eat through the mesh, but we tied that up those holes too. The last two weeks, we've been having a lemon cucumber and a regular (almost store size) cucumber a night.


The animals don't like our green beans (they are missing out because they are awesome right off the vine - we're a raw veggie kind of family). They also haven't touched our green peppers. I'm thinking they like the cucumbers due to the water content. The cucumbers seem to go missing on very hot days.

In terms of other problems we've encountered in our garden:
1. Our leaves turned yellow: the internet says this can be caused by basically anything, like over watering, under watering, not enough nitrogen, not enough iron, disease, bugs, etc. We tried not watering and watering more with no change. We bought plant/vegetable food from the local hardware/garden store and fed our plants. They were looking much greener two days after the food, which included nitrogen. Our box of plant food says to feed every 7-14 days. We went 21 days since the last feed and decided to do it again since the leaves were yellowing.
2. Our cucumber leaves got crunchy and died: this seems to be part of the life cycle of the cucumber. This is different than the yellow colored leaves. We are still producing quite a bit of cucumbers, so I'm not worried.
3. We were afraid the green peppers in the back of our planter wouldn't get enough sunlight, but they are producing peppers now. Last year we tried the peppers in an upside down planter. We got 5-6 small peppers. They turned red while we were waiting for them to grow bigger. That's when we learned that red peppers are just ripened green peppers. This year's pepper plant grew much taller and so far has 3 peppers which are all larger in size than last year. It looks like more peppers are possible.

How is your garden growing? J usually gets first dibs at everything. It's so exciting to see him so willing to munch on a handful of green beans and offer beans and cucumbers to his neighborhood friends. We've introduced a few families to the wonderfulness of lemon cucumbers.

Wednesday, July 17, 2013

Stuck in Cornstarch

Last week, our friends invited us over for some oobleck fun with cornstarch in a kiddie pool. I figure the video is still appropriate since J keeps bringing up how much fun it was. I finally uploaded a video from John's phone that shows what happens when you stop moving while walking on cornstarch+water.


Poor J. Don't worry, he was rescued and lived to tell the tale of being stuck in goo.

Science is awesome!

Saturday, July 13, 2013

Science Saturday, Ice Cream!

I scream. You scream. We all scream for ice cream!

We had our best turn out for Science Saturday. The park was full of little chemists learning how to cool their ice cream mixture using salt + ice (it works by lowering the freezing point of water). Here's the basic ice cream in a bag lesson. We tried reducing the amount of cream and tried a single baggie for the ice cream mixture (instead of double). The recipe worked very well with all milk and with milk/cream combination. Some parents opted to go with a reduced sugar recipe (using 1 T instead of 2 T), and there were no complaints.

If you're doing this on a larger scale: For about 30 kids, we needed about 30 pounds of ice (1 lb/person), 12 lbs (three 4 lb boxes) of ice cream rock salt, 2 gallons of milk, and 1/2 gallon of cream. Since we used the remainder of our bulk vanilla, so I can't tell you how much. It was probably at least 2 oz. The recipe uses a pretty minimal amount of sugar, so a small box/bag of sugar will definitely suffice. We also had some mix-in like sprinkles and mini chocolate chips.

Experiment on your own! You can try other ice cream recipes. This method to make quick ice cream should work in theory on anything you'd put in an ice cream maker. Enjoy a cool summer treat while learning about science.

Sorry, I was too busy with ice cream making that I didn't get a chance to take pictures of the event. Trust me, we all had a good time!

Friday, July 5, 2013

Cornstarch in a kiddie pool

Did you ever want the feeling of walk on water?

It's not my idea, but thought I'd share. Our friends invited us over for this event. They had somehow acquired over 150 lbs of cornstarch**, which they promptly added to a kiddie pool filled with about 4 inches of water. The end result was a lot of fun. J had just as much fun playing on the goo than he has had at other parties with bounce houses. Think of our Goo experiment on a much larger scale. I call it goo, but I think the technical term for cornstarch and water is oobleck.

Oobleck is a Non-Newtonian fluid.

Viscosity of a non-Newtonian fluid depends on the shear rate. The key is, keep moving. If you stop moving, you'll sink, and the liquid is so viscous, you'll get stuck. The best way out would be to move as quickly and forcefully as possible, ie. jump if you can (apply a shear force).


Science is fun!


Thanks to our friends who invited us over for the science fun.

**A quick search yielded 50 lb bags of cornstarch for $25. It's not an "every day" science type of experiment, but it's definitely fun to try if you get the chance.

Related Post: 
*Stuck in Cornstarch!

Sunday, June 30, 2013

Follow-up: Baggie Ice Cream Temperatures

We made baggie ice cream again for dessert tonight (it's been a warm weekend and cold ice cream tastes so good).

My new thermometer (affiliate link) arrived last week, so I thought I'd report on the temperatures of the experiment.

The rock salt and the ice mixture started out around 31.7 degrees Fahrenheit (freezing temperature of water is 32 degrees F, so the salt was already starting to work). After 10 minutes of play, the temperature of the salt/ice mixture reached 18.0 degrees F. The ice/salt mixture was so cold that it froze the condensation that was coming off of the bag! Salt does lower the temperature of ice.

I didn't measure the temperature of the ice cream mixture because I didn't want to wash the probe before (lazy, I know). I'd recommend washing your thermometer after the salt/ice mixture measurements as salt can cause damage to some materials.

Wednesday, June 26, 2013

Baggie Ice Cream!

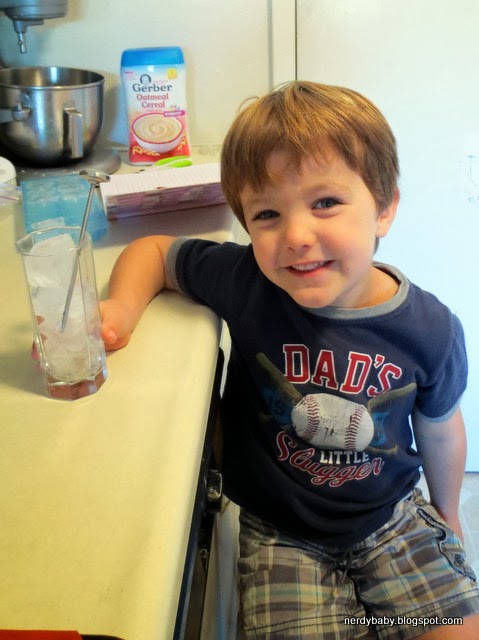
We started off the week making ice cream in a ball, but as far as Science Saturdays go, ice cream made with the ball is not very feasible on a larger scale since it takes over 20 minutes and the balls are expensive.

Instead, we took some knowledge from the recipe book of the ice cream ball (the heavier the cream, the faster it'll freeze) and combined it with this ice cream science activity from 3M. The ball recommended heavy cream for the fastest freeze time, and the 3M activity says 1 cup of milk or half and half would work. Personally, I didn't like the taste of all cream ice cream, and all cream would get expensive on the larger scale. I tried 50/50 this time, but I think I'll still like the taste better with even less cream (I'm a lighter ice cream gal) - so even more experimenting here before Science Saturday next month.

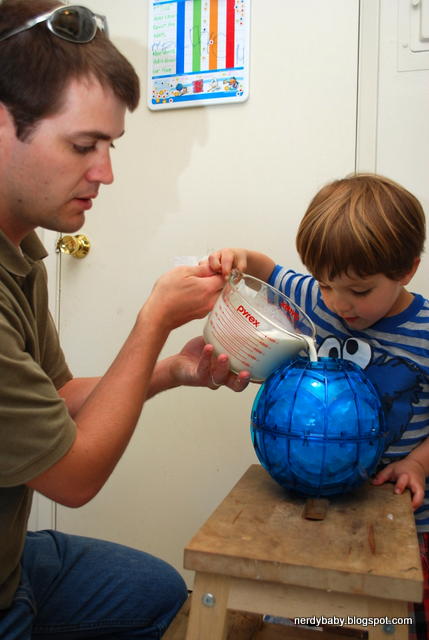
J's a little young to understand the lowering of the freezing point of water using salt. It doesn't help that we live in a place where it doesn't freeze, so we don't need to salt our sidewalks during winter time. I also wanted a 10 minute maximum for attention needed. The mixing of ingredients and change of matter is scientific enough for my four year old, and the fact that he gets ice cream at the end of it kept his attention fairly well (in fact, it made him pretty hyper).

Ice Cream Recipe (adapted from 3M activity)
1/2 cup heavy whipping cream
1/2 cup milk
1/2 tsp vanilla
2 T sugar

-Combine all ingredients into a quart sized zipped baggie. Zip the baggie, letting out all possible air.
-3M says to double bag the ice cream so we did (again with no air bubbles since air acts as insulation). I'm sure this is just so the ice doesn't accidentally puncture the ice cream mixture. I'll take extra precaution to ensure non-watery+salty ice cream.
-Place ice cream in a gallon sized zipped baggie full of 4 cups of crushed ice and 1/2 cup of rock salt. Zip the gallon baggie, and 3M says to gently shake. J got a little excited with the shaking that by no means was it gentle.

We set a timer for 10 minutes and started shaking the baggie around on squishing/mixing the ice cream with our hands. However, after a minute or two, the ice + salt got too cold for our sensitive hands. Instead of reaching for our "winter gloves" which I just thought about, John grabbed a towel and wrapped the ice cream + ice in the towel. We tossed it around that way for a few minutes. We combined it with punching/kneading the baggie through the towel.


The timer dinged after 10 minutes and the ice cream was perfect! It was enough to even split between J and me. Despite our cold hands setback, this method was actually easier and less to clean up than the ice cream ball. All we had to do was toss the bags - no dishes other than the few measuring devices and the bowls we transferred the ice cream to. You could enjoy the ice cream right out of the baggie instead of bowls.


The seal of approval

One satisfied scientist

Discussion for younger kids:
*What ingredients are you mixing together? What if you vary the ingredients (ie the ratio of milk to cream or additives like cookie pieces or chocolate chips)? Do you think it will work the same? How do you think it will taste?

*Is the ice cream mixture solid, liquid, or gas when you mix it together? What about when it becomes ice cream?

*Is ice hot or cold? When we stick something in ice does it get hotter or colder? What about the ice; does it get hotter or colder?

*What happens if we just stick the ice cream mixture in the freezer? How long will it take to freeze? Does it taste the same as the ice cream you made in your baggie?

Add on discussion points for older kids:

*What did the salt do to the ice? Why did the salt melt the ice?

*Get a thermometer and measure the temperature of the ice cream mixture, the ice before adding salt, the ice immediately after adding ice, the ice cream after it freezes, the ice + salt mixture after the experiment is over. What did you observe? What's the freezing point of water? Is the ice + salt mixture below the freezing point of water?

All in all, baggie ice cream was a success, and I do think ice cream making would be feasible for the next Science Saturday. Tentatively, we're scheduling it for Saturday, July 13th (of course we depend on weather and family wellness). Shoot me an email if you want specific details. Hope to see you then!

Related Posts:
*Baggie ice cream follow-up: temperatures of ice+salt.
*Science Saturday in the park: ingredients needed for 30 kids.
*Make ice cream in a ball

Sunday, June 23, 2013

Ice Cream Making - It's Science!

This was my second year with BioX Kids' Day, and both years, I saw many kids having fun with the YayLabs! ice cream ball in the chemistry booth nearby. I wanted to try, but the day is so jam packed that there is no breaks for helpers (at least from my experience).

How does ice cream making work? The key is getting the mixture to mix around while surrounded by salt and ice. Salt is a special ingredient that lowers the freezing point of water (ie. it melts the ice to make colder than ice water!!).

I think J's school has made ice cream with the kids, but I wanted to do it on my own with him. I decided to purchase the ice cream ball from Amazon (affiliate link) (as a bday gift to myself - thanks to my bro and sis-in-law).

The ball came with a simple recipe: 1 pint of cream (we used heavy whipping cream), 1/3 cup + 2T of sugar, and 1.5 tsp of vanilla.

After filling the ball portion with crushed ice and rock salt (Safeway had a box of special ice cream making salt for $0.99 - it's not food grade, but it's great to use in experiments like this since it won't be directly touching what we'll eat):


we mixed the ingredients in a separate bowl:


and poured into the ice cream compartment:


Don't forget to seal both compartments!

Then we got to tossing/rolling.


The book that came with the ice cream ball had approximate freeze times for ice cream. The heavier the cream, the faster the freezing time. Since we used the 2nd heaviest cream (heavy whipping cream), we decided 20 minutes would be a good time based on their recommendation.

And this is what we got after 20 minutes of "play":

A little soupy

I was warned by a few parents at the last Science Saturday when brainstorming ideas for the next Science Saturday that ice cream making does take a long time, which is why I'm currently testing the ideas. Really, the ball took 20 minutes and it was soupy (but still good enough to eat as ice cream). Keeping J's attention that long was tough. Plus, it's too expensive to get enough ice cream balls to make it worth while for a Science Saturday event.

However, I'm still determined to make ice cream making work on a larger scale for a Science Saturday event. Tonight, we had much more success just making ice cream in a baggie. I have pictures, video, directions, and activities surrounding baggie ice cream that I'll post later in the week. Stay tuned.

Until then, I hope you are enjoying your summers thus far!

Related Posts:
*Make ice cream in a baggie

Wednesday, June 19, 2013

Math Land Barbie

I'm a nerd. I've always been. I was forced to clean out my parent's house back in March. Since I'm the only one in my family with a kid of my own, I "inherited" all of the board games. Included in the games was one I only semi-remember making in 11th grade trigonometry/pre-calculus. I'm pretty sure it was an assignment though looking back at it, I went waaaaay overboard.

A friend gave me the Dream Date Barbie board game for my 10th bday. It barely got used. When we got this assignment, I thought it would be fun to have something smart related to Barbie. I was willing to sacrifice the board game for the math assignment. I combined it with a new version of Candy Land (which retails under $10) to make the one and only Math Land Barbie.


I used the Barbie and Ken pieces and pasted the Barbie themed tiles over the Candy Land graphics.


All of the Candy Land cards have word problems written on them. The double color cards have double problem sets. I believe they were color coded based on level of problem solving difficulty. I'm sad to admit that some of the questions will need references in order to solve again (luckily there's an answer key, with work shown, that comes with the game!! Time to relearn up through trig/pre-calc math).


Anyone up for a math challenge? Maybe we can play virtually. Otherwise, I'm considering giving the to my littlest bro-in-law who will be majoring in math in the fall for some nerdy dorm fun at college.

A special shout-out goes to Mrs. E. for the fun assignment and math memories.