Showing posts sorted by relevance for query balloon racers. Sort by date Show all posts

Sunday, August 25, 2013

Recyclable Racers

I can't tell you how many times a toilet paper tube has saved my sanity as a mom. Punching four holes with a simple hole punch and using a stirrer straw or a kabob skewer for axles takes 3 minutes max and can lead to hours of play. You can attach a balloon to a straw with a rubber band and then attach the straw to the recyclable via double sided masking tape. After blowing up the balloon, watch it race across your house, driveway, backyard, park, wherever! If your kid is too small for balloons, set up a cardboard box as a ramp and bring on the giggles. You can also add a sail to the car and watch the car move as your child blows on it. Sharing this knowledge was the goal of this month's Science Saturday.

We had a great turn out for our Science Saturday this month! We had it in a park with great sidewalks and access to sand (for weight), but unfortunately, we only one table to assemble things. It was crowded, but we sure had some fun. The goal was to learn about equal and opposite reactions, friction, and general engineering (tweaking your designs for better performance).

How to make your own recyclable racer:


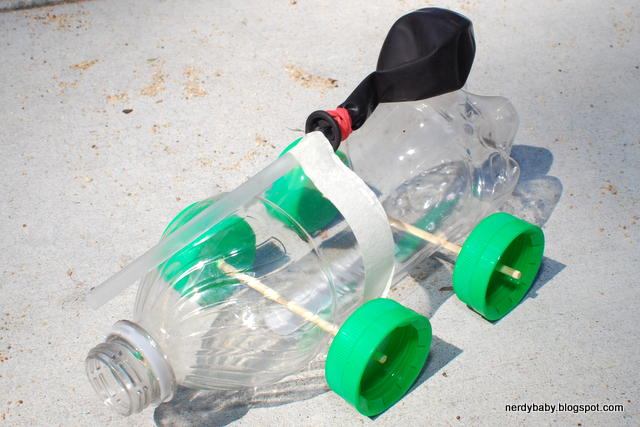
1. Pick out a recyclable you think will make a great race car. I'm always fond of soda bottles. Water bottles nowadays are made with less plastic and are too squishy. I also wouldn't recommend aluminum cans since they are squishy and super light.

Tape standard straws to the bottom of the recyclable
Weigh down the car with washers or sand if necessary

2. Attach two pieces of a normal size drinking straw (small pieces are fine, think cut into 4ths or more) to the underside of your recyclable. This will hold your axles for the wheels, allowing them to move without friction. Note, in previous versions of balloon racers, I used an awl and pre-punched holes into the bottles. Using straws gives you a lot more freedom with adjustments (I hardly ever punch straight holes) and is safer all around (luckily, no battle wounds from before). You want the straw pieces to be parallel to each other and as straight as possible (perpendicular to the direction you'd like the car to move).

3. Stick your axles through the straws. We used stirrer straws for the little recyclables and kabob sticks for the bigger ones. I'd recommend chopping off the points of the skewers before giving to a small child.

4. For wheels, we pre-drilled holes into bottle caps, I made some circular corrugated cardboard wheels using a compass-like tool for cutting circles (affiliate link), and I bought some foam discs. Nobody chose the cardboard wheels. It was split pretty 50/50 on foam and bottle cap wheels.

5. Attach your wheels to the axles. I recommend that the wheels not touch the recyclable since friction will slow down your race car. At this point, you can glue them into place with a hot/warmish glue gun. Whether you use a press fit or you glue the wheels, the wheels should spin with your axle. Make sure the wheels are straight or your car might veer.

6. Attach a balloon to a straw with a rubber band. I found the bubble tea straws (affiliate link) work really well (we cut them into 3rds to reduce costs - though I linked to Amazon, I found these at our local BB&Beyond for $2). You can use a standard straw, but you have to walk the fine line between the rubber band being too tight and crushing the straw or not being tight enough and you can't blow up the balloon.

7. Tape the balloon to the car. I recommend a place where it can hang off the back and you don't have to keep taking it off and on to blow it up.

8. Blow up your balloon and pinch tight, or put your finger over the straw to block the air. Set your car down and let go of the balloon.

9. If your car flips, consider weighing it down (washers or sand do a great job). You can also switch what direction of your car is front (ie. flip the balloon around so it points from the opposite end of the racer).

10. Make adjustments and see if your car can go even faster!

I was able to pull out my camera for video of a few racers we had in the middle of the activity. Parents had to help the little ones blow up the balloons, but fun was had by all:


I think these racers went further than last years balloon racers!

Related Posts:

Tuesday, April 24, 2012

Balloon Racers in the Park

We had our first family science day in the park on Saturday.  It was so much fun.  We had lots of friends show up and make balloon race cars.

Here's J and Big J making a prototype before everyone showed up.  J decided on the recyclable, balloon, straw, and where to attach it.


J's race car:

We got so engrossed in balloon racer making that we didn't get a chance to take photos of everyone making their race cars.  However, we got some shots of fantastic racers:


And the races!

The off-roader

This one won the distance challenge
There weren't rules against double balloons

A 4 yr old friend let's the smallest balloon racer go
It was weighed down by sand.

It decided it wanted to play in the sand

Go, go, go

Lessons learned:
  • Balloon racers don't always behave as you want them to behave.
  • Wheel alignment is a key to straight travel.
  • More balloons = more power!
  • Sweep the ground before trying your racers.
  • Make sure your cars are directed downhill (might as well work with gravity).
  • If your balloon is too powerful, add weight to help drive your car (sand, rocks, etc).
  • Don't eat ranch that has been around 15 little kids who double dip.
  • Kids LOVE cones!


We're so thankful for everyone who came to enjoy science with us this weekend.  I am hoping to make family science day a regular occurrence (hopefully with a snazzier name too).  If you are interested in joining our fun, I'm compiling an email list for our science family days in the park in the SF Bay Area.  Please email me (see link on << side bar) to request to be on this email list.

P.S. Here's a how to for our original balloon racer and why we went with the recyclables we chose.

Related Post:

Saturday, February 23, 2013

Another ivillage highlight: Balloon Racers

ivillage (NBC Universal's parenting website) recycled the Balloon Racers piece from this past summer (page 6) for a piece on reusing cardboard for fun. It's nice to have new viewers to the blog. They link to the preschool tag, so you have to scroll a bit to get to the balloon racers we did in April 2012.

Here's a better link if you are looking for instructions: balloon racers.

Enjoy your racing!

Monday, April 16, 2012

Balloon Racers

I've been meaning to play with quick and easy materials to find a fun balloon racer to make at home.

Here's what I came up with:


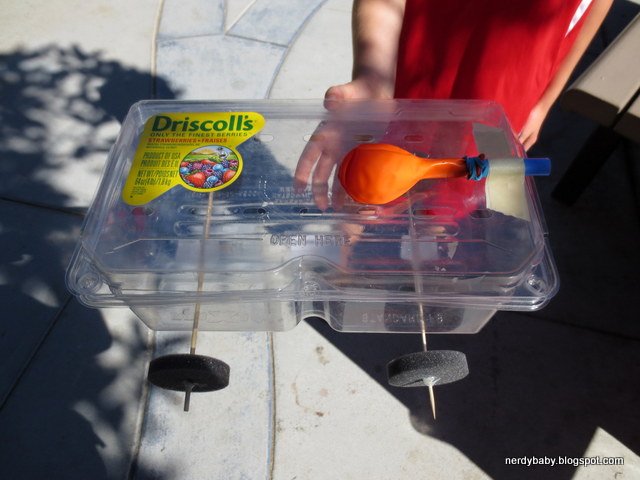
Strawberry containers:

Benefits:
  • Many holes = less work for me!
  • Basket for the balloon to sit in/attach to easily (I attached it with a rubber band using a girth hitch knot).
  • The basket can also carry weights if you chose some of the variation activities.
Cons:
  • Lightweight, easily flips over.

Salsa containers (wheels):

Benefits:
  • Due to my lack of motivation for cooking and the easiness of a nearby take-out Mexican fast food chain, we have PLENTY of these around the house.
  • They are round-ish and bigger than bottle caps.
Cons:
  • Hard to poke holes into (cheap plastic).  We tried to drill, ended up with a gentle poke of an awl.
*We used wooden skewers as axles and attached the salsa cups via press fit (you could glue them into place too).


Balloon and straw:
  • I used a standard size birthday balloon.
  • I attached the balloon to a cheap, standard bendy straw with a rubber band.
    • Be careful not to squish the straw with the rubber band being too tight.


Here's how my balloon racer runs:


Variations:
  • Try different sized balloons.
  • Try attaching it to different size straws (vary diameter and length).
  • Add weights (easy with a strawberry basket).
  • Try to see if your racer runs on different surfaces (tile, carpet, sidewalk, asphalt).
  • Use different materials.  You'd be surprised at what you can make from your recyclables collection.
  • Steer your vehicle by placing the straw at different locations/angles and see what happens.

Here's what happens with a bigger straw and our basket:


Why?  The straw wasn't connected straight (hence the crazy sideways motion) and the forces from the straw were so great that the light basket just flipped over!


Lessons learned:
  • Newton's third law: for every action, there's an equal and opposite reaction

J's Quote:
  • I used making a cool science balloon race car as a bribe for him eating his dinner.  He held me responsible.
    • (Passing me the strawberry basket that's been on our counter for a week) "Mommy, let's do science!"
    • We got so excited about science that we forgot about dessert.

Monday, January 21, 2013

2 years of Nerdy Fun

WOW! I kept this up two years! I can't tell you how much fun we have as a family doing science.

My goal in 2011 was to blog once/week about science that is all around us (and not science through expensive kits). It's amazing what comes up when you have a curious kid! Basically everything can be related to science.

A look back, post from:
1 year ago
The beginning

Where we are today:
- From April through October 2012, I held monthly gatherings, Science Saturdays in the Park, at no cost for local families. Each had turn-outs of 20-30 people. I halted for the holidays and until the weather warms up a little more since I am a wuss when it comes to "cold" weather.
- I volunteered in a few preschools, bringing science to little kids. Their smiles and giggles are the best!
- The blog was featured in NBC Universal's parenting website, ivillage, for fun activities to do with young kids. They initially contacted me regarding the sail cars, but they ended up highlighting the balloon racers we did at our first science in the park day.
- I worked with a friend to get a super cute, official logo for Nerdy Science.
- I still work as a Research Engineer in the biomedical engineering field. I enjoy research.
- Point above is part of the reason I have yet to make the official website live. The blog is easy to do with little time and html experience.

Where I want to be a year from now:
- I want to be still blogging weekly about the wonderful scientific world around us.
- I want to continue Science Saturdays in the Park, hopefully starting back in February or March.
- As J grows, I want to establish worksheets, puzzles, and games that keep his mind active and help him learn new science and math concepts. These would be shared with my blog followers.
- I want to learn how to draw to help with the worksheets and activities listed above.
- I hope to have a website to go along with this blog.
- I hope to have time to join the bigger community of Mommy Bloggers. There's so much we can learn from each other.

Most popular posts to date:
- Balloon Racers in the Park
- Toilet Paper Tube Sail Cars
- The Scientific Method

Thanks for sticking with me!! It's fun to have nerdy friends.

What has been the favorite thing that you learned from Nerdy Science this year?

Wednesday, January 22, 2014

Happy 3rd Blogiversary to Nerdy Science!

It's always fun to do an annual reflection on how things are going with this blog and my goals. Thanks for joining me on our science adventures.

My goals have always been to do simple, easy science at home and making science part of everyday life/conversation.


My goals from last year and how I met them:

- I want to be still blogging weekly about the wonderful scientific world around us. 
**Blogging weekly has been a challenge this year. We're having a new nerdy addition joining our family in April, and though I've been blessed with no morning sickness, pregnancy is no walk in the park. We talk about math and science all of the time in our house. Translating interesting and thoughtful lessons to the blog became the bottleneck.

- I want to continue Science Saturdays in the Park, hopefully starting back in February or March. 
**Science Saturdays have been a real gem in my life. I have so much fun sharing science and conversing with families who have similar passions. We had one per month from March - October (except May), with many new lessons including: Squishy Circuits, Magnet Detectives, and Ice Cream in a Bag to name a few. Every time we pass a park where we've had a lesson, J states that's a park for science and which science we've done there.

- As J grows, I want to establish worksheets, puzzles, and games that keep his mind active and help him learn new science and math concepts. These would be shared with my blog followers. 
**I have not been able to much progress on this goal. I did make a worksheet for the M&M math for preschoolers.

- I want to learn how to draw to help with the worksheets and activities listed above. 
**I still suck at drawing anything.

- I hope to have a website to go along with this blog. 
**Ya, this goal was supposed to be completed by June 2012. I have all of these ideas of what I want it to look like, how I'd like it to function, and the features I'd like it to have. Unfortunately, the little html knowledge I have will not translate into a website that I can be proud of. I will maintain the domain name with hopes of one day having a website.

- I hope to have time to join the bigger community of Mommy Bloggers. There's so much we can learn from each other.
**Thanks to suggestions from my friend MaryAnne of Mamasmiles, I joined the Kid Blogger Network and have connected with many other parent bloggers.


2013 highlights


For 2014, my goals are:
  • Give birth to a healthy baby girl.
  • Show Miss Baby J the world through science, hoping to add on to my baby science tag.
    • I secretly hope J gets in on the lesson creations for Miss Baby J. I just love how his mind works! And right now, there is nothing sweeter than him reading to the baby and explaining the pictures and what big words mean.
  • To continue bringing simple, fun science to young children through Science Saturdays and community outreach programs.
  • Develop some fun supplemental science and math worksheets.
  • Blog more about science that does not need set-up/clean-up time: how science in our everyday life and how to think like a scientist.
  • Continue to develop and grow the relationships that are formed by networking.

Related Posts, Previous Year's Reflections:

Sunday, August 18, 2013

Next Science Saturday and Apologies

The next Science Saturday is this Saturday, August 24, 2013.

We'll be making race cars out of recyclables and learning about gravity and equal and opposite reactions. You can make balloon racers, sail cars, or figure out how to make your car run using forms of energy (elastic, potential, etc). It'll be tons of fun! Bring your own recyclable or use some of the ones we'll bring.

Email me using the link on the left <<, and I can give you detailed information of Science Saturday.

In other news, I apologize for taking a little bit of a blogging break. We still have been doing science at our house. I have two lessons half way composed. Hopefully, one of them will make it to the blog by the end of the week.

Friday, January 6, 2012

Toilet Paper Tube Sail Cars

My previous post on sail cars made it onto Pinterest (edited: I'm now on Pinterest!).  I feel so crafty though it was such a clunky car.  It was a really simple car to make on the fly and could be made out of things lying around the house (ie. a contact sol'n box).  It can also occupy kids' attention for some time.

I've been debating about my next lesson with the preschoolers at J's school.  I really want to do sail cars, but I'd have to make 12-15 of them (and make them look identical so we don't have 15 grumpy 2-3 yr olds).  The little voice in my head kept saying cafeteria milk cartons, but they aren't easy to come by if you don't have older kids in school.  I thought about it some more and played with what we had lying around the house.  Enter in my new sail car made from recycled materials that are plentiful: toilet paper tubes and empty tissue boxes.


I actually think this one works much better than the quick sail car I threw together in October.

Materials:
Toilet paper tube (or paper towel tube cut in 1/2 or 1/3)
Empty tissue box
Wooden dowel (I use skewer sticks with the tips cut off)
Popsicle stick (preferably a clean craft stick)
Scissors
Masking tape

Methods:
-Trace a circular object onto the tissue box cardboard (4 times) for the wheels***
-Cut out the 4 wheels
-Cut the two dowels 1/2 to 1 inch more than the diameter of the paper tube.
-Attach one wheel to each dowel (I press fit then masking tape it in place to the dowel) - make sure the wheels are straight.
-Single hole punch 4 holes for the axles - 2 in the front and 2 in the back (make the holes relatively straight across from each other and the front in line with the back holes).
-Insert wooden dowels in the holes and attach the other wheels (masking taping the wheels to the dowels if you so choose).

*Now you should have a car you can push around (even blow on the front of the tube to get it to move).  Test it to make sure your wheels are straight and the tube isn't touching the wheels.  You can also build a small cardboard ramp to let gravity drive the car.

Methods (cont):
-Cut out a sail shape from the tissue box.
-Attach sail to a popsicle stick via masking tape (tape front and back of sail to the popsicle stick).
-Carefully puncture the top of the tube with one pointy side of an opened pair of scissors.  I prefer the puncture to be perpendicular (90 deg) to the length. With only the top of the tube punctured, the sail won't be dragging on the floor slowing the car down.
-This new puncture should be just the right size to insert a popsicle stick.
-Reinforce mast with masking tape.

*Now blow on the sail and watch the car effortless glide across smooth surfaces (it still doesn't work well on carpet).


More fun activities with sail cars:
  • Put your car on a long coffee table.  Can you give it enough power to drive over the edge?
  • Navigate an obstacle course.
  • Have a friend stand on the opposite side of the table.  Blow on opposite sides of the sail.  Watch the car go back and forth between you two.  Have a competition on who can get the car to fall off first.

***I used a compass this time around for wheel drawing, which was nice since I had a pin prick where the center of the circle was.  In turn, my wheels seem to turn better this time time than last when I think I used playdough containers as my circle guide.  Yay for being a little bit of a hoarder when it comes to old math tools.  I don't think I've used it since high school.

Related Posts:

Tuesday, May 28, 2013

Rolobox: Car Wheels

I am at times an impulse shopper, especially if the item can be used towards many days of science fun. I was searching Amazon for cheap cardboard or reusable wheels that could be used with our sail/balloon cars. I did not find something compatible at first search, but I did find this product that seemed interesting: Rolobox Reuseable Wheel Kit for Boxes (affiliate link). It's just another tool we can add to our imagination and science play with boxes.

I like the minimal reusable packaging

I purchased Rolobox over the weekend and it arrived at my doorstep this afternoon, so we played a little bit after dinner. I'll admit that I didn't read the product description thoroughly before purchasing. The wheels are much larger than I expected. The wheels and axles are easy to assemble though parents should do the hole punching into the cardboard. Rolobox website shows a pencil for puncturing, but our shoe box needed scissors. Please use caution when cutting holes into cardboard (I am clumsy, which one reason I recommend hole punch + skewer sticks for axles when it comes to our toilet paper racers).

J and his new race car

Surprisingly, we had a shoebox handy (one that has outlasted the pair of shoes that came with them). I also thought a Cars box was pretty relevant for a (race) car science demonstration. It seems like it would work with tissue boxes and any corrugated cardboard box. 

Sciency things to do with makeshift car and Rolobox Wheels:
  • Attach the wheels so you can put things in the box. How does the car move with different items in them? How does the car move when loaded down with rocks? How does the car move when loaded with tissues?
  • How does the car roll on carpet vs. wood floor vs. linoleum/tile?
  • Flip the box so the bottom of the box is the top of the car. Add a sail, balloon(s), or fan/motor(s). Can you get your car to move without pulling on the included string?
  • Cut your car into a more aerodynamic shape (think "teardrop" or more like a triangle). Test it using gravity on a makeshift ramp (we use particle board as ramps) How does a more aerodynamic vehicle move in comparison to a boxy vehicle?
Now if only I could find reusable wheels small enough to attach to our toilet paper rolls (our most plentiful recyclable) that would also be light enough to move with simple kid power (blowing)...

Disclosure: I purchased Rolobox Wheels with my own money. Opinions are my own.

Official Rolobox Site and Rolobox's recommended place to purchase.